

Cabinet Door Hinges 101
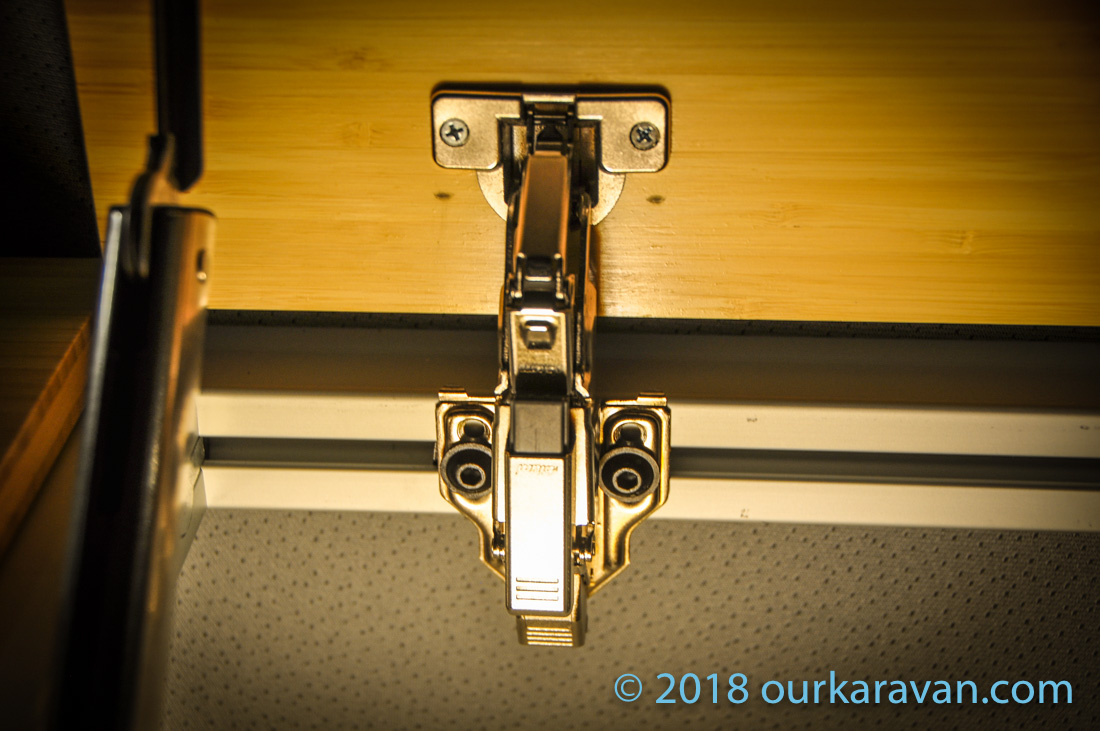
The Karavan utilizes european-style hinges that conceal all of the moving parts on the inside of the cabinet. European hinges typically offer adjustment screws so if things aren’t perfectly square, you can fix it with the turn of the adjustment screw. This is key for us amateur van builders. In addition, the european hinges look cleaner and offer some nice features like soft-close. We can’t afford this nice hardware in our house, but the van has so few cabinets we can afford to splurge a little.
We use “face frame hinges,” which means the end of the hinge assembly is flush with the aluminum framing. When you line up the hinge mounting plate on the aluminum, you will quickly notice that the pre-drilled holes in the hinge are likely not going to align with the slot in the extruded aluminum. With a wood cabinet, you would drill a hole in the wood and run a screw in to support the hinge. With the aluminum framing, you do the opposite. Drill new holes in the hinge plate that align with your framing.
Attaching the Hinge to the Framing and Drilling Hinge Cups
We need threads in the aluminum in order to attach the hinge to the framing. You can use 5/16″ t-nuts in the channel of the 80/20 to provide the required threads. You can then use 5/16″ button-head flanged cap screws to bolt the hinge mount to the framing. This forms a rock-solid connection. There is also an unexpected side-benefit. By loosening the mounting point, you can slide the hinge in the slot to gain adjustability. Lock the set screw down and it’s rock-solid. This gives you more room for error than when working with wood.
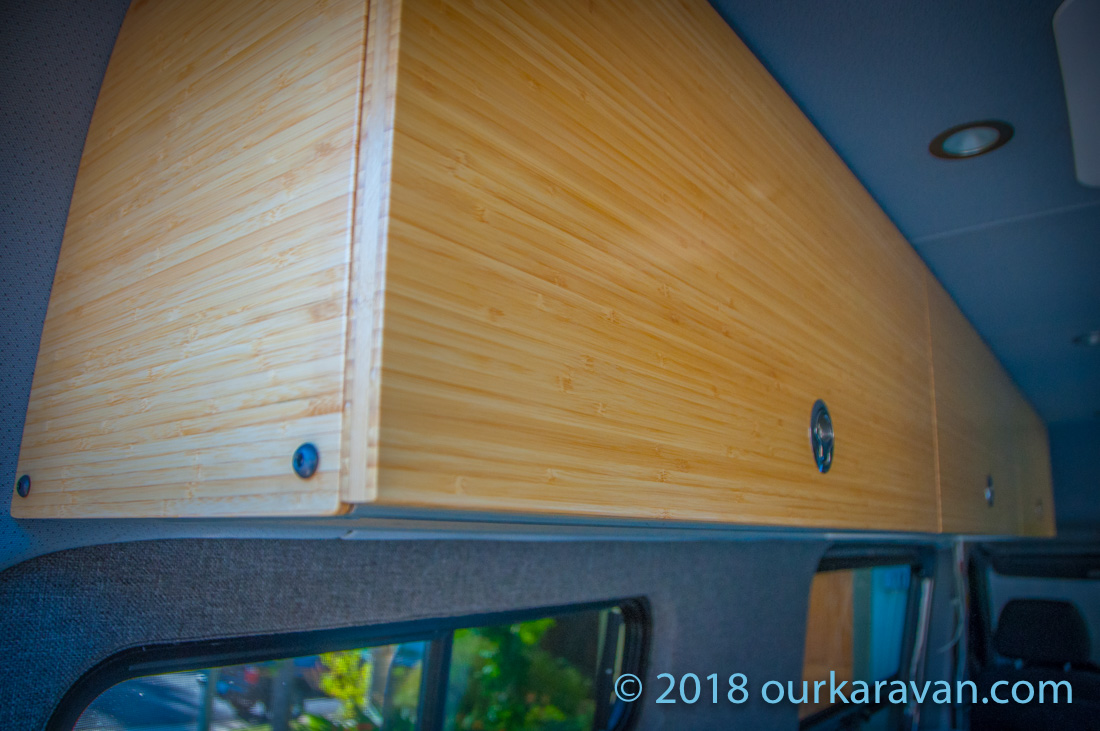
European hinges require a pocket in the door to accommodate the hinge mechanism. Use a 35 mm hinge forester bit to create the required pocket. Most hinges have different specs for where to drill, so you’ll need the instructions to help you decide where to drill the recess. You would still have to do this even if your cabinets were framed with wood. You will need these hinges and mounting plates to make it all work. (The large overlay is what covers up the aluminum framing. It takes a special hinge to do that.)
Mounting Drawer Slides
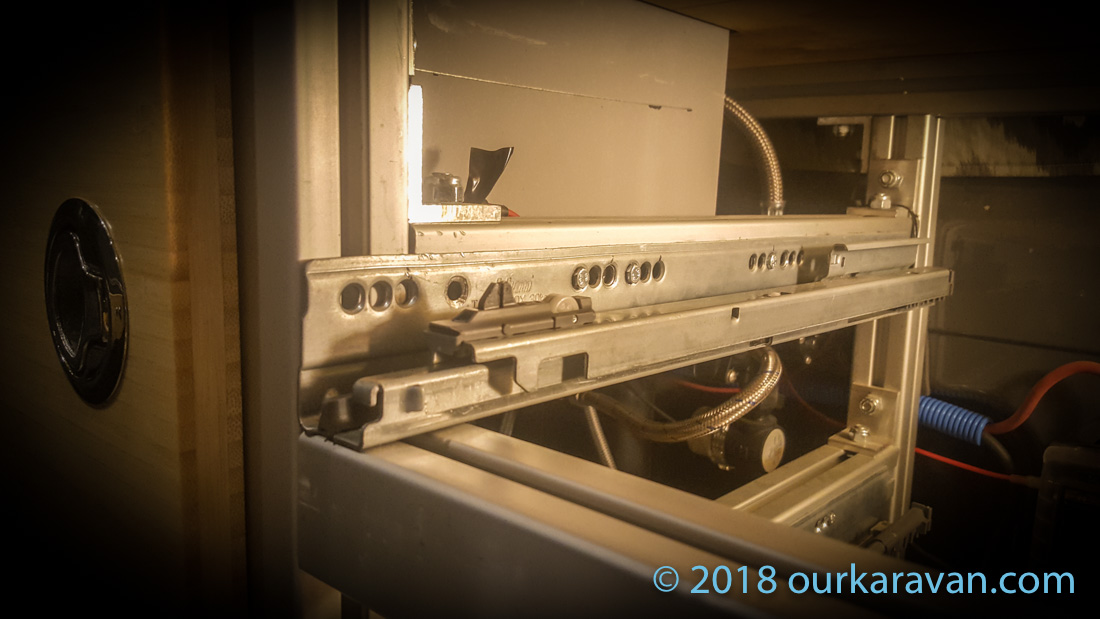
Drawer slides may require that you run a lateral bar of extruded aluminum behind it to offer a mounting point. On the Karavan’s galley framing, you can see the four lateral bars that support the four sets of drawer slides. Much like the cabinet hinges, a threaded t-nut provides the thread in the extrusion. Then you simply align the holes in your drawer slide and pass the bolt through the hole and into the t-nut.
The Blum drawer slides used on the Karavan come with a number of pre-drilled holes that simplify installation. Look closely at the photo below. Three M4 bolts pass through holes in the drawer slide and into M4 t-nuts in the framing. There is a fourth bolt further back that is hidden by part of the drawer slide. Four bolts is overkill, three would have been fine. I found it necessary to use low profile bolts here as my Blum drawer slides had tight tolerances.
Adding Positive Door and Drawer Latches
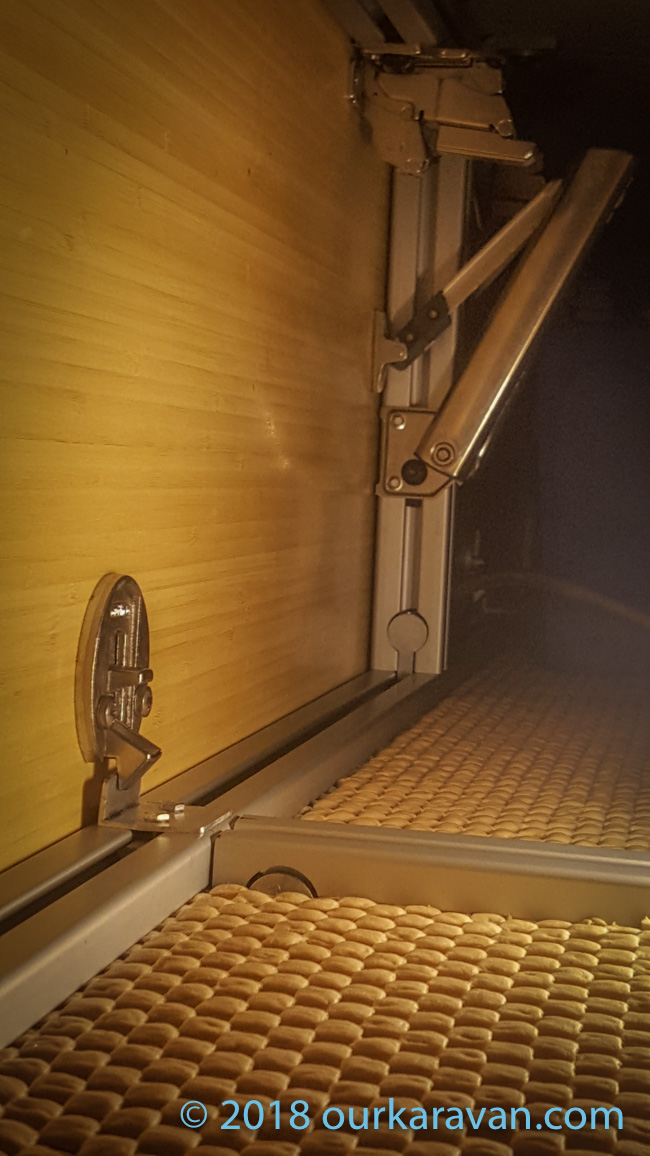
Another aspect to consider is the need for positive latches to keep cabinet doors and drawers closed when driving. We used stainless steel marine latches on our cabinetry, which requires mounting a catch for the latch to grab on to. This meant we needed to add laterals across the front of our galley kitchen framing to hold the latch catch. Like the hinges, we drilled holes in the catches and bolted them to the framing via roll-in t-nuts. Unlike the drawers, the overhead cabinets require no additional framing for mounting the catch. The lower support member is a perfect location for the catch.
Mounting Cabinet Door Lift Struts
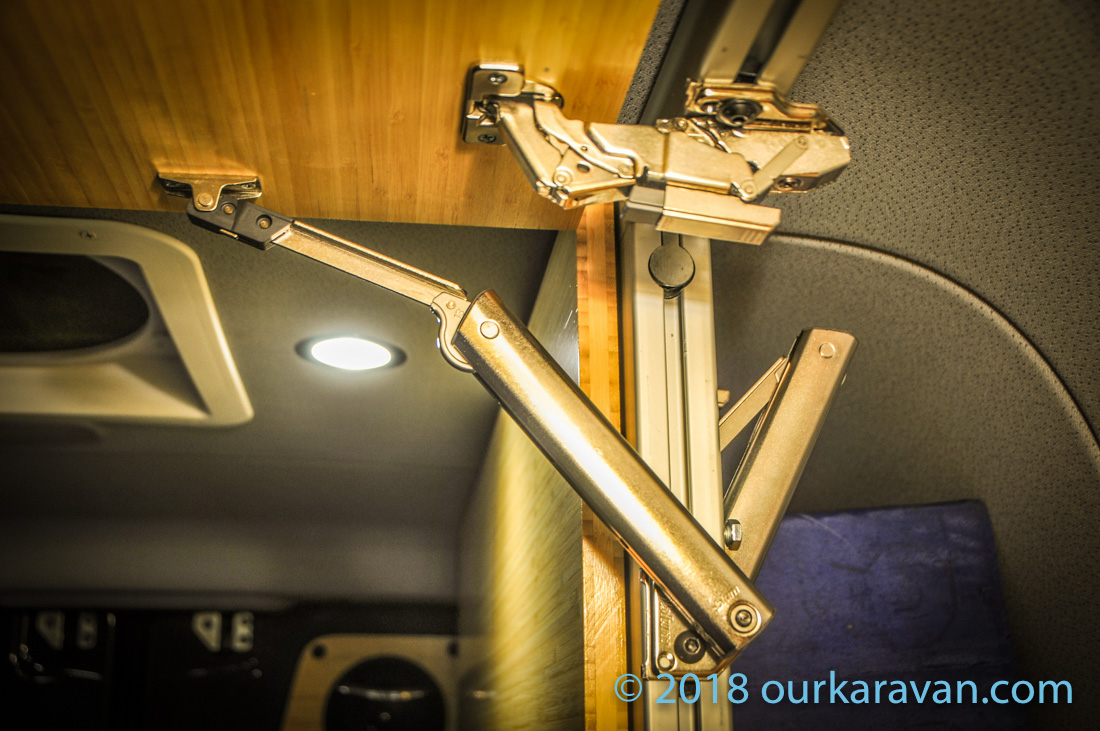
Another common piece of hardware used in vans are lift struts to hold overhead cabinet doors in the open position. We again used Blum lift struts, as they offer a screw-adjustment for fine-tuning of the lift mechanism. (See our Store for all associated parts.) Set too low and the cabinet door won’t stay up. Set too high and the spring tension will want to lift the door so hard and fast it will almost pull the door out of your hand. Ours are set on setting “3” out of 7, which is the same setting Goldilocks used on her porridge to get it just right.
Mounting the lift struts required an attachment to both the wooden door as well as the aluminum framing. Use the provided wood screws to attach the lift arm to the door. Now we need to attach the lift mechanism to our framing. Just like the hinges, we drilled a new hole in the mounting bracket to align with the slots in the aluminum. Only one hole and bolt was required to mount the lift strut. Unlike when working with wood, you’ve got the ability to slide your mount up and down without drilling new holes. Flexibility, people.
Mounting Wooden Panels
Let’s suppose you want wooden end caps on your cabinets to cover up the framing. The ends of the 1-½” aluminum extrusions are designed to accept a 5/16-18 thread. All you need is a 5/16-18 tap and handle to create threads in the ends of the extrusion. Now you can simply cut a wooden panel to fit the dimension of your cabinet and use 5/16-18 screws to attach them. We like the look of hex cap screws.
Help Us Help You
We offer all of our write-ups and instructional videos for free. A lot of time, effort and money goes into developing and maintaining this website. If you find the information on this website helpful, you may use our various links when you are ready to make purchases. As Amazon Associates we will make earnings from qualifying purchases, however it costs you nothing to use them. Alternatively you may consider using the donate button below to make a simple Paypal payment, or message us if you prefer Venmo. We sincerely appreciate your visit as well as your support.
Thank you for sharing the van building adventure!
My question is about the lateral bars to support the drawer slides. I’m thinking the slides could be supported front & rear only, maybe a different type? On;y because I intend to inset my side panels into the extrusion. With a drawer bank towards the corner, the lateral bars would not work for me.
Best of luck!
Yes, as long as your drawer slides are long enough and your drawers aren’t too heavy, I would think that would be fine. You’ll likely have to drill your own holes in the slides, and as long as there is room to do-so, I see no issue with that. The drawer dividers that the locking drawer latch catches on also helps support the front of the drawer slide, so that helps too.
Hi Ken, Let me begin by saying what a pro you are. You put other DIY van builders – and van v-bloggers – in the dust. Thank you for being so generous in your information, and so thorough in the information you share.
I just pulled the trigger with 80/20 for all the parts for my own galley cabinet. I’m letting them do the cutting since I’ll have lots of other things to do. I see the upper cabinets in the photos of this thread, but I don’t see a corresponding video or plans regarding your build of uppers. My wife and I were about to commit to about $2500 of uppers because – with the curved spaces – I felt they were beyond my ability and/or time available. Did you do the uppers yourself? Am I missing a video, or… ? Any sketchup plans you could possibly share.
Thanks again. Donation button being activated momentarily.
Hi Gano, thank you so much for the kind words. I sent you a message privately…really appreciate the support.
I did do a video on the overhead cabinet framing: https://www.youtube.com/watch?v=yfK4SDDFkrI as well as videos on how I made the overlay doors and the associated hardware used for the overheads. The length can be whatever you desire, I think I ended up at 109 or 112″ long (can’t remember but it’s in the video). From the headliner to the outside of the framing they are about 12.5″ deep, which I think strikes a good compromise between storage and not having your head buried in a cabinet when using the galley. You can reference the video for the factory holes I used for mounting and come up with the same result. If you need specific measurements let me know and I can come up with them.
Thanks again and let me know how I can help. -Ken
I’m grateful for everything you’ve published so far; really great work.
I, like Gano, think the upper cabinet is so well thought out that perhaps you could pitch to Heitek to offer a upper cabinet kit to sell in addition to the galley kit? It’s brilliant, really, there’s a market there.
We have more products coming, keep checking back! A new one drops tomorrow. -Ken
Thank you so much for posting this! Your information and resources are beyond helpful. I am currently waiting on about $2000 worth of extrusion and about to start the journey of putting together the galley and upper cabinets. Just like Gano, I am slightly nervous of the curvature of the van for the upper cabinets but trusting the process. Very grateful to you and all the community of van lifers out there looking out for each other.
Thank you Jodi…a camper build would be so much easier in something like a box truck with square walls, but it is what it is. The spacers I used account for both the slope of the roof as well as the 8.5 degree angle of the walls (in a Sprinter). It will all work out in the end! We are here if you have questions. -Ken
Hi. 1 observation and 1 question. I drill through my panels and into the 8020. Then I tap threads directly into the 8020 to secure my panels. It is plenty solid and saves the time of aligning the panel and the tnut on a vertical panel.
My question is how do you secure the mounting plates so that you can drill new holes in them?
Thanks, in advance.
Correct, and in places where there is just a slot and no place to thread, I use “roll in T-nuts.” They can be popped in without having to undo other fasteners, and the ball bearing will hold it in place on a vertical surface while you tighten it. A regular t-nut of course would just fall down under gravity. I’m not sure I understand the question about the mounting plates, can you clarify? -ken
For the Blum Tandembox drawers how big of a difference is there between cabinet opening width and drawer width? For example- if you are wanting a 12″ wide drawer would the opening need to be 13″ or 13.5″? Designing my galley frame right now (well- plagiarizing yours mostly!) and want to be sure I cut the front pieces of 80/20 that the drawers rest on to the correct width. Although with the flexibility of the 80/20 I know it is always pretty easy to readjust! Loving it so far.
Hi Katie, the opening in my framing is exactly 15″ wide. The width of the drawers, to the outside of the drawer box, is 14.5″ So there’s only a 1/4″ gap between the framing and the *outside* of the drawer box on each side. I would guess the actual inside dimension of the drawer box is probably 1″ less than that. If a photo would be helpful let me know.
i’m working on my galley right now too, and was trying to order the Blum 125 degree overlay clip top hinge but the links don’t work in amazon anymore. Is the hinge you used the Blum Clip top BLUMOTION 125°, Straight-arm Hinge, Press-in, 71B7580D, or the Blum Clip top BLUMOTION 125°, Straight-arm Hinge, Screw-on, 71B7550D and do you have to buy the cups and plates separately, or is it a different hinge entirely? Thanks!
Hi, you’re right, the link is currently not working. This is the correct hinge: https://amzn.to/2CdHFJH (the 71T7500D). You choose the mount you want (I used this one: https://amzn.to/2GAJEey ), and the soft close piece: https://amzn.to/2uzbp2m
I hope that helps!
Hi Ken,
I’ve been using the info on your website to help make my own cabinet system out of 80/20. Your system of attaching the concealed hinges to the 80/20 is very nice design! But I’m having trouble finding hinges with enough overlay to cover up the 1.5″ aluminum frame. It looks like the Blum 71T7500D has been discontinued and is no longer available (see your amazon link above). It looks like 71B7550D may be a replacement, but I haven’t been able to find documentation from Blum that this can accommodate up to 41mm of overlay like the hinge you used. Any idea if the 71B7550D would work the same way or have another link to the correct hinge? Thanks!
Hi Jackson, I took a quick look and the part looks very similar to the one I used and is also labeled as a zero protrusion hinge. Zero protrusion allows the hinge to pull away from the frame enough so pull out drawers can be used. It’s also generally the ticket for having a large overlay….if the hinge did not pull away, then the door wouldn’t open with a large overlay. (If that makes any sense.) I don’t have a bunch of time to research at the moment but you may want to contact Blum at 800-438-6788 or sales.us@blum.com. Also check online and see if the product has been discontinued or replaced…I’d be looking for a diagram similar to the one shown in my video to confirm this other hinge would work. Would love to know what you find out.
I believe the actual overlay on my cabinet doors is 1.25″ (32-33mm).
Awesome, thanks for the response and info! I’ll do some more research and let you know what I find out so you can update your part numbers for everyone else!
Great, thank you!
I ordered the Blum 71B7550D hinges and they look like they should work with the same overlay dimensions as the older 71T7500D. The difference is that they have the Blumotion integrated, so no need for the 973A7000, and there is a small switch to activate it and deactivate it. Otherwise everything else looks the same and I was able to drill the mounting plates to attach them to the 80/20.
Thanks again for figuring all this out and the inspiration! It would have taken me many more hours to figure out how to attach cabinet hardware to an 80/20 frame and I doubt it would have been anywhere close to as elegant a design!
Jackson, thank you for reporting back! So it looks like you need just the 71B7550D hinge and the 173H7100 ( https://amzn.to/2Q0yna2 ) mounting clip. It’s nice that the blumotion is integrated. Would love to see a final installed picture if you’re able to grab one. (email is hello [at] ourkaravan.com)
This will be very helpful for everyone else–got to love when a known product gets discontinued. Thanks again!
Thanks for the detailed video. I’ll be doing something very similar myself.
Quick question – how deep and tall are your overhead cabinets?
Hi, the overheads are 14.5″ tall and 12″ deep (to the framing). Seems like a good size to me. My original plan was for slightly deeper cabinets, but thankfully I did a cardboard mockup and realized my face would have been buried in the cabinet when cooking at the galley.
Where did you order the drawer components?
Hi Robert,
I ordered everything on Amazon. The vendor for the actual drawer boxes more often than not does not keep the listing current, but all of the links for latches, lifts, hinges, etc work reliably. I wish they would do better about keeping the drawers in stock.
When do you think you’ll have more info on how you mount the “skins” to the carcasses? I think I read somewhere that you were planning on explaining. Thanks for the awesome guide. I’ve ordered a bunch of stuff on Amazon using your link. Hope that all pays off in aggregate for all your hard work!
HI Steve, I always appreciate knowing where knowledge gaps exist. Until I get a chance to add that information to my write-up, here’s the cliff’s notes version. In this video: https://www.youtube.com/watch?v=ZcETNZ7r52w I explain how to tap the ends of the 1-1/2″ profiles with a 5/16-18NC tap. Then you can bolt your skins to the outside with flat head button cap screws. OR you could use t-nuts in the profile and simply drill holes in the wood and run your bolt into the t-nut. Rather than partially disassembling the end to load t-nuts in, you could always use the “roll in tnut” style so you can add t-nuts after-the fact. If you don’t think you’ll be removing the panel, you could use 3M VHB (very high bond) double stick tape to tape the wood to the framing. That said, if you need to remove the wood the VHB is so strong it will rip a layer of wood off in attempting to remove the panel…very sticky stuff. Finally, you can inset 1/4″ plywood into the slots. I did this in the ‘floor’ of my overheads. The panels will rattle so you can go to Home Depot and get some tapered wedges for truing up a house door and drive them between the framing and the panel for a tight fit, then just snap it off. Lots and lots of options. Let me know if I can be of help. And thank you very much for the support!
Thanks for replying! I’ll be starting cabinetry soon, hoping to use IKEA fronts and slides if I can get away with it. Appreciate your support of the DIY community
Did you use the latch catches that came with the latch? The catches do not look wide enough to span the 3/4″ to the center of the 8020 in order to be bolted down.
In this case I did not. I cut some angled aluminum down so one end would be long enough to span entirely across the 80/20 profile. I didn’t use any fancy tools by any means, just a hack saw and a file to round the edges.
Hi Ken,
I recall you saying on a video that all of your cabinet faces used only 1 sheet of bamboo? Did you use 3/4″? Then you also used 1/4″ bamboo for the drawer bottoms and sides on the uppers? What color is the Plyboo bamboo that you used? Did you use edge grain or the flat grain? Your cabinets look GREAT! You mentioned that you may organize a van meetup someday. We would love to attend if you ever do. I believe you have inspired many people. I am sure you would have a great turnout. Thanks again for all of your help!
Correct, I used 1 sheet of 3/4″ bamboo and now two sheets of 1/4″ bamboo total. As you stated 3/4″ for the cabinet doors and drawers and 1/4″ for the cabinet bottoms and sides. The bamboo is natural color, edge grain. And thank you, I appreciate the complements. I would like to do a van meetup at some point, but until then there’s Sprinterfest in Taylorsville, CA October 11-13! 🙂
Are going to Sprinterfest in Taylorsville, CA October 11-13? We are planning to attend as well. Did you use oil based or water based polyurethane? I was thinking maybe exterior might be better for van use. What do you think? Thanks!
Yes, I am planning to attend; hope to see you there! I used oil-based Minwax semi-gloss polyurethane on all wood surfaces.
Hello! Thank you for sharing your amazing build with us. I am currently trying to make ceiling cabinets the same way for my 2016 Sprinter 144. I am still pondering on how I will install them to the side wall/roof. Maybe I have not looked through your extensive website enough, but how did you mount your cabinets to the roof/walls? I currently have cedar walls installed on mine, and make use of L-track to mount accessories. Many thanks!
Hi Miguel,
I haven’t done the website write-up yet, right now I would refer to my YouTube video that shows how I did it. https://www.youtube.com/watch?v=yfK4SDDFkrI
I have it on my list to put a complete write-up on the website. Thanks for writing!
Do you have the drawing/dimensions for the machining required to use anchor fasteners? What made you decide anchor fasteners vs hidden coner connectors (there is a $2 difference but I am wondering if there were any other strenght related data points).
Hi, there’s a diagram on the 80/20 website that shows the drilling dimensions for anchor fasteners. I’m traveling right now and in a quick search I couldn’t find it. I at least have a copy of the file on my computer at home if you can’t locate it.
I don’t think the internal corner connectors were available back when I made my cabinets. They are definitely worth considering.
Wow! This is great info and very kind of you for sharing. Thanks! I did have a question for you. Will the same recommended cabinet hardware: European (blumclip) Hinge, 5/16 t-nuts and cap screws work on the 10 series (1″) 8020 profiles?
Thank you again!
Hi Josh,
I don’t see any reason why it wouldn’t, except that the t-nuts and bolts would be 1/4-20, not 5/16″. You might want to give some thought as to whether or not the Blum mounting clip has enough material on it to allow drilling the mounting holes closer to the hinge. (This is because the slot on the 1″ isn’t in the same location as the slot on the 1-1/2″.). The only other thing I can think of that would be affected is where you put the hinge cup recess in the door since the hinge is in a slightly different location. I hope that helps! -Ken
Hello! I love the clean look! A few questions:
Where did you purchase your cabinet panels? I’m searching the net and nothing that I can tel resembles what you have. I’d also like to stain them a cherry wood color. Would that be possible?
Also, I’ve watched some videos about the materials on the 8020 website and they show some “rods” with the thread already manufactured into the ends for easy and quick connection. Do you know if the materials sold on Amazon have the same feature or would I need to buy directly from 8020 for those?
Hi Raye,
The bamboo plywood I used is made by the company Plyboo. I was able to order it from two separate hardwood stores, so that makes me think it’s not difficult to source. I’m not sure how cherry stain and bamboo would look but the wood will certainly accept the stain.
The centers of the 80/20 are designed to be tapped. Because that ‘rod’ runs through the center, anywhere you cut the 80/20 will be able to accept those threads. The 1″ 10-series will accept 1/4-20 threads and the 1.5″ 15-series will accept 5/16 threads. I hope that helps! -Ken
Hi, your videos and articles have provided so many, countless tips and tricks, thank you so much 🙏 (UK subscriber)
What is the material you have used to line the base of your upper cabinets? It looks great.
Hi Dan,
Are you referring to the beige material on the floor of the cabinet? If so, it’s anti-slip mat to keep items from sliding in the cabinet. The stuff I used is intended to go under area rugs in your house to prevent them from sliding. Thanks for the kind words and take care! -Ken
Love your videos and followed you to 80/20 for my Pinzgauer interior build. I just watched your shower video and noticed the Grey “coin” textured panels on your electrical box and the back of your van. Do you have a video talking about that material? Very interested in what it is and how you have used it.
Sounds like a cool build! I sure do have a video, here it is: https://www.youtube.com/watch?v=YmfWGvHsDjI
Thank you for your wonderfully instructive videos!
It doesn’t appear that the link to your Store (via Kit?) is working. Has it been changed? Searching Kit, also didn’t find.
Cheers!
Hi, maybe it was down at the time? It should be working now. kit.co/ourkaravan
Hi thank you for your detailed blog and helping all the DIYers out there! I want my upper cabinets to fit inside the aluminum frame and not sit ontop. Will these hinges still work for that application? I have 1/4″ HDPE plastic i’m going to use for them. How deep is the round cabinet part that i have to drill out, will that work with 1/4″ material? Thanks! 🙂
Hi Lauren,
Most of the european style hinges require a 1/2″ deep pocket hole for the internal hinge mechanism. I wanted to use 1/2″ bamboo in my build, but used 3/4″ solely to accommodate the 1/2″ deep european hinge cup. Considering that there is less than one full 4×8 sheet of 3/4″ bamboo in my van, moving from 1/2″ to 3/4″ only cost me approximately 16 lbs in the entire van.
You’ll need a different hinge if you want to use 1/2″ or thinner wood. You might google search “surface mount european hinge,” I know Everbilt makes some that may work with thin material. But there isn’t much holding power in 1/4″ wood for screws. Thank you for the kind words! -Ken