

What will it cost me to build my van’s cabinetry from slotted aluminum extrusions? What is it likely to weigh once it is complete? In order to answer these questions we must first know how many aluminum profiles are required to build the galley module. Below you will find a break-down that provides the most efficient way to order and cut the extrusions with the least amount of waste. With this information we can calculate a cost of the product as well as calculate a final weight of the galley module.
Note: This site contains affiliate links for which I may be compensated.
Materials and Cut List for the Karavan Galley
The galley in the Karavan consists of 3 different styles of 80/20 framing. The 4-slot 1515-LS (LS = “Light Smooth”) was used in places where the slots would not be seen, 3-slot 1503-LS in places where one face of the extrusion would be visible, and 2-slot 1502-LS on the corners where two sides can be seen. 80/20 is commonly available in 48”, 60” and 72” lengths.
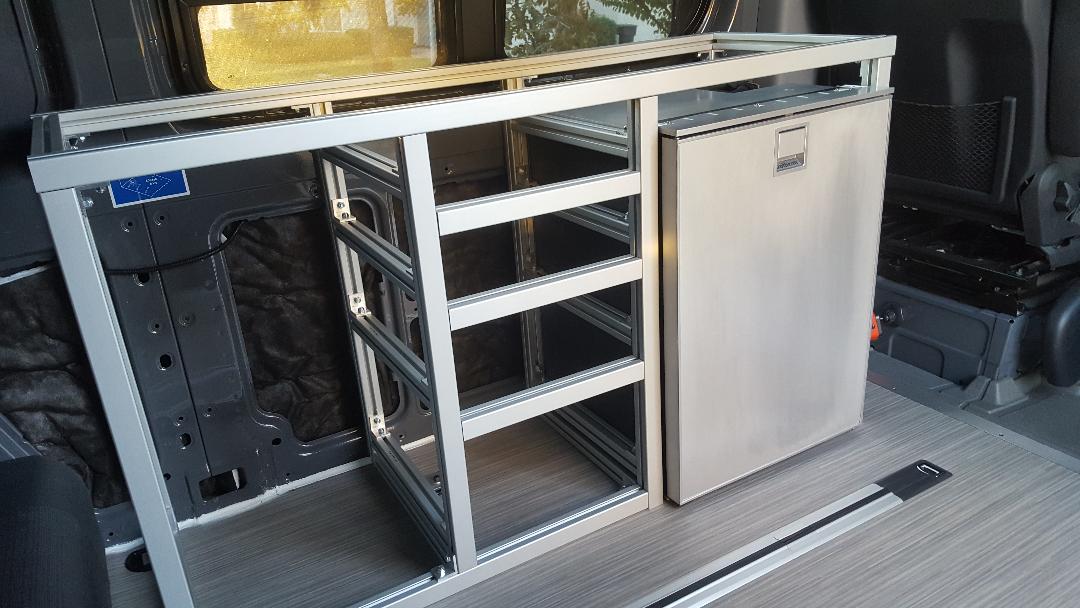
As you might guess, 80/20 costs more than wood, and you will always have some amount of waste material that is too short to use. Accordingly, we took the liberty of calculating the best way to order and cut your material, assuming you’re using our galley design. We also took into account the waste from the cutting width of the blade (called kerf). The kerf of the blade we used is 2.4mm, or 0.0944”. The galley consists of the following lengths of product:
80/20 1515-LS series 4-slot aluminum:
32-1/2″ (x4)
58-1/2″ (x1)
17″ (x14)
- This requires the purchasing the following 1515-LS extrusions (Amazon affiliate links):
Cut list:
1st 72″ extrusion = 32.5″ + 32.5″ (with 0.19″ cut losses and 6.8″ of excess)
2nd 72″ extrusion = 32.5″ + 17″ + 17″ (with 0.28″ cut losses and 5.2″ of excess)
3rd, 4th and 5th 72″ extrusion = 17″ + 17″ + 17″ + 17″ (with 0.38″ cut losses and 3.6″ of excess)
60″ extrusion = 58.5″ (with 0.09″ cut losses and 1.4″ of excess)
36″ extrusion = 32.5″ (with 0.09″ cut losses and 3.4″ of excess)
80/20 1502-LS 2-slot aluminum:
32-1/2 (x1)
31” (x1)
- This requires purchasing 1 @ 72” 1502-LS extrusion (Amazon affiliate link)
Cut list:
1st extrusion = 31” + 32.5” (with 0.19” cut losses and 8.31” of excess)
80/20 1503-LS 3-slot aluminum:
32-1/2” (x1)
31” (x1)
34” (x1)
58-1/2 (x1)
15” (x3)
- This requires the purchasing the following 1503-LS extrusions (Amazon affiliate links):
Cut list:
1st 72″extrusion = 34” + 32.5” (with 0.19” cut losses and 5.3” of excess)
2nd 72″extrusion = 31″ + 15″ + 15″ (with 0.28″ cut losses and 10.7″ of excess)
60″ extrusion = 58.5″ (with 0.09″ cut losses and 1.4″ of excess)
24″ extrusion = 15″ (with 0.09″ cut losses and 8.9″ of excess)
Cost to Duplicate the Karavan Galley Framing
You can calculate the exact cost, including shipping, by adding these items to your Amazon shopping cart. As of the day of this updated writing, June 17, 2023, the total cost of the aluminum was $547.56 and cost of shipping to our house in California via Amazon was $108.36, plus any applicable tax, for a total of $706.76. To complete the framing you will also need a 6’ x 1-½” x 1-½” angled aluminum (3/16” thick) for making the corner brackets (we bought this at Home Depot) and a box of 5/16” carriage bolts and nylock nuts. (Or you can just buy this in kit-form–information can be found below.)
For the final assembly you will also need a countertop (ours is ½” plywood covered in Wilsonart laminate), 2 hinges for the cabinet door, 4 drawer slides and drawer boxes, drawer/door latches (if you choose to use them), misc attaching hardware and whatever wood you decide to cover the cabinet in. We used less than one 4×8’ sheet of Plyboo bamboo for ALL of the cabinetry in our van, including the 9-foot long overhead cabinets.
Weight of the Galley Framing & Woodwork
Taking it a step further:
Isotherm Cruise 130 refrigerator: 64 lbs
1/2″ plywood countertop + laminate = 11.4 lbs
Sink = 14 lbs
Faucet = 6.5 lbs
2 hinges, 4 drawer boxes & drawer slides (estimated) = 30 lbs
Estimated Total weight of Galley including refrigerator: 219.8 lbs
Final Thoughts
The galley is not feather-light by any means, but not too bad either. When you consider that the galley also has 10 gallons of water attached to it and probably 80-100 lbs worth of stuff in the drawers and inside the refrigerator, that 66 lb framing is holding several hundred pounds of items that we want securely restrained in the van. From that perspective, we are happy we went with the aluminum-framed cabinetry in our van.
The Pre-Made Kit Option
OurKaravan worked with a leading supplier of 80/20 to improve this galley and offer it in kit form that you simply bolt-together. It is slightly lighter than our original galley at 61.66 pounds and uses 80/20 anchor fasteners as opposed to DIY angle brackets. The kit costs more than the DIY-route described above due to the cost of cutting the bars to size and milling for fasteners. (All brackets and fasteners are included in the kit.) However, there is no price mark-up, and in fact it comes at a discount compared to the cost of the materials, cutting and machining. See our OurKaravan Galley Product Page for more information.
Nice video,I will be using 80/20 when I build out my van next year. I will use the link you provided. Where I work 80/20 is used for a million thing’s, it’s amazing stuff. I plan to build a gimbaled bed frame out of the heavier 80/20. So I won’t have to worry so much about finding a perfectly level place to park tocamp and sleep.
It is amazing, I have enjoyed working with it so much that I’m feeling a bit sad about putting in my last pieces of it this weekend. Looks like I’ll need to find another 80/20 project. 🙂 I appreciate the support, thank you, and good luck with your build!
Thank you for posting all of this! I’ve clicked around but haven’t seen much detail on the build of your upper cabinets- can you point me in the direction of any detail on that? I’d like to do something similar in my promaster and am curious what material you used for the bottom of the upper cabinets
Hi Hadley, sure, the article on the overheads is located here: https://ourkaravan.com/8020-overhead-cabinet-framing/
Let me know if you have any questions!
I have a 2012 sprinter van that I have had for 3 years. We built a wood platform in it last summer to do almost the same travels as you did. Yellowstone, Glacier, Lake Tahoe, and Mammoth. The platform was our sleeping area and we stored bikes, paddle boards and camping equipment underneath. I have since removed the platform and started finishing the new flooring and will be adding wiring, insulation and panels in coming month. I have decided that 80/20 or t slot is the way to go. I know once I have a design and the materials in front of me I can make it all come together. Problem is having a hard time getting to the design phase and picking out what profiles and pieces will work best. I have tried to reach out to 80/20 but have had limited success with them. Would love to support you by purchasing materials from 80/20 but they don’t seem interested in my project enough to help me through the design phase.
Hi Greg,
Not having any familiarity with vans I doubt they would be very helpful. You may want to check out http://www.sprinter-source.com and search for platform bed. Seems that most mount a rail on either side of the van, usually using rivnuts or plusnuts, then attach the bed platform to that. 80/20 is a good material to use for that. I’d check the work of others and then see if that inspires your design or helps with the planning process of yours.
Hi Thanks for the Great site and videos. Love the attention to detail.
Planning my Transit conversion and a little worried about the weight. In the Australian version with 2 rear wheel its only 1200kg payload ..(~2600lbs)
So my question is did you think about the 1inch framing instead of the 1.5? From what I can make out it should carry the weight but my maths could be completely wrong!
Cheers,
Kane.
Yes, I did use some 10-series, but continued the rest of my build with 15-series. I discussed why here: https://ourkaravan.com/8020-extruded-aluminum-van-cabinets/
Basically, nothing wrong with 10-series but I was not happy with the fastener strength. You may be able to work around this by using a double fastener (4 bolts per angle) or using some other type of fastener. Thanks for the complements, and good luck!
Hello again Ken,
I noticed that the cut sheet shows 32″ and not 32.5″ for the legs. The “understanding the model” shows 32.5″. I think it should be 32.5? Just wanted to confirm so you can correct whatever is off. Did you use 5/16 x 5/8 or 5/16 x 3/4 carriage bolts? PS…..FYI, I just purchased $475 of 8020 off your link. Hope you get the credit you deserve. I will send you pics when it is completed. Thanks again!
Thank you Don, I made that correction. Thankfully it doesn’t change the amount of aluminum required, there’s just less waste. I really appreciate the use of the links, much appreciated!
Found it few topics down
220 + lbs do you feel unbalanced? Thank you for detail line items
Not a bit. I am conscious about the weight and do my best to keep it balanced. I will be adding a water tank on the passenger side to offset some of that weight.
Did you rivnut the bottom extrusion to the floor?
I utilized some of the factory tie-down points in the floor of the van. There are angle brackets attached to the framing and through a hole in the bracket down through the factory tie-down.
Hi. Great work on the van and thank you for sharing so much information. I could not see where you purchased the bamboo plywood – doesnt seem like a very common item. Any recommendations ?
Thanks.
Hi Ed,
I have purchased bamboo now from two different suppliers in my area, and both were able to order it without seemingly much trouble. The bamboo I have is made by the company “Plyboo,” but there is also a competing brand called “Calibamboo.” Try a good hardwood store in your area and see if they can get it for you. Thanks for writing!
Thank you so much KEN . I wonder if you can use the 80/20 in a platform bed if you have to cabinets on each side so the platform would only be four feet or so in a Sprinter?
I have seen photos on Instagram of builders doing exactly that. The less the span the easier it gets, and I think it’s a good way to go.
Hey! I am planning a build inside a ex-ambulance and am considering using 80/20. You mentioned that that you paid $371.70 for the aluminum, was this the total cost for the whole build or just the kitchen cabinet? Also why did you choose bamboo plywood? As far as I have found the main reasons to use 80/20 is the high strength to weight ratio and that it allows everything to be very airy while also using little wood. Are there any more benefits of 80/20 other than those? Love the post and hope to hear back! 🙂
Hi Julian,
The cost you mentioned is for the aluminum framing. You can build-out the rest in any material you like, from really inexpensive plywoods to mahogany to plastic FRP panels. The weight savings really comes from the cabinet not requiring a floor or a back, and you can use 1/4″ for the sides and even the fronts if you wanted, however I think having the depth of 1/2″ or 3/4″ drawers and cabinet faces really makes it look professional.
The main advantages of 80/20 include the strength/safety factor, ease of assembly (it’s like building an erector set), the ability to add things to the aluminum framing later (like say bolting down your water jugs, mounting a water pump, etc), and it looks very modern and professional. I’ve been super happy with it and would do it again… -Ken
Hi, great job and information. I was wondering how much weight the 80/20 can hold including hardware. I want to build a frame for lithium batteries and inverter which will get heavy. Any suggestions would be appreciated.
80/20 publishes all of the load capabilities on their website, but I haven’t tried to do any of those calcs. I use the 15-series 80/20 for everything as I know it’s up to the task, and it’s the easiest to work with thanks to a wide variety of connectors, profile types and the ability to use 5/16 carriage bolts rather than expensive fasteners. Let us know what you find! -Ken
Looks amazing! 👍 I have daydreamed for years about doing something like this in my Vanagon Syncro Adventurewagen camper. However, I haven’t seen much talk about how you install the bamboo face and countertop onto the aluminum framed cabinets like the pictures show? Do you any write ups or more information on that?
Hi Jeff,
I plan to add more related content to the website, but for now I have a few videos on YouTube that show the rest of the cabinet build. Here’s the drawer video: https://www.youtube.com/watch?v=vcg6oYVHXUs and here https://www.youtube.com/watch?v=ZcETNZ7r52w. There are several more but those should get you started. -Ken
Ed – just watched your ready to assemble cabinet video, so helpful. Want to order the set, but wondering if you can swap the fridge to the left side and water cabinet to the right side using the same package kit?? Thanks
Corey, you can check with the distributor. I suspect that’s beyond the scope of what they can change because it changes the location and side of some of the anchor fasteners, which means re-thinking some aspects. That doesn’t mean it’s impossible (it’s not), but I would check with them. You have to create an account and click on the request quote button. They will contact you and you can ask about those changes. -ken
Hi Ken,
Appreciate all your efforts to share your experience!
I’m thinking about using the metric 30 series to build my cabinets, which is 30mm = almost 1 ¼”. It’s right in the middle between the 10 series (1”) and 15 series (1.5”). Your thoughts on this?
It’s the only other profile I would consider using, for the exact reasons you mentioned. Let us know how it goes, might be the perfect middle ground.
Hi Ken,
You are an amazing person! Thank you for all that you have done to help the rest of us!!! Two questions for you….1) Do you have an Amazon link for the bolts that you used? Would love to purchase through your store. 2) Why did you go with 1515-LS (light) and not the 1515-ULS (ultra-light) for the galley?
All the best to you!
haha, why thank you! I assume you’re referring to the 5/16-18 carriage bolts, 3/4″ long. I bought a box of 100 at Home Depot, along with 100 nylock nuts.
1515-ULS is definitely worth trying…I can’t see any reason why it wouldn’t be a lighter alternative the LS without the downsides of the smaller profiles. Please report back! -Ken
What are the downsides of smaller profiles? I am considering building this out of 1010 series to save some cost, weight, and space. Would you recommend against this?
Hi Mike
The downside of the smaller profiles are the strength of the fasteners. The small 1/4-20 bolts used in the small profiles are not very strong. You could eliminate this problem by moving to 80/20 anchor fasteners, but they are difficult to do at home, which somewhat some of the simplicity of working with 80/20. I used 10-series for my first van cabinet and have used 15 series for every cabinet since. I hope that helps. -Ken
Ken,
Good morning, I plan on purchasing your 80/20 Galley and doing some slight modifications (-1/2″ width, -2″ depth) to install in my Sprinter. The reason for the modification is to install on the other side of my Van (passenger side) and use the Fridge section as cabinet space instead, as my Fridge will go on the other side of build (driver side). Do you see any issues with those slight mods?
Additionally, I’m just getting started designing my Sprinter interior using SketchUp to determine, but I’m having trouble importing and learning how to use the 80/20 plugin/extension (not sure what to call it) from the 3D warehouse. Any help on this would be appreciated.
Thanks…
Hi Ken, I see no issues with the changes you propose. The refrigerator section does not have a lateral leg across the bottom like the dedicated cabinet side. I doubt you would notice that with a full-overlay cabinet door, or alternatively you could buy an additional piece of 1503-LS 80/20 and bolt it in there using angle brackets to keep the look cohesive. Otherwise I see no issue.
I’m far from a pro at Sketchup and have to rely heavily on google to answer my questions. Wish I could help more there. If you have any other questions about the galley, etc feel free to ask. -Ken
Thanks for the great idea of using aluminum extrusions for kitchen galley. I will be doing this on my van as well. How exactly did you attach the bamboo/plywood siding to the aluminum frame ?
Hi, the ends of the 80/20 profiles can be tapped for a 5/16″ bolt. So my end panels are bolted to the ends of the profiles.
Love your easy to follow videos. I Just purchased and built your 50” galley kit for our sprinter 170. I too need to next build a bed that will be higher off the floor than the standard rib and 76” long. Can you describe how you could use this double 80/20 profile to do that kind of high bed and what the connectors you would use?
Hi Cindy,
There are quite a few ways you could go about building a raised bed from 80/20. If you assembled the galley you’re familiar with anchor fasteners, which are the strongest method, but not the easiest to reproduce at home. Angle brackets or a variety of different corner connectors could meet your needs well. I would draw it out and see what makes the most sense. I’ve seen some even make the bed slide so it reduces down to half of the size of a queen.
I hope you’re happy with your galley! -Ken
How did you secure the structure to the van? Is it only bolted to the walls? Or is it also bolted through the floor? Thanks!
Hi Erman, for the lower cabinets I slid carriage bolts into the back slots of the 80/20 and bolted it through the steel sidewall of the van, backed by large nuts. In a couple of locations I was also able to tie into the factory floor tie downs in my van. I hope that helps. -Ken
Dude, just want to say, you are so cool for making this website and putting all this info out there. I watched your 80/20 youtube video and was just blown away. Total class act. Taste, and precision. Beautifully done. I am going to make an 80/20 platform with slide in the back of my truck to replace my decked drawers with hopefully half the weight, and possibly more space.
Thank you for the kind words and good luck with you project! Be sure to share when it’s done. -Ken
Hi Ken
I have loved your videos from the time you bought your rear seat, my question is you show cuts of 17″ using 15 series 80/20 and if the depth of the cabinet is 22′ should the depth cuts be 19″ plus the 1 1/2″ of support on each side?
This galley, as built and installed in my van, is 20″ deep. So the 17″ cross members is correct.
However, for the pre-cut kit offered through my vendor, I deepened the cabinet by 2″ to 22″ to allow a wider variety of refrigerators to be used. I hope that helps clarify. -Ken
Hi Ken, I love your cabinets and plan to build a similar design! I found a local Plyboo supplier and working on an order.
Can you please confirm the exact Plyboo type you used – edge grain vs flat grain? or Plyboo strand? Natural vs finished? And if natural, what finish did you apply?
Apologize if this info is located elsewhere, have tried my best search of your materials without luck so far.
Hi Robert, sorry for the delay. I’m using Plyboo vertical natural grain, and I used a Minwax semi-gloss polyurethane over the top, 3 coats with sanding inbetween each coat. It has held up perfect the past five years–literally looks as good as new. -Ken