

Popular Layouts
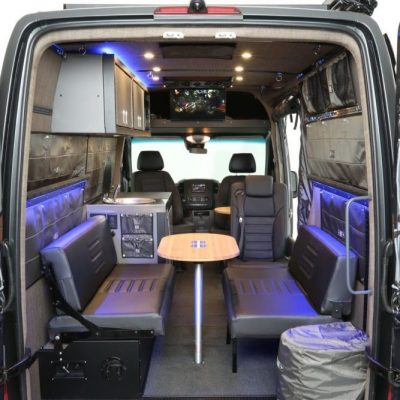
Transverse Couch with Rear Galley Kitchen
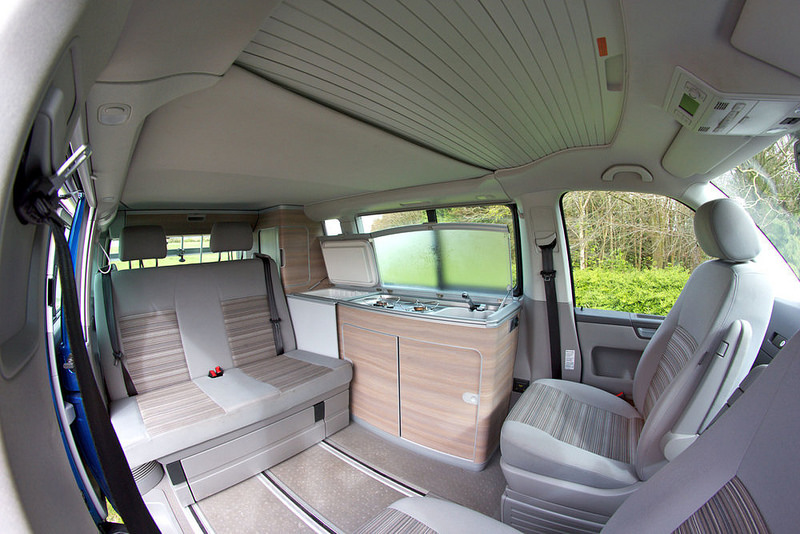
Had we not required a second row seat we would have had a couch facing out the sliding door. (As shown in one of the photos above.) With this layout the galley resides at the rear of the van. The couch gives a great view out the sliding door and offers a great place to store mechanical systems underneath. The rear galley kitchen would allow opening the rear doors with a full wide view while cooking.
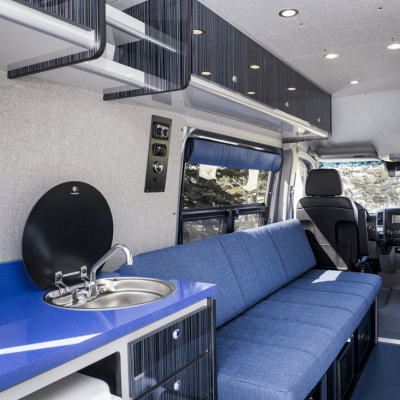
Rear Dinette Layout
The rear dinette with collapsing table is another great design. Similar to the layout above, you have views out the big side window when cooking. The rear doors can be opened up to bring the outdoors in when sitting at the dinette table. The seat boxes on either side of the van allow for batteries on one side and water on the other. This helps balance the van’s weight side-to-side.
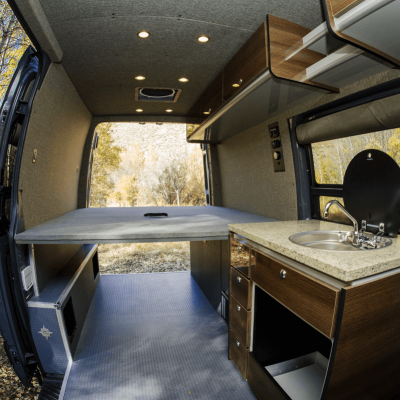
High-Mount Rear Bed Layout
The third design is what we will call the “standard high mount rear bed layout.” A good number of van builds we have seen use this layout. Advantages include a large comfortable bed and a “garage” underneath for storing bikes and gear out of sight. This leaves the front half of the van available for seating, galley kitchen, or a combination of the two. In our minds, the downside of this layout is the bed occupies half the space (in a short wheelbase van) all the time, limiting options inside the van. You can use a 3-panel bed so 2 of the 3 parts can be pushed back, or all 3 sections stacked against a wall. In practice, everyone we spoke to that has this setup never moves the panels. But the ability to store gear out of sight often outweighs all other factors, so this remains a popular choice.
Our Design is Cruising Boat-based
Bluewater cruising boats inspired the design for our van. Let us explain. Ken had the fortune of spending summers on his family’s boat exploring the Inside Passage of British Columbia. Their favorite space on the boat was the pilothouse. It was here that you could see out the windows in every direction. Swivel chairs allowed them to spin-around and face the main seating bench. Most important though, a small collapsible table offers an area for eating and socializing inside when conditions outside are uncomfortable.
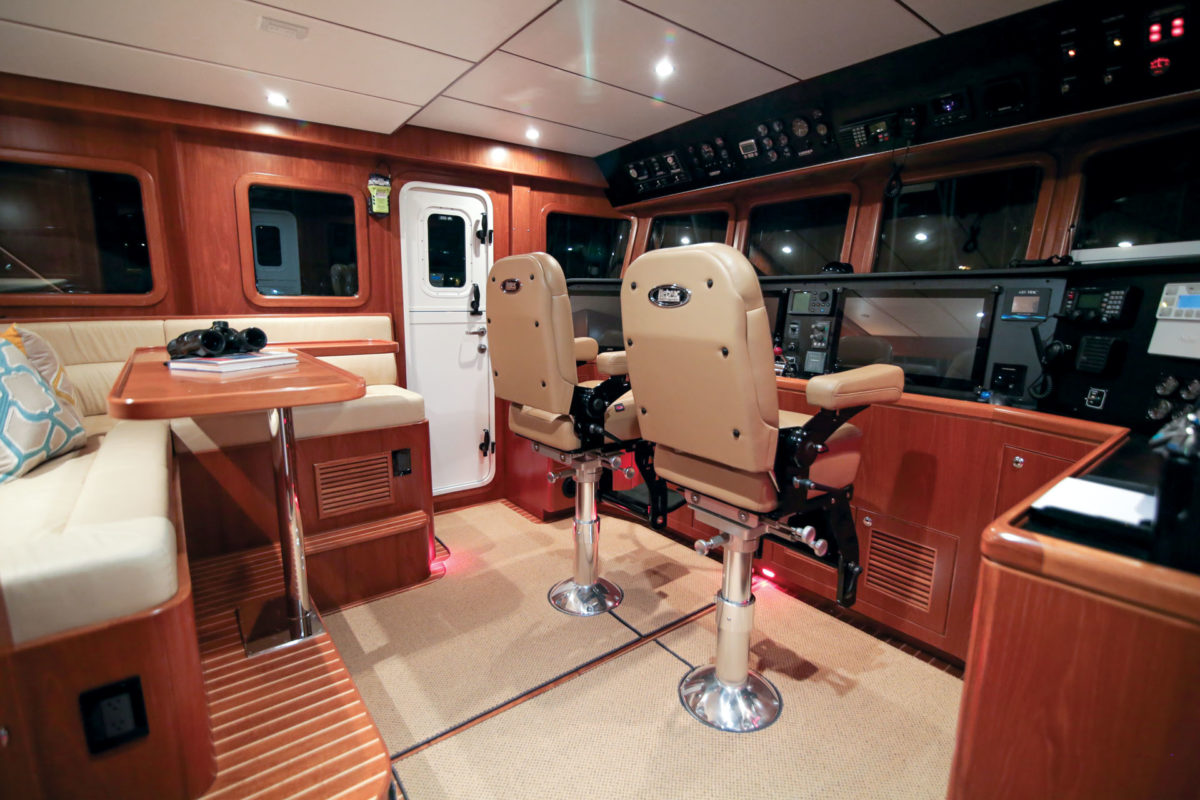
We wanted this in our van. You start by swiveling the driver’s and passenger’s seats around and sliding the movable bench forward. Now deploy the marine-style table from above the refrigerator and you have a pretty good replica of that found in a modern cruising boat. You also have the massive sliding door and rear doors you can open to bring the outdoors in. This closely resembles the cruising boat experience minus the need to stay awake at night wondering if you’re dragging anchor.
Implementing the Plan
The requirement for a second row bench to safely seat the child created quite a challenge. A fixed bench seat would sit in the sliding door entry and complicate access in and out of the van. It would take up the footprint where we wanted the galley kitchen. It didn’t take long to discover that Volkswagen found an excellent solution to this problem in the modern Volkswagen California. Go figure, VW has only been building campervans since the 1950s. Coincidentally, the VW California is not available in California or the entire U.S. It offers a bench seat that folds into a bed and slides nearly the entire length of the floor so it can be out of the way when not needed. We knew this was the solution for our van.
Now the problem was sourcing something like this in the United States. There are two companies that make bench seats that fold into beds (affectionately called “rock n roll beds”), one being Scopema in France and Reimo in Germany. There are several companies in the U.S. using these seats in van conversions. We spoke to all of them about obtaining a seat. None were willing either due to liability concerns or the sheer fact that they wanted us to buy a complete $100,000 build.
Importing a European Rock ‘n Roll seat/bed
We ended up locating a company called Uberbus in the UK that marries the Scopema seat to the factory VW seatrail system. These rails meet all safety requirements for a new vehicle sold in the rest of world and the seat itself is pull-tested to meet european M1 standards.
We have more research hours into this part of the van build than any other. Finding an overseas retailer willing to sell to us was the first challenge. Aside from that challenge, 100% of the documentation, scheduling pickup and shipment, paying fees, all fell on us. Trying to figure that out from half-way across the world was not easy. We had to learn about VAT exclusions, couriers, international shipping, customs documents, harmonized codes, international tariffs. Let’s just say it wasn’t easy, but it is do-able.
Great News! (2021 Update)
As of September 2021, those of us in the U.S. and Canada now have a source for these amazing seats. Our friends over at Van Evolve are now importing shipping containers of Scopema rock n’ roll beds exactly like ours. They have them in 2-person as well as 3-person orientations. Please do us a favor and let them know we sent you.
How Great is Our Rock ‘n Roll Bed?
Quite frankly, it’s amazing. Ideally, every fixture in the van should serve dual purposes. This seat allows us to safely transport four people. It sleeps two, and when you include the transverse bed across the back of the van, we have two separate bed areas. (We could also add a high-mount bed in the rear and sleep five.). Either end of the bed will tilt and form a chaise lounge that points either forward or back. We use the rear-pointing orientation for watching movies in our van.
The bench seat provides an open layout with emphasis on a great entertaining space just like the cruising-boats we discussed. In order to achieve that in a 19 foot-long van, it means the beds will need to be deployed, and we are fine with that. Having a great socializing space is invaluable when the weather is bad or the mosquitoes come out. That said, we love being outside so most cooking and activities will occur outside of the van when possible.
Needless to say, we blatantly copied the basic design of the VW California, but with some of our own additions.
Talk about Versatility!
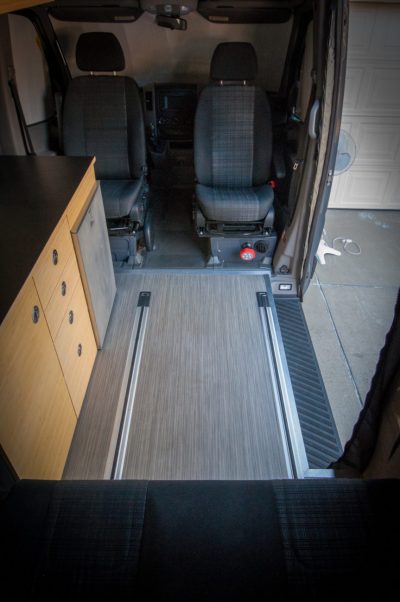
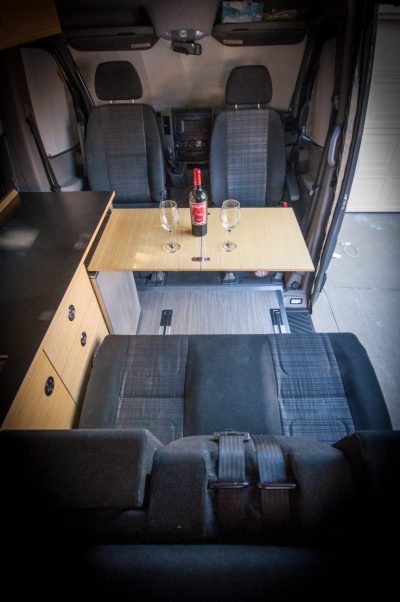
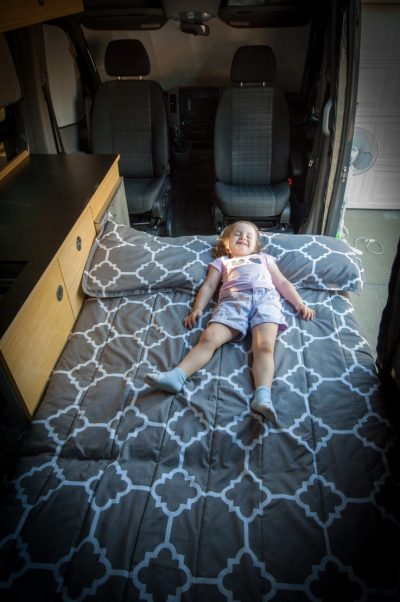
The seat we imported offers essentially four layouts in our van. The first is driving mode, where the seat is moved all the way forward where it functions much like a passenger car. This is important when you have young children. The second option is open-floor space mode where the seat is slid 8′ feet back on its rails, providing lots of room for moving around, changing and preparing food. Third is dinner/game mode where the driver and passenger seats swivel around, the bench is moved forward and the fold-out table is deployed from above the refrigerator. You now have seating for four. Finally, there is bed mode, where the bed does its magic and folds flat to provide a bed 6’1″ long. We love the versatility this offers in a relatively small van.
Hi, can you provide information on how to order and import the seat into the USA? I would greatly appreciate it! Thank you in advance.
Love your advice. We have a 10 y.o. and want to build our van to sleep 4, accommodating a friend or a family member on trips. However, I would like to read about importing the RIB seat. What is the process? How do I start?
Hi Monika, I sent you a DM on Instagram. It sounds like Uberbus might be working with US customers a little more, so the process might be easier than what I went through. I don’t know the details though, I would contact Uberbus directly.
The seat and rails definitely make this build something unique. Incredible versatility. As you say, how else can a family of four actually travel and sleep in a van this size? They can’t. Sad it’s so difficult to source here in the U.S.
It is shame. Almost unbelievable that we cannot get a safe crash rated seat here in this country. That said, sleeping four can still be done–usually by using two layers of beds. It gets tight with a fixed bench though.
Yes, how about that detailed write-up on those seats? It’s not on your YouTube channel and it’s not here. Everyone wants to know!
I will see if I can gather enough material for a writeup.
Definitely interested to learn more about this bed and rail setup!
+1 on learning more about importing the seat. Been looking for this seat in the US for a long time and can’t find any (except the Recon Camper guys, but they won’t sell the seats separately).
I sent an email to the company I purchased from to see if we can work together in making it easier to get the seat here in the U.S. I’ll report back…
I would love to know more about the costs all together with the seat and rail system and how to import it. Any installation tips would be helpful as well. Thank you in advance!
Ken I think there is enough interest in this seat that could possibly warrant. 1) a write up 2) a group email 3) a group buy of sourced seat 4) install at group rate 5) making donations to Our.Karavan for a service/product desperately needed for growing families and owners of sprinter vans. I hope you’ll consider it.
It’s a great concept, but I have reached out to the manufacturer and they aren’t particularly interested in dealing with international customers. I was hoping I could work with them in order to streamline the process. At this point in time I don’t have enough information to provide a path for people. For those looking for just the Scopema seat and not necessarily the sliding hardware, I can tell you that the seat is available widely across the UK and with enough effort you will find someone willing to sell to you. I haven’t given up, but I suspect this particular company has enough domestic customers to keep them busy.
These guys look to be selling this rock and roll bed in the USA.
https://www.esplori.com/services/
I’ve emailed them for details.
https://www.smart-beds.com/beds/smart-bed-evolution-rail/
I’m definitely interested in any info you receive from them. Rock n roll beds are perfect in a van.
Here’s what I received from them:
————-
The dimension can be found here (https://www.smart-beds.com/beds/smart-bed-evolution-rail/) or here (https://www.smart-beds.com/beds/smart-bed-evolution/).
Installing in a Sprinter works great and the options are fabric or leather, then color choices. They also make seatbelts and headrests option, but we find most customers in the USA want both.
Pricing
Evolution-
Fabric – $4,800
Leather- $5,100
Evolution II-
Fabric – $3,450
Leather-$3,800
I hop that helps, and let me know if you have any additional questions.
Tony, thank you for the info! I’m sure others will find it very helpful, and it’s encouraging to know these will have better accessibility in the States. Be sure to let us know when you get it installed! -Ken
Awesome!
This may not be the best place for this question, but in looking to place an order, there are options for the wood floor and hardboard paneling in the Sprinter. What are your thoughts on using these factory cut pieces in a build-out? Would they be useful, or just a waste of time that would be better done custom later?
Thanks!
I think most people order the wood floor. I sure did. I pulled it out, added insulation below it, then reinstalled the wood floor with vinyl over the top. You can see it in my floor video on youtube. As for the hardboard paneling, most don’t use the factory paneling, but I’m sure some have. Generally once you’ve insulated under floor and thus raised it, you would at least have to cut some off the bottom of the factory panels.
Yeah, it’s been tough to find information on what exactly you’d be getting online. RB Components sells a plywood wall kit for ~$800, as opposed to $400 from MB, but the RB schematic makes cutting your own look relatively trivial. Perhaps I need to return to your video… =)
Good find, Tony. If there are savings to be had by ordering multiple, perhaps we could bulk up!
Oddball question… the 2019 has the option of an electronic side door. Apparently fully electronic (with key button) for ~$700, and electronic assisted closing for ~$300. In your experience, would either of these features be practical?
I’m not sure what the difference between the two options is, but the sliding door is huge and requires some effort to close. When we have the van closed up (no windows or vents open), we practically have to slam the door to get it to close. So yes, an electric assist would be nice.
I’ve since gone into the dealership and demo’d all three. The generic door is as you describe, there’s an optional indentation for two-stage opening.
The assist prevents you from fully closing the door and takes over for you to get it close. The indentation for two-stage opening can be applied here if you want.
For the the electric door, you tug the handle from the outside and it will open on its own, not speedily, but good enough. From the inside, there’s a button on the B-pillar, as well as one in the center of the console beneath the cup holders. Either of these buttons will pause the opening/closing wherever you want. There’s an optional limiter, but if you get that, that’s as far as it goes, period (so not a smart option). It’s also worth noting that this will cease to function if you kill your battery… but, you can manually disengage the motor in such a case.
I have the two-stage door stop and use it all the time. I definitely recommend that. Either the full electric close or the assist sound really nice. If I don’t have any vents or windows open, I have to move my door with some heft to get it to close. I think I’d probably compromise and get the assisted one. Thanks for reporting back!
Thanks for all of the great information!
If your doors are noticeably harder to close with the windows closed than open you may have a vent issue. All modern vehicles have vents designed to prevent pressure buildup inside the vehicle (decades ago vehicles leaked so much air vents were unnecessary). Clearing the path to the vents can not only reduce the door closing effort, but also improve ventilation and defogging performance with windows closed. These vents, called air extractors, are almost always located in both rear corners of the vehicle between the inner and outer sheet metal below the floor and vent behind the bumper fascia. These vents have rubber flaps that close to prevent dust and CO intrusion when there is not positive pressure inside the vehicle. The path to these vents should optimally maintain roughly the cross-sectional area of the vent itself (on the order of 10,000 mm2 each). These paths are often obstructed by insulation and interior paneling in builds by unwitting upfitters. The paths can easily be reopened in a finished van by simply drilling holes in the paneling or cutting a hole and installing a grill to create a path from the vent to the vehicle interior. Adding these holes or vents through the paneling higher up toward the rear glass may further improve defogging of the side and rear glass. If you look at a wagon or SUV you should find what looks like a speaker grill in the interior rear quarter trim or a grill or gap around the rear side glass for the purpose of providing a path to the vent.
You are absolutely right, most people don’t realize this. I did go to the trouble to buy the Mercedes vented plastic inserts that are used on crew and passenger vans to maintain that movement of air from inside of the van to the vents under the rear corner bumperettes. There’s also no insulation in the vicinity of those louvered vents. I think the volume of air being pushed around when the large sliding door closes is more than what can pass through those small vents. Thank you for posting and for raising this issue. -Ken
What are your thoughts on having used the factory headliner? I’m seeing it as a $900 option, and have seen some notes on the forum that it’s difficult to work with. What was your experience, and would you recommend it? It sure turned out great.
Hi Christian, I did not order my van with a headliner. When I realized how many corners and angles I would have to account for in building my own, the factory one started to look really good. I found one used on the sprinter forums for $150, which seems to be the going rate when one is available. It saved me a ton of work and figuring out how to finish the corners, so I’m happy with it. It’s also very light weight and has a small amount of sound deadening in it. The thought of strapping a bunch of heavy wood to my ceiling didn’t sound appealing.
It’s really not that bad to work with. If you go into it knowing you will probably break a few plastic clips, just make sure you have some extras and it’s not that big of a deal. There are MB knock off clips on Amazon for super cheap.
if any body needs anything from UK let us know i will see if i can make the process easier for you as i am a resident
Wow, very kind of you!
Thanks for all of your guidance Ken. This site is my go to for my build.
How do you meet your requirement to sleep 4 humans with this setup? I can see 2 adults in the rock n roll bed. We are thinking of a low top with a pop-up for an additional sleeping for 2, but concerned about losing the storage space available with a high top.
Linda, I will be updating this page soon as we just completed a bed across the rear of the van, which gives us sleeping for three. What I likely did not explain well is I want the “capability” to sleep 4 by leaving the upper wall sections open so a high-mount bed could be added in the future. With the rear transverse bed now completed (I just posted a video on our YouTube channel ‘ourkaravan’), adding a high mount bed would give us sleeping for 5. That would be 2 on the rock n roll bed, 1 on the transverse rear bed and 2 on the high mount. In short, we lost Kara’s (my daughter) mom to cancer and need flexibility in our layout. I had considered a pop-top too because they give you almost two separate rooms. There are downsides though, but every layout has its compromises! -Ken
FYI – I also reached out to Smart Beds in the UK and they gave me this info:
________
Give Tom a call at Acme Overland. He is the importer of our products into the U.S.
Thomas Bender
ACME Overland
4220 West 2100 South Unit B
Salt Lake City, Utah 84106
http://acmeoverland.com/
hello@acmeoverland.com
847 287 9639
_________
I reached out to Tom and here is what he had to say:
____________
There are a few different models of Smart Beds to estimate for pricing. Upholstery options and shipping vary the cost but here’s an average cost.
EVO R ~$4,700
EVO II ~$3,300
Full Width ~$3,700
This includes the frame, upholstered cushions, mounting hardware(fit kit), and shipping to you. Typical lead time is 6 weeks.
Let me know if you have any other questions.
Thanks,
TOM
__________
So the good news is, it looks like they have streamlined the process for buying in the U.S.
Joey, thank you for sharing that! I get a lot of people contacting me saying vendors are unwilling to ship from the UK. It’s nice to know there is now another option. These things are never as inexpensive as you want them to be, but the pricing is less than I paid and WAY less hassle to obtain one. Thanks again!!
Hi Ken
Absolutely amazing web page and videos. Easily the best out there – and that’s saying a lot!! Thank you so much for taking such valuable time to help us out.
Quick question: How much space did you leave behind the driver seat to allow for a swivel before the cabinetry starts?
Thanks again
James
Hi James and Ken,
My husband and I are wondering this same thing about space between the cabinet and a drivers side swivel seat. I may have just missed your response, but do you have any guidance on that? Thanks so much!
Hi, There is 12-3/4″ between the back of my seat pedestal and the front corner of the galley. That leaves just enough room for my knees to be in that space, without pushing my galley back so far that I’m wasting space. -Ken
which Nordhavn was that pilothouse photo from? which hull number?
No idea but do you want to buy me one? 🙂
What the the dimension of the Rib bed in your Van
They offer several widths and lengths, here they are: https://www.scopema.com/produits/pdf/Altair3P-min.pdf
Hi Ken,
Love the website and your build ideas. Fortunately it looks like there is a company selling preassembled insulated L-track floors and a variety of RNR and other beds to go with them at semi-reasonable prices: https://www.travoisusa.com/ They claim to have all the safety stuff figured out, which is important for families with young kids.
Unfortunately, you need to get your van to California to get one of these floors, which makes it harder when you live on the East Coast.
I am so happy to see safe seating finally available in the U.S. It scares me to think of all of the families riding around in RVs that have unsafe seating. Not even the $174,000 Winnebago Revel on the Sprinter chassis offers proper 3 point shoulder belts. Thanks for sharing!
Hi Ken,
First, I love your site, and hugely appreciate and enjoy the all the info you so freely share with the community. I’ve been following you for over 3 years, and pretty much watched every video you’ve created. I’m finally jumping into it.
I have a 2020 Ford Transit 148″ WB and in the process of installing the rails for the EvolutionR Smartbed, which I ordered from Esplori, 48SE Bridgeford Blvd, Bend OR 97702. My contact there is Colin Clark cclark@esplori.com, who is wonderful to work with. I even communicated with the fabricators overseas on some specific engineering questions (I’m a retired mechanical engineer), and they were very responsive.
My Smartbed appears slightly different than yours, but thus far appears well engineered and fabricated. I had originally ordered a left-hand installation unit with 1800 mm rails.
FYI: Potential customers of the Smartbed must be certain which side of the van they will be installing it. I made the mistake of ordering left side install, but changed my layout for right side install. It is proving to be a huge problem because the unit is not symmetrical. It is biased away from the wall. So, the left-hand unit I have now cannot be installed in the mirrored position on the right side of the van. The seat cushion will swipe the right-side wall structure for slide door opening. I must now shift the Smartbed approx. 2″ further away from the right-side wall to obtain the necessary clearance. This greatly complicates the installation of the rails. There are many new obstructions under the floorpan. If I had ordered the right side install design, this install would be so much simpler. Also, as discussed below, I subsequently ordered the 2300 mm rails, but the supplier in the UK was gracious enough not charge for them, although I did pay for shipping. Bottom line, know what you want before you order.
The issue I have now is the length of the rails. I ordered the 2300 mm rails for maximum travel to maximize “garage” area or “living room” area. I notice your rails extend well into the “living room”. So here are my questions.
1. Do you find the raised profile of rails in the “living room” to be bothersome?
2. My rail covers are nearly ¾” high and may be a trip hazard or simply annoying. How much do your rails protrude above the finished floor?
3. Have you found it necessary or beneficial to be able to maximize “garage” or “living room” areas? Perhaps, I’m overthinking it? If I used the full 2300 mm length, I may consider placing place some ¾” thick mats to fill the space between the rails and the cabinet. (Yes, I’m following your great cabinet design).
Look forward to hearing from you. Hope I’m not too long-winded here.
Thanks,
Bill
Hi Bill, thank you for the message and the kind words. For what it’s worth, my seat is also a few inches away from the nearest wall panel. I wanted to ensure I had plenty of room for the seat to move through it’s full motion no matter where it is ‘parked’ in the van. Your message was a good reminder for those considering going this route.
The reason my rails are so long is I wanted the ability to push the seat as far back as possible. This allows me to have a long galley and still be able to open the cabinet all the way at the rear of the van without conflicting with the seat. The back 30″ or so of the van is my daughter’s transverse bed, so it stop short of that.
I had to build my floors up to match the height of the rails. Once I had the rails bolted to the floor of the van and installed 1/4″ mini cell foam and the factory floor, I had to come up another 1/2″ to match the height of the rails. I’d say my rails only sit about 3/16″ off the floor, and at that they taper up to that point. Not a trip hazard at all, and if an area rug is thrown over the top you barely notice it. I can email you a photo taken at floor level if you’re interested.
I don’t really have a garage in my van. I have a 56″ x 26″ storage area in the rear under my daughter’s bed, and a pass-through that I access from the rear of the van where I can store a paddle board above in a compartment that extends from just forward of the wheel well to the rear of the van. I wish I had a garage space, but it’s just not possible in a 144 with two rows of seats and two beds. I put a huge value on having an open floor plan, that way if we get stuck in several days of bad weather on a trip, we have room to move around and not be stepping on each other.
I hope that helps. Let me know if there are holes in my response and I can fill those in. Take care! Ken
Well done. Your design is well reasoned. This blog is a great resource.
Hi Ken,
Thanks for your response.
I went back and re-watched your videos on RIB seat/bed install and insulated vinyl floor install. Yeah, I see the 3/16” profile you’re talking about. Nice. Unfortunately, I will end up with a ¾” profile. I will, however, mount my rails further back to provide a good 30” behind the front seats, thus should not be a trip concern for traffic via the slide door. Furthermore, the seat/bed will generally be towards the front, sitting over the rails, so generally shouldn’t be an annoyance.
In your video, it appears there are clips along the length of the steel rail which apparently allow you to install (and remove) rails brush covers after the flooring is complete. I like your design. With my system, the brush cover must be installed together with the steel rail as an assembly before final bolting onto floor. Doable, but less flexible. It appears your design may even allow for some minor adjustment to accommodate a slightly different vinyl sheet thickness, or even vinyl plank if one changes their mind.
Thanks again for your excellent website.
Bill
I wish I could take credit for coming up with the track system but it’s lifted straight from a European Volkswagen California. It really is slick, super happy with it.
Your plan sounds like a good one. My advice would have been simlar–leave the forward portion of the rails set back a bit so it’s not a trip hazard for the most highly-used portion of the sliding door opening. I don’t know about you but my van has the factory sliding door stop that stops the door half way, and I almost never open it more than that.
Thank you for the kind words! -Ken