

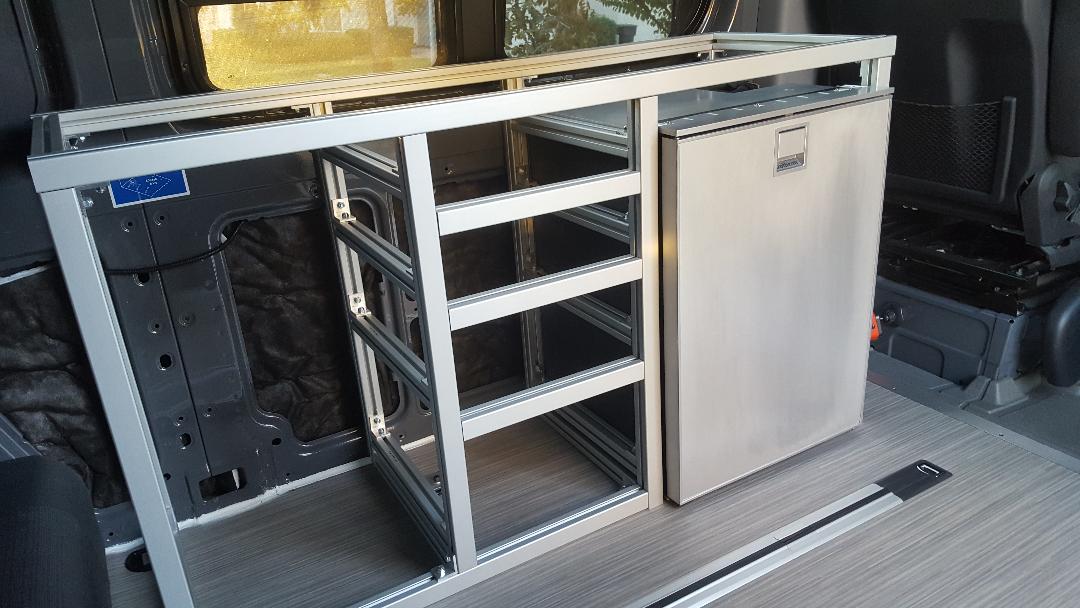
The Karavan features upper and lower cabinets framed in lightweight and strong 80/20 extruded aluminum. In the event of a vehicle accident, we would prefer to not have a pile of wood and screws hitting us in the back of the head at 65 MPH. 80/20 is securely bolted to the support ribs of the van. Everything else is then securely bolted to the 80/20 framing. Of all the reasons for using 80/20 cabinets in the van, vehicle safety was the primary consideration. Building 80/20 extruded aluminum van cabinets also keeps build weight down and the material is easy to work with. Let’s talk a little about how to build 80/20 extruded aluminum van cabinets.
Note: This site contains affiliate links for which I may be compensated.
About 80/20 Aluminum
80/20, Inc. is a manufacturer of slotted extruded aluminum framing. Their slogan is “the industrial erector set, ” and that’s a good way to describe it. 80/20 makes enough connectors and accessories to build your own space shuttle, if you wanted to. They manufacture a variety of internal and external fasteners, hinges, bearings, glides…you get the idea. In general, the slots in the aluminum provide the mechanism for attaching structures together.
10-Series vs 15-Series
For the purposes of our discussion the most common non-metric 80/20 profiles are the 1” bars (called “10-series”) and the 1-1/2” bars (called “15-series”). Conveniently, a 5/16″-18 carriage bolt fits nicely in the 15-series profile. 1/4″-20 bolts are “supposed” to fit in the 10-series profile. However some have reported that not all 1/4-20 bolts fit. We have used both the 10 and 15 series and prefer working with the 1-1/2” 15-series. The primary reason is not due to the strength of the extrusion, rather the hardware that bolts them together. We broke two 1/4-20 carriage bolts in the process of building our battery box with 10-series. We very well may have overtightened them, but each time we were shocked how easily the bolts broke. In working with the 15-series extrusions and 5/16” bolts, we have not had that problem. A 5/16” bolt has a 61% higher proof load and tensile strength than a 1/4-20.
80/20 Profile Styles
15-series extrusions are available in four different styles: regular, light-smooth, ultra light smooth and rounded. We like the aesthetics of the “Light-Smooth” profiles. When looking at 80/20’s model numbers, 1515-LS is the 15-series 4-slot in light-smooth, which we use more than any other. 1502-LS has 2-slots, 1503-LS has three. 15-series can be ordered with slots on just one side, on all four sides, or anywhere in between. We have found it handy to have a non-slotted side facing out in some locations to improve appearance.
How to Use 80/20 in Your Van
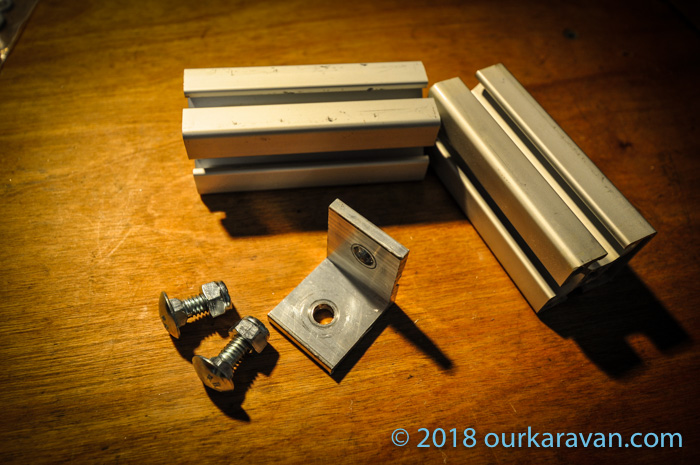
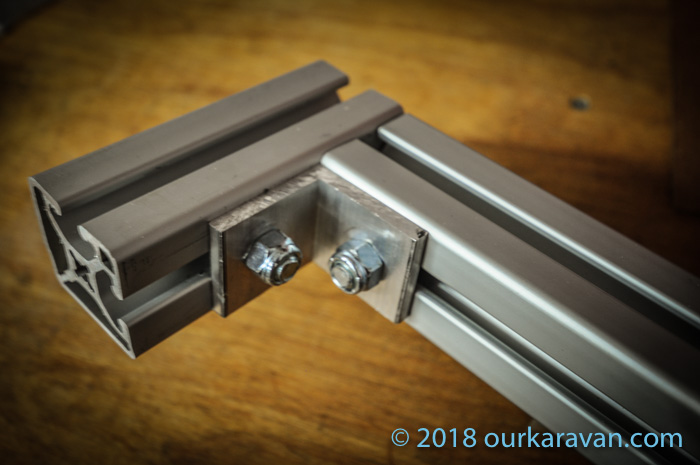
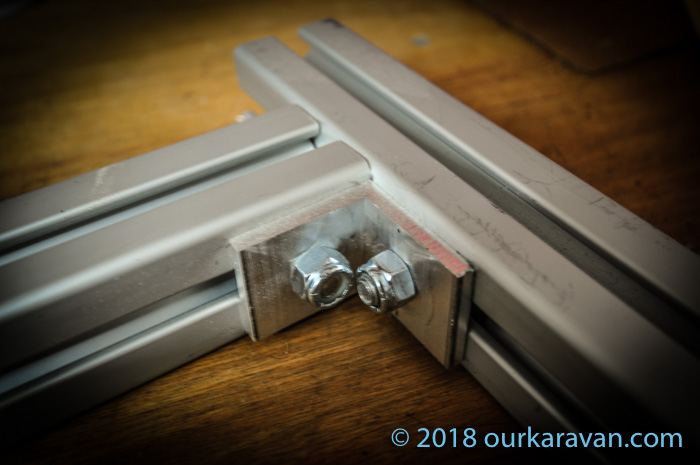
In general, you will be using 80/20 to create a frame for your cabinetry, but you can also use it to create a secure tie-down for your batteries, water tanks and other hardware. The most common connection will be a 90-degree angle where an aluminum angle bracket will attach the two extrusions together. With a boxed frame constructed you will then bolt your drawers and cabinet faces to the structure. There are times you may want to run a couple extrusions parallel to each other, in which case you would use a simple plate bolted between the two extrusions. The 90-degree angle brackets will mostly likely represent 95+% of your connections.
Cutting 80/20 With a Miter Saw
There are a number of ways to cut your 80/20 down to size, but we highly recommend you use a miter saw. We use a sliding compound miter saw, but you simply need a device capable of making 90-degree cuts. I would not try this with a handheld circular saw unless you have a way to ensure your cuts end up 90-degrees or you’re going to make your life difficult. You also need a non-ferrous fine-tooth saw blade. This blade has worked great for us.
Word of caution, cutting anything on a saw can be dangerous. Not to sound like your mom, but beyond the normal ear and eye protection, you really need to clamp your work. We have not had any trouble cutting the 80/20, but when cutting the 1-1/4” long aluminum angle brackets, we’ve had a couple fly across the room on us. It always happened when lifting the blade right after a cut. We have not had that happen since we began the practice of cutting completely through the angled aluminum, LETTING THE SAW BLADE STOP SPINNING, then lifting the saw blade. The staggered teeth of the blade has a tendency to kick the small pieces out of the saw. And again, it hasn’t happened since we began the aforementioned technique.
Fabricating Your Own Brackets
80/20 is happy to sell you brackets for any type of connection you want to make. But for a price. A standard 90-degree angle bracket with two holes is just shy of $3. Meanwhile, an 8-foot long 1-1/2” x 1-1/2” piece of angled aluminum cost us under $20 from a local aluminum supplier. You can make close to sixty brackets from that 8-footer. That said, it does take time to make the cuts and drill two holes in each bracket. We learned from Dave Orton to cut the angle brackets so they are 1-1/4” wide rather than 1-1/2”. If your holes are slightly off the bracket won’t hang over the edge of the extrusion.
Drilling the Mounting Holes
Use a 5/16″ drill bit to accommodate the 5/16″ carriage bolts. Refer to the photo below of the drilled brackets. The holes are centered left-to-right, but are drilled 1/2” from the outside edge of the angle. This will give you more room to tighten the two nuts that come together inside the angle.
Fasteners
Galvanic corrosion potential is a measure of how dissimilar metals will corrode when fastened together. For galvanic corrosion to occur, typically an electrolyte (water) is required. Referring to a galvanic chart, metals close to one another on the chart generally do not have a strong effect on one another. The farther apart any two metals are separated, the stronger the corroding effect on the one higher in the list. 80/20 is a 61xx series aluminum and zinc is closer to aluminum on the galvanic chart, so we chose to use all zinc fasteners in our 80/20 assemblies. We also use nylock nuts to prevent vibrations from working the nuts loose.
Ordering 80/20 Extruded Aluminum
Before you place your order, you want to sketch out a plan. Some use Google Sketch-Up, we use the analog version. (It’s called paper, people.) We have had a 100% success rate with getting the correct product ordering through Amazon. Their shipping rates are the best we have found, and that’s important because the shipping can really add up. Amazon also makes it easy to build a shopping cart with different sized pieces so you can find the best deal. Any piece larger than 96″ (8-feet) will cost more to ship because it goes from a UPS or FedEx delivery to FREIGHT, which costs more.
How to Use the Amazon Shopping Cart for the Best Price
Let’s say you need two 48″ bars of 80/20 1515-LS. Prices change, but at the time of this writing a single 96″ bar will cost $45.60 and $20.67 in shipping. THE SHIPPING COST, PER BAR, GETS LESS EXPENSIVE AS YOU ADD MORE PRODUCT. Ordering a second 96″ bar doesn’t double the shipping cost to $41, it increases to $29. A third bar increases it to $37. You get the point.
But back to our example where you need two 48″ bars. Rather than buying one 96″ bar for $45.60 + $20.67 in shipping (total = $66.27), instead buy two 48″ bars for $23.55 each and $14.63 total for shipping, coming to $61.73. We just play with the Amazon shopping cart by adding pieces of varying length and adjusting the number needed until we get the lowest price. Use multiple internet browser windows to compare total cost with shipping.

Summary
Now you know why we chose 80/20 extruded aluminum. Sketch your design, play with the Amazon shopping cart to find the most economical length of 80/20 to meet your needs. Measure twice and cut once. It is not difficult at all to have your entire structure’s tolerance end up at 1/16″ or less with careful measuring and cutting. We simply could not come anywhere near that working with wood.
Another tip is to be mindful of other things you may bolt to your structure. Once you have bolted your structure together, you may find you have closed-off access to the slot for inserting more carriage bolts. We ordered a fairly large number of these roll-in T-nuts, which are very handy and allow you to “roll in” a threaded insert even after your entire assembly is complete.
We attribute the very nice final product of our van cabinetry to the use of 80/20. 80/20 is very easy to work with and the angle brackets result in square corners every time. The cabinet framing is super strong, relatively light and looks great.
Finishing the Cabinetry with Hardwood
The scope of this article was to teach you how to frame your cabinets in 80/20. See our 3D Sketchup Model article where drawings and dimensions are provided so you can replicate our galley kitchen, or change the dimensions to your liking. Explore our website to read about how to attach drawer slides and positive-drawer latches to the framing. We also describe how to finish the cabinetry in a beautiful hardwood of your choice. (We used grass, aka bamboo.)
Thanks for reading!
I’m really loving the new site and info! I appreciate the time you’ve put into documenting and sharing your build. Kudos!
Thanks for the message Cory, much appreciated!
Ken, I just noticed a photo of a table that slides out from above the fridge and folds out. Do you have any more photos or info on this? It is exactly what I am looking to do. Love your build!
It’s still a work-in-progress as I’m not happy with the sheetmetal leaf supports, which rattle like crazy. Until then, shoot me an email using the contact form and I’ll share what I have so far. Thanks for the complements!
What a fantastic idea. I will be doing the same likely. Looking forward to how you added fronts, hinges, latches and drawers!
Thanks! Until I get the write-up done you can take a sneak-peek at my youtube channel and see the final product. 😉
You really need to show us how you built that table, it looks really rad! What kind of wine is that?
Great build. Can you share dimensions for cabinets? Thx
Thanks Colin. I am working on a diagram now and should have it complete end of next week. Take care!
Thanks for the inspiration. We’re using 80/20 to build our interior van structures too. I found free software (http://www.framexpert.com/products/framedesigner/download/) that makes designing your project super easy. It was simple to use, even with no CAD experience. You just choose the 80/20 profile components you want to use, and start your virtual build. When you’re done, you can generate a materials list and design specs. We use that to calculate the lengths of the aluminum profiles we need, then order through Amazon.
Thank you for sharing. It’s too bad the software is not available for Mac. I am re-learning how to use Sketchup so I can provide detailed framing instructions for replicating my galley. There are some aspects of Sketchup that are not the easiest to use and I can imagine the software you are using makes it a bit easier. Thanks for the comment and let us know how your cabinets turn out!
Love the idea of 80/20. Beautiful and extremely clean and elegant design. I will be copying it for sure. Can you also give the link to the bamboo source? thanks in advance
Thanks Peter! The bamboo is made by the company Plyboo. I have ordered from two different stores now, so any reputable hardwood store should be able to get it for you.
Love your site and your tips. What did you finish your bamboo with and what thickness did you use?
Thanks Sylvia, I used 1/4″ bamboo for the cabinet sides and the rear sliding cabinet doors, and used 3/4″ bamboo for the galley drawers and cabinet as well as the cabinet doors on the overheads. I put a few coats of polyurethane on each. Take care!
Thanks so much for the detailed videos. I’m planning on cabinet build and without access to a shop (or even garage) and nothing but a sloped driveway, I was dreading trying to figure out how to frame my cabinets in wood and getting them square and true. I’ve been looking into 80/20 but was struggling to figure out how to attach the draws and cabinet fronts to the aluminum framing. Definitely appreciate all the effort you put into making this info accessible!
I just added another article on building with 80/20, with more to come. Thanks for following along!
Also how long are your carrage bolts
I use 3/4″ long carriage bolts
On the 1 1/2 angled aluminum is it 1/8th or 1/4
I use 3/16″ aluminum angle
Hey – Great info and very inspiring. I was looking for ideas for 80/20 build as well. Just want to mention the extensive resource for 80/20 at http://www.mcmaster.com. Super easy to search what you need for all manner of fasteners and miscellany.
I don’t see where you have listed the make and model of refridgerator you used. Could you please share that?
It’s an Isotherm Cruise “Elegance” 130. I purchased from West Marine, as did a friend, and customer service was pretty bad. West Marine was in the process of being bought-out a few months ago, which was affecting their ability to do any level of customer service, so I would look into that before purchasing from them.
Thanks for the detailed info! I’m curious why you chose 80/20 over standard aluminum square tubing, which looks to be cheaper in my research. I’m thinking of going with standard and using a combination of bolting and pop rivets. 80/20 has the advantage of being easier to dissemble but that isn’t needed in my case. What other advantages did you see to outweigh the cost?
Hi James,
I mostly chose 80/20 over wood for its ease of use, strength, adaptability for future changes and light weight. I never really compared 80/20 vs tubing because learning to weld and purchasing additional equipment felt out of reach for this project. In other words, building from scratch with tubing is a lot more involved. I’d use anything before going back to wood though. 80/20 does have the advantage of being able to adjust the things you have bolted to it by simply loosening and repositioning a bolt. I hope that helps!
Its been a while but I thought I would share my West Marine experience. I recently bought my Isotherm Fridge through West Marine and had great customer service. I originally bought the 85 and did not install it. After two months I decided I wanted the 130. I called West Marine to see if they would do an exchange. I ended up having to place another order but didn’t have to pay for it. In the end it worked out to my advantage because when I did the exchange they put the refund for the first fridge on a gift card which actually got me a 5% bonus. We then used that gift card to pay for the 130 I ordered. So I got a 5% discount for my mistake. I’d say in 2023 the West Marine customer service is pretty great.
That’s great to hear. I know West Marine got bought-out a couple of years ago. They had some pretty awful customer service before, so it sounds like they are headed in the right direction now. Thanks for the update. -Ken
I am getting my bamboo tomorrow. What did you use to cut it? Just a circular saw? Any special blade?
I have cut it on both a table saw and with a circular saw. No special blade required, although cutting expensive material I would recommend not using a blade that was last used to cut firewood. I recommend moving very slowly when you get the very end of the cut to avoid chipping the edge. Bamboo seems to be pretty forgiving.
Good to know about the chipping. Thanks.
When you used 1/4-20 carriage bolts do you know what grade they were? I am making my upper cabinets out of 10 series and found some grade 5 ones on line. I hope these won’t break.
HI Cliff, I do not. One thing you might try is using “T bolts” and see if you can get a larger bolt to fit in the slot of the 1″. Or taking a 5/16 carriage bolt and grinding the head down to fit in the slot. I really wasn’t comfortable with the strength of the 1/4-20 bolts. Maybe for something lighter duty, but not for a galley that holds hundreds of pounds of refrigerator, water jugs and drawer items. A 1″ profile with a stronger bolt would be a nice way to go.
I have the isotherm elegance 85 and am still completely confused as to how to install it. After you pop the buttons out from inside the fridge what size bolt did you use to attach it to the brackets? I can’t find it anywhere in the instructions. also, I can’t thank you enough for answering all of my questions and the helpful online advice—this website has been a lifesaver !
Hi Anunta, correct, pop out the buttons and remove the small plug of insulation. What I did was send a small drill bit through the hole from the inside, then I was able to pass a small bolt through. I can’t think of any other way to do it. From there the bolt just passes through an aluminum angle bracket attached to my 80/20 framing, then I have a nut on the back. I can’t remember what size bolt and nut, but they are small, like sheetmetal screw-sized. I hope that helps. Good luck, and thanks for the kind words!
What an incredibly organized, methodical and thorough approach you’ve taken to your build. Thanks so much for sharing! Any idea if the Isotherm fridge can handle offroad bumpiness? I like the style better to conserve floor space but worry about longevity for 4×4 adventures. Thanks!
Thank you Steven, I appreciate the complement. Most of these refrigerators, be it a front load, drawer-style or chest refrigerator, all use the Danfoss DB35 compressor. It is very efficient and works well. That said, my refrigerator required some modification to keep it from rattling. Mostly, I added some thin closed cell foam between the interior shelves and the sidewall. Other than that, it works well. I personally don’t like the organization of a chest-style refrigerator. Everything I want is always on the bottom.
Hi,
What is total weight of base cabinet? My apologies if I missed it . Thank you for stating the info in such a clear concise manner. Kinda like a Bob Ross series. After watching you know you can do it !
Hi!
When building with 10 series as you did for your battery box and using 1/4-20 carriage bolts, what size angle did you use? 1x1in or did it still have to be 1.5×1.5 to leave room for both bolts? Can’t quite tell from the battery box / lithium battery video. I will be building a cabinet from 10 series making my own connectors, but need to order in everything in advance including the Alu angle, so advice would be greatly appreciated. If you remember the Alu thickness and carriage bolt length you used that would also be of great assistance.
Thanks!
Hi, I used 1.5″ with the hole set back .5″ from the end of the angle. It might be tight using 1×1. I used 3/16″ thick for most of my build but I think there’s some 1/4″ in there too. Bolt length is 3/4″.
For the 1.5 inch aluminum angle brackets how thick is the aluminum 1/8 of an inch or 1/4”?
And would you recommend thicker if it’s going to be a work/tool shelf that will hold a lot
Of weight?
Thanks a lot.
I used a mix of 1/4″ thick and 3/16″ thick aluminum. For a tool shelf I’d probably use 1/4″.
Great. Thanks. That’s what I was thinking too.
Cheers
How did you install the child seat? is that movable in a rack somewhere? I need a similar setup for my 5 year old.
Difficult to see in the photo but the child seat is simply seat-belted into my second row seat with the three point shoulder belts. The seat is a european Scopema Altair 3P.
Hi, great build and video series. I saw your other vid on installing an L-track on the opposite wall for anchor points and wondered why you preferred using the double T-track instead of using an L-Track to attach your REAR cabinets to the wall?
The two serve different purposes. The L-track is for securing gear to the sidewall of my van, such as my camp table and to hold bike helmets, etc. The double slotted channel is to secure my rear cabinetry to the wall. It was very easy to make angle brackets to bolt the 80/20 framing to the 80/20 rail.
The 80/20 work, look, and advantages are awesome, but the links provided and all i’ve been able to find on amazon is in 48″ lengths. Not quite as aesthetically appealing when there’s a joint in the middle. Any lines on updated links?
If you follow my link, you can then search for those profiles on Amazon in any length you want. Let me know if it doesn’t work for you.
I am so thankful for your website. I’ve been doing research for a year and finally brought home our 144. I can’t count how many times I end up back here for info to compare with our builds. This site and your build is truly a goldmine. We are currently at the insulation stage but are looking ahead to interior framing. Did you bolt your framing to the floor in anyway?
Hi Jeff, congrats on the new van! My framing is bolted to both the wall of the van as well as the floor. There are a number of factory tie-down points in the floor and I used aluminum angle brackets between the framing and the tiedowns to anchor in place. The entire structure is very solid.
Thank you for the kind words, much appreciated. Good luck and enjoy your build!
Bolt strength: I’ve decide to go with the series 10 bars. In light of your problems with 1/4″ bolts I did some destructive testing. From your pictures I see you used ungraded bolts. No lines on head. This is what was available at all the hardware stores I also went to. The 1/4″ bolts failed between 8 and 10 foot lbs. Series 10 torques can be as high as 17. I found great selection and price at Wholesalebolts.com and bought Grade 5 1/4″ x 5/8″ – 20. I tested these at 25 foot lbs without failure.
Very useful information, thank you. Bolt strength was one of the biggest reasons I didn’t continue to use 10-series. This will help others that prefer that size over the larger stuff. Thank you!
Thank you for all the information! Just picked up my van and starting my build. What material did you use for the Thermal break? Are you happy or would you use something else?
Thank you!
Hi Kevin,
I have various forms of thermal break in my van. For my overhead cabinets I used fiberglass angles (instead of aluminum angles) attached to the van walls and ceiling to isolate the aluminum from the van. On the galley, it is bolted directly to the sidewall of the van, so I simply put closed cell foam between the 80/20 and where it touches the van. To be honest, I can’t really tell a difference in the performance of the various methods. I think anything you can do to slow down the transfer of heat between the body and aluminum is good, whether its closed cell foam, plastic, fiberglass, etc.
Hi,
Can’t thank you enough for the video, I’ve managed to install a similar cabinet and wondering what material you are using for the dowel spacers that connect to the 8020 through the headliner. Apologies if you posted the details somewhere.
Br,
Chris
Hi Chris,
I am using PVC spacers. You can find them by clicking on “store” on ourkaravan.com, and it’s in the “Aluminum 80/20 Cabinet Framing” section. Let me know if you have trouble finding it, and thanks!
Hi,
I’m curious if you have thoughts on how effective the Lizard Skin insulation for heat has been for you? For a hot climate, do you think it makes enough difference to use the Lizard Skin + insulation, versus just using normal insulation methods? (If you had to start over and do it again?)
Hi Brian, if I were starting over I would spray the van first thing with Lizard skin, and use the exact same materials I did on this build. My buddy and I sprayed our vans on the same day, and we both feel it was well worth the couple hundred dollars and the time to prep and spray. As discussed in the article, there’s a noticeable slowing of the spread of heat across the sheetmetal. I’ll take all the help I can get in the hot climate in which I live. But I wouldn’t pay some of the over-$1,500 price tags I’ve seen to have it professionally done. Not worth it at that price, IMHO. -Ken
Hi,
First off, I really enjoy all your content on your build. Can you give the dimension of your cabinets using the 80/20? Thank you and please keep up the good work!
Hi, I have an article posted with the full dimensioned drawing for the galley. It’s in the same section of the website where you found this one. I hope it helps and thanks for the complements! -Ken
Hi, can you tell me what dimensions you used for your overhead cabinets in the kitchen galley (height/depth)? Thank you.
Hi Tina,
My overhead cabinets are 109″ long and 12-1/2″ deep from the factory headliner to the outer part of the 80/20 framing. If you need any specific measurements let me know and I’ll get them for you. Otherwise I did a pretty a couple of detailed youtube video on the overheads as well. Take care! -Ken
Hi Ken, Your site is great, thank you!
I plan to replicate your galley framing exactly except that I may use a different fridge which would require tweaking that section’s dimensions. I have two questions: First, Can you share the dimensions with me? I searched all over and can’t find them. I also downloaded your design to Sketchup but I can’t see the dimensions.
Second, how are you venting the refrigerator? Does it get hot in that location right behind your driver’s seat?
Hi Jay,
You can certainly change the dimensions of the framing to accommodate a different fridge, or for any reason. The exact dimensions are built into the Sketchup model…you can use the tape measure tool to measure any dimension you like. If you’re not interested in messing with the model let me know what specific dimensions you need and I will do it for you.
For ventilation, the refrigerator is sitting about 3/4″ off the floor and I drilled holes in the internal structure of the van directly behind the compressor to give it more room to breathe. In addition have a mesh panel approximately 12″x12″ in the side panel of the galley to allow plenty of airflow. I don’t seem to have any issue with adequate ventilation. -Ken
Awesome, thanks. Honestly just couldn’t figure out how to measure with Sketchup so I will use the tape and see if it works. Thanks also for the tips on ventilation!
Just want to make sure you saw this article with the appropriate lengths and the cut sheet: https://ourkaravan.com/8020-cost-and-weight/
Doh! I missed your note on the article with appropriate lengths. I created my own google sheet, but then just eyeballed my longer lengths to make sure I had enough 97″s. In some areas I had to add a 48″ here and there. You’re a lot smarter than I, so this would have helped! Mine got kind of complicated because I had some black bi-slot lengths laying around from a roof-rack that I didn’t use, so I used those in hidden locations around my electrical system/bench seating and my galley.
Hi Jay, I will make an edit to the article to reference the cut sheet. I’m sorry it went unnoticed until now.
Thanks again for your support of our site! Feel free to message if anything comes up. -Ken
Thanks Ken, I used your links to Amazon to buy all of my hardware, angle, and 80/20 as well as the fiberglass thermal break.
Thank you Jay, we very much appreciate your support! -Ken
Hello- we recently purchased a 170ext Sprinter and are diving in on 80/20. In one of your videos you said you were originally ordering from a certain company but they had bad returns and customer service. Which company was that? Was it the literal [website] company? I have found a company called [website] that has really good pricing, but wanted to make sure it wasn’t the company you said to avoid. Thanks so much for your videos and this site!
Hi, The company I had trouble with was Fastenal. I’ve ordered from Amazon ever since. I did have an early order direct with 8020 but their website can’t calculate shipping whereas amazon recalculates the shipping every time you add more product.
I love your videos, they have been incredibly helpful. It was your cabinet video that convinced my wife to let me build rather than buy. So, thank you for that. Could you tell me what thickness of plywood you used? I searched but was unable to find it
Thank you
That’s great to hear, thank you! I use 1/4″ plywood for the sides of the cabinet, and I used 3/4″ for the cabinet faces. I would have preferred 1/2″, however the hinges I used need about 1/2″ depth for the hinge cup, which wouldn’t work on 1/2″. Overall I think the move from 1/2″ to 3/4″ only added about 12 lbs to the entire van build since there isn’t a ton of wood. The great thing about 80/20 is the wood faces are not structural and can be as lightweight as you want them to be. Good luck and take care! -Ken
Ken, one of the best things about your site (and there are MANY!) is how responsive you are too those of us in this community. While I don’t have any specific questions yet, I know I will and it’s heartening to know that we can come here and very likely get a question answered by you. It’s wonderful to get a glimpse into you guys enjoying the delicious fruits of your labor, too, after so much hard work and meticulousness (I watched your CO video last night). World’s love to bump into you guys ok the road sometime… If you’re ever up in the Portland area needing a place to park or some romping buddies, just let us know!
Thank you again Tamara…very much appreciate the offer! The Colorado video is my favorite so far. I enjoyed the process of shifting from a DIY-style video to something that required a little more creativity. I appreciate the feedback too and will keep at it. Keep in touch and GLWYB (good luck with your build)! -Ken
Great explanation of everything. If I may ask, what type of carriage bolts and nuts were used? Were they nylock? Any info would be appreciated!
Hi Gerry, thank you. I used 5/16-18 bolts, 3/4″ long, as well as nylock nuts. No issues whatsoever! In case you were not aware there is a pre-cut version of this galley that is also available. -Ken
Hi! Love your site and spending hours on it! So inspiring. ❤️
I’d really like to use the 1” 8020 for both our galleys to save both weight and money. Do you think the Blum drawer kits would work with this size? Thanks!
It should work–similar idea, you are simply bolting the slide to the t-slot of the aluminum. I’m quite certain the M4 roll-in Tnuts I used to secure the drawer slides to the 80/20 are also available for the 10-series. Thank you for the kind words!! -Ken
hi Ken,
I am having heck of a time trying different finishes on the the plywood i am using, (nice Baltic birch) can you share what you used (poly, varnish, epoxy) to finish the vertical surfaces like drawer fronts, and galley cabinet top, etc.
Hi Peter,
I used Minwax semi-gloss polyurethane. It protects the wood and gives it a bit of a gloss without.
Hi Ken,
Where did you get your Plyboo plywood for your build? I also live in NorCal and would like to purchase.
Hi Jean, I have purchased through both Hughes Hardwoods in Rancho Cordova and Auburn Hardwoods in Auburn, CA. Most any good hardware store should be able to order Plyboo bamboo.
Good luck! -Ken
Hi Ken. My name is Johanna,Im from South Africa. My husband is imterested i building a van. Pls could we have the address or email to order the cupboards. Would really appreciate it. Regards Johanna
Hi Joanna, I apologize for the delay in responding…I left on vacation the day you messaged. The kit is available here: https://store.heitek.com/products/HTA-CSL-011321-100-00B. Please let me know if you have any questions. -Ken
The (your) (I know it’s separate vendor) kit just arrived today! Woohoo!! It was shipped promptly and packed like it was done by a Sgt Loadmaster. No instructions included?, I’ll find on your site since I’ve seen before. Also no confirmation when I ordered, or on the pack slip, on whether they made the custom width cuts (or not) – I’ll find out soon.
Hi, I think you mean this? https://amzn.to/3sGDL4Z Shurflo used to include two of them with the pump. Is that no longer the case? -ken
Great info, how did you attach the 80/20 to the van?
There are many ways to do this, but for the galley cabinet I put 5/16″ carriage bolts in the back-facing slots of the 80/20 and put them through holes I drilled in the interior sidewall of the van. I used some large washers and nylock nuts to secure it. Alternatively you could use angle brackets and bolt to the van wall, you could bolt it to L-track, plus nuts, etc. I also used angle brackets that go through the stock floor tie-downs to secure it to the floor. I hope that helps.