

Background
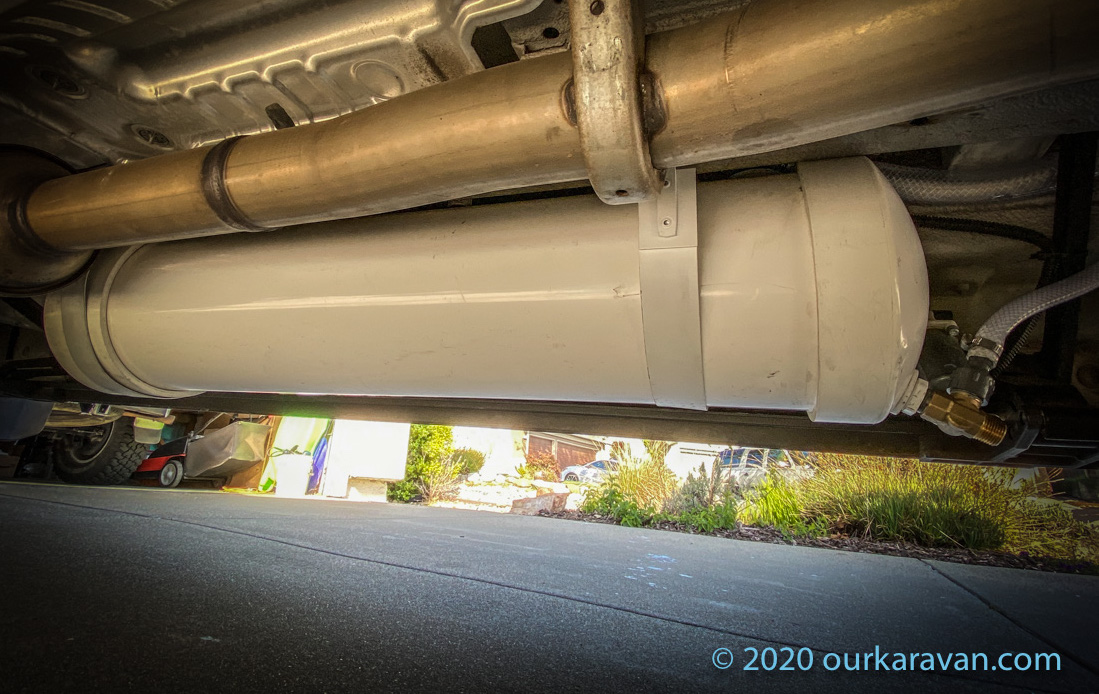
We built a PVC water tank for our van to provide water to our shower system. The Karavan has two separate water systems. Our sink is supplied with drinking water from a portable jerry can system. This system is located inside the van where it will not freeze and is easy to keep clean. To save valuable space inside the van, we placed our shower water tank under the chassis. The tank was added on the passenger side to keep the side-to-side weight of our van balanced. The space is narrow and our Amp Powerstep folds in this space, adding additional limitations. We found it necessary to build our own tank in order to maximize water capacity. 8-inch PVC pipe was our best bet at maximizing capacity in this tight space.
Why Use PVC?
The only real reason to build a PVC water tank is because there are no production tanks that offer the capacity and size you need. We searched everywhere for a long, narrow tank, and none had the right shape and capacity.
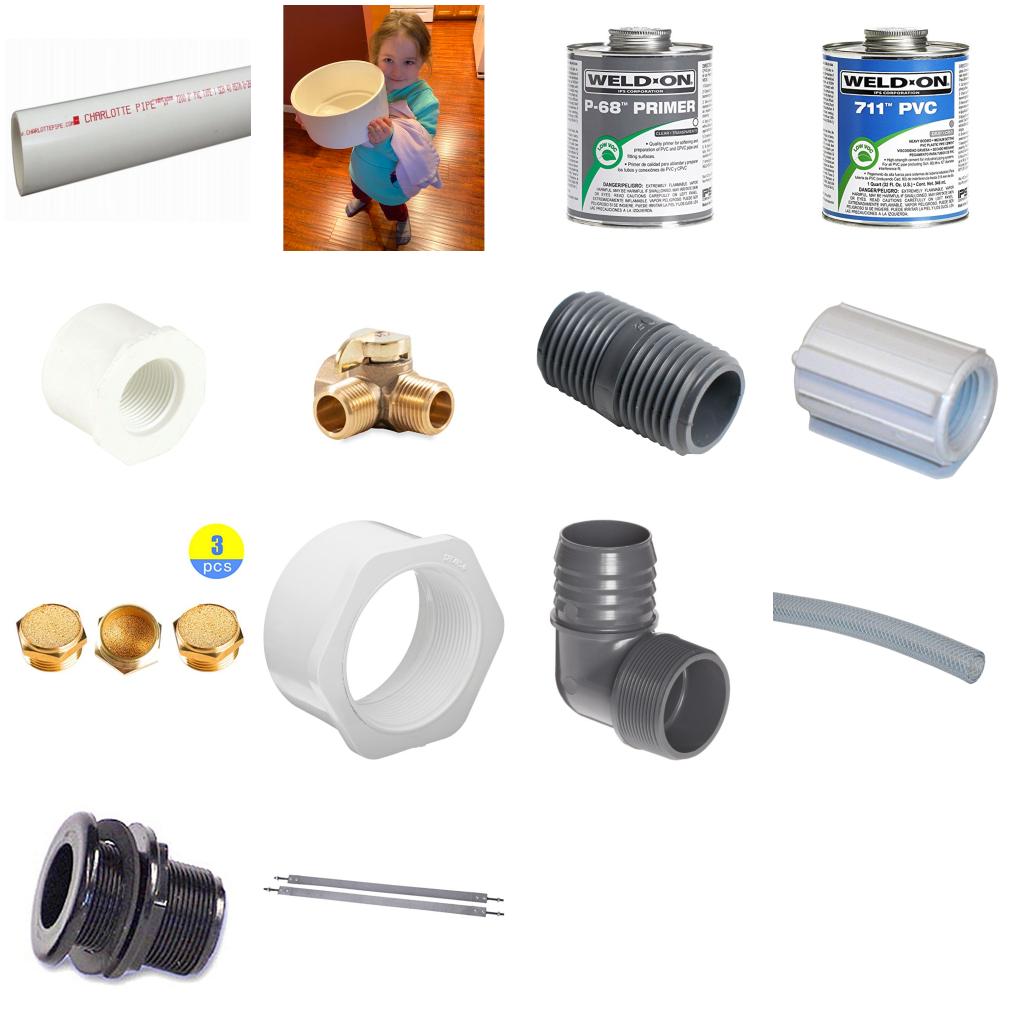
Some advantages of using PVC:
- PVC is easy to work with;
- Tank can be sized to your exact specification, maximizing water storage;
- BPA-free and most drinking water rated (we used pipe designed for drinking water well casings);
- Thick walls mean you can mount the tank using compression and can also pressurize the tank up to 160 psi;
- Thick walls also prevent light from entering, helping prevent algae growth in the tank;
- Most fittings available at local home improvement stores (NOT true for the pipe itself when >6″ diameter);
Some disadvantages of using PVC:
- You have to build the tank;
- 6″ and larger pipe usually only available at commercial pipe warehouses*
(we obtained ours from Ferguson’s Plumbing Supply in Sacramento, CA
Note: This site contains affiliate links for which I may be compensated.
Plan the Water Tank Placement
Begin by measuring the proposed tank mounting area. We found that we had 40-inches total length between a frame crossmember and the rear leg of our Amp Powerstep for a tank. 8-inch PVC pipe has an internal diameter of 7.942 inches. An an online calculator was used to determine that the pipe with the bell-shaped end caps would result in about 8.8 gallons of storage.
Plan the Tank Mounting System
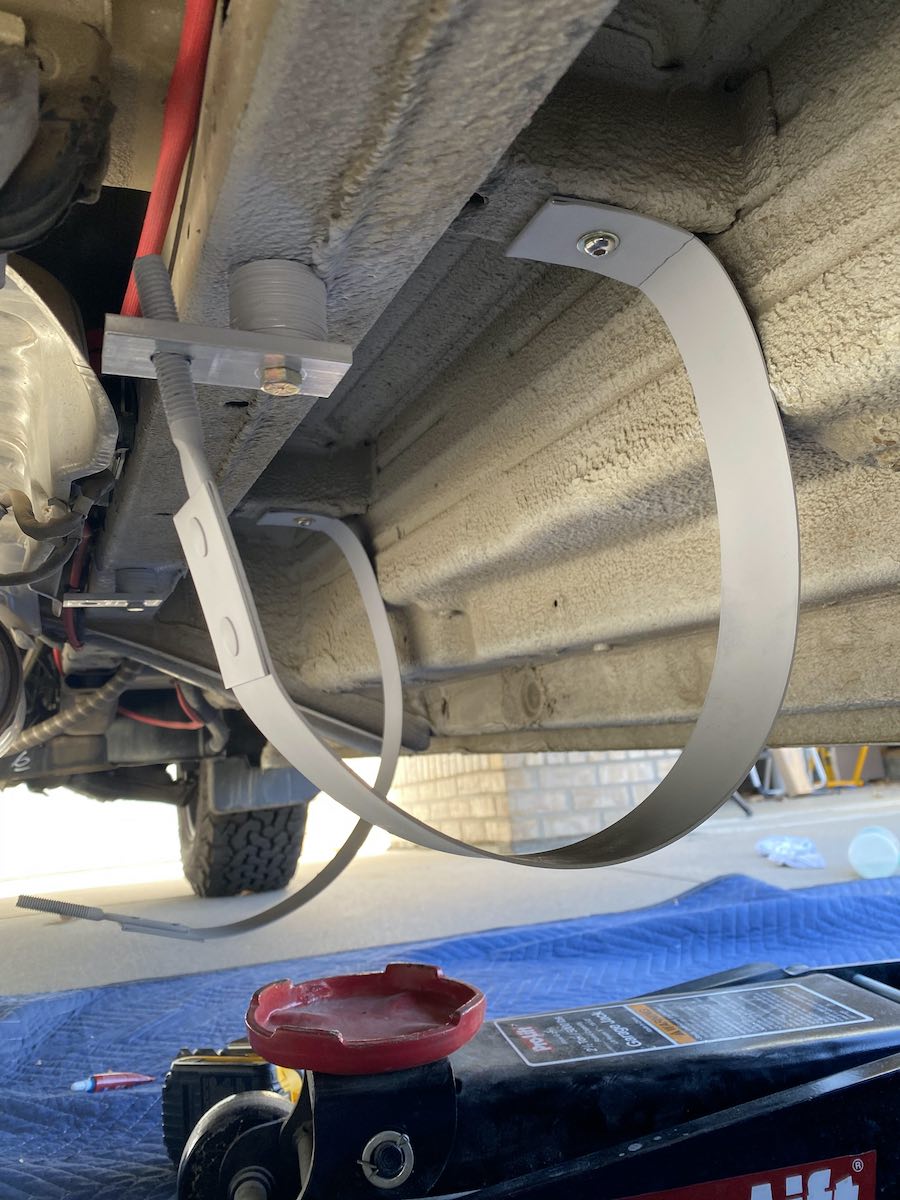
Prior to building the tank you should design the mounting system. Many people use galvanized pipe strap to hang their water tanks. We would not recommend this method, but it seems to work for others. We used 25″ long fuel tank strap set, available for just over $20 on Amazon. The steel of the strap is thick enough to use bolts on one end yet thin enough to conform to a round tank. They also have adjuster mechanisms on one or both ends, ours had an adjuster rod with cinch bolt.
Not Plug and Play
Please keep in mind this is nowhere near a plug-and-play install. Our van is unique in that it had steel strap running in the tank cavity for our sliding seat rails. This allowed us to weld some mounting tabs directly to it. That said, our friend concurrently constructed his tank for his Sprinter and used a different approach. He used the same strap we did, but installed plusnuts in the van crossmember to hold one end of the strap. He bent a bracket to accept the adjusting end of the strap. This tank install can be seen near the end of the YouTube video we posted above.
To make your install easier, we would recommend using a longer strap. We used the Spectra ST07, which is 1.75″ wide and 25″ long. However you may consider using this extra long 44″ strap for increased flexibility. You can cut one end off as needed. Here is a photo from one of our user’s using plus nuts in the frame and cross member and a cut-down 44″ strap.
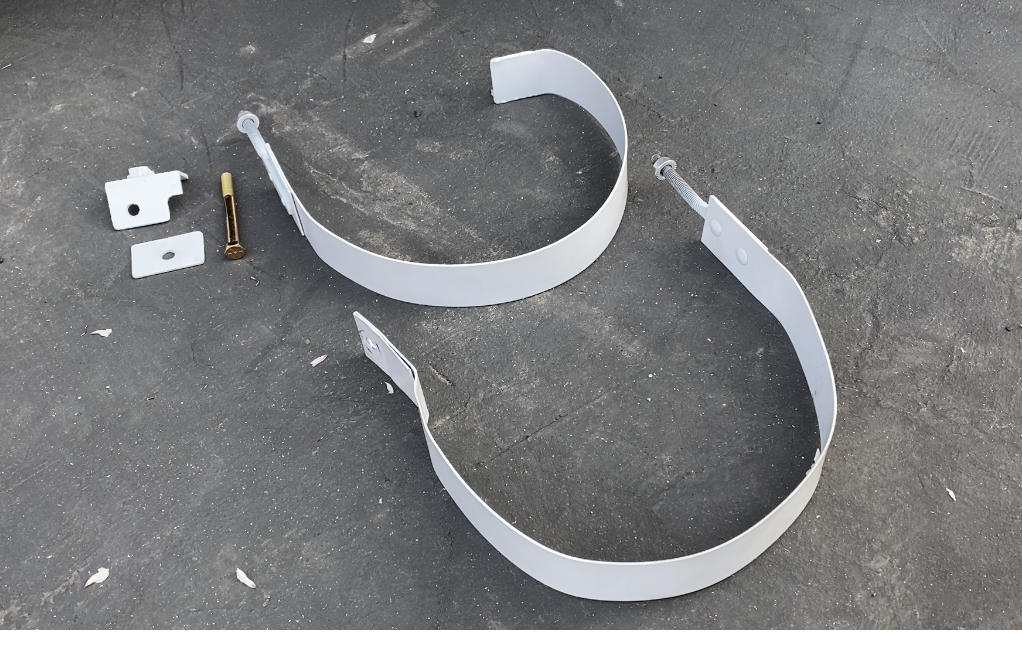
Mounting Tabs from Angled Steel
We were able to use existing holes in the frame for the adjuster side of the mount. First we obtained a bolt long enough to pass through the vehicle frame. A small plate with a hole serves as a washer. The hole in the frame is much larger than the bolt, hence the use of the plate. On the other side of the frame is an angle bracket with two holes. One hole accepts the bolt through the frame, the other accepts the adjuster mechanism of the tank support. We welded a nut to the bracket to accept the bolt through the frame, however this is not required. Be sure to offset the holes so the bolt though the frame does not contact the bolt of the adjuster mechanism. One of the two brackets is shown above.
Designing the Water Tank
Your PVC storage tank can be used for either fresh or gray water. Ours is being used to store fresh water for taking showers. We built our tank side-by-side with a friend who will be using his for gray water. The fresh and gray water tanks are of the same design. If your sink is on the passenger side of the van, using this as a gray water tank is a perfect solution as there are no tanks designed to go in this location on a Sprinter van.
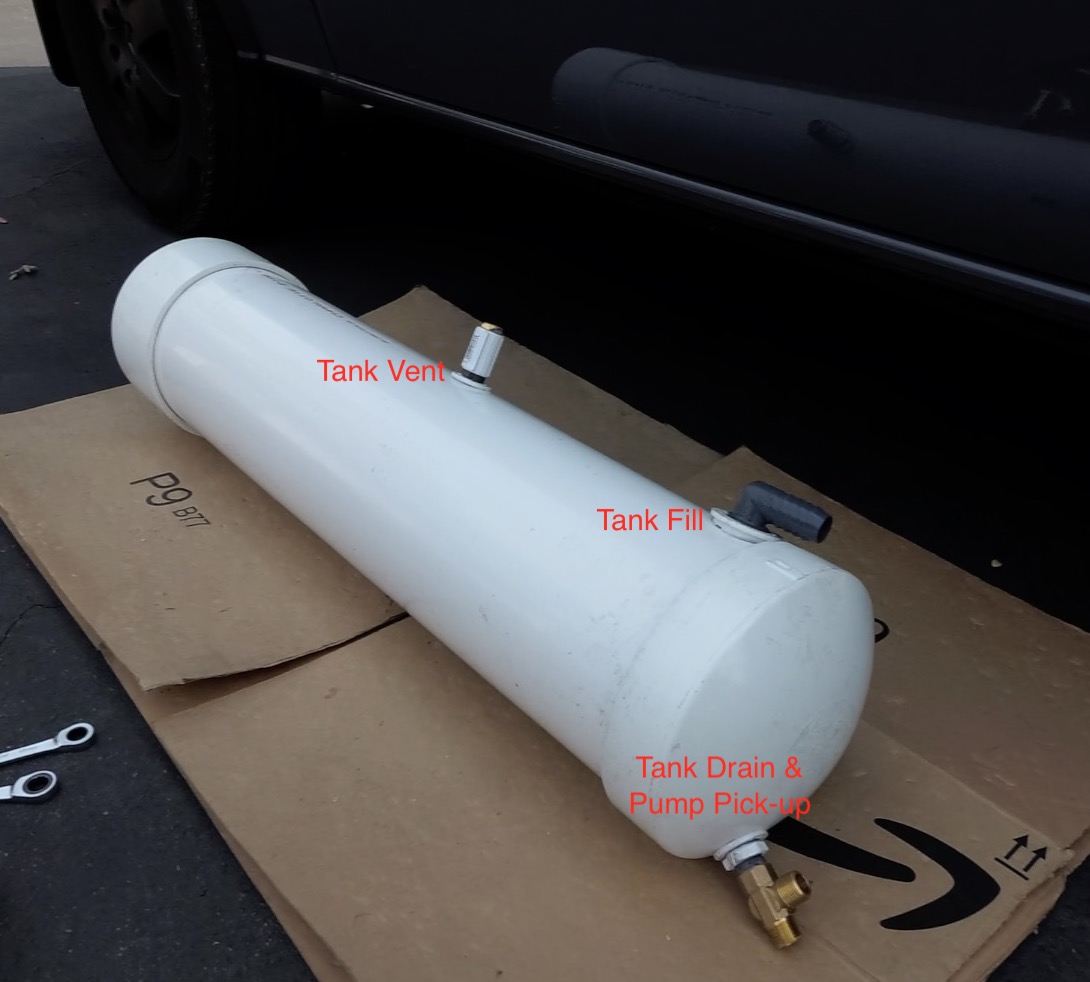
Your tank will require a way to fill it, a way to drain it, a vent and a pump pickup if being used for fresh water. The vent is required for the water to displace the air when willing, and the opposite when draining.
Cutting the PVC Pipe
Once you have calculated the total length you have available for the tank, cut the pipe accordingly. Be sure to account for both the thickness and the bell-shape of the PVC end caps. We used some flexible strap bent around the pipe to mark the cut with permanent marker. The PVC was easy to cut with a handsaw.
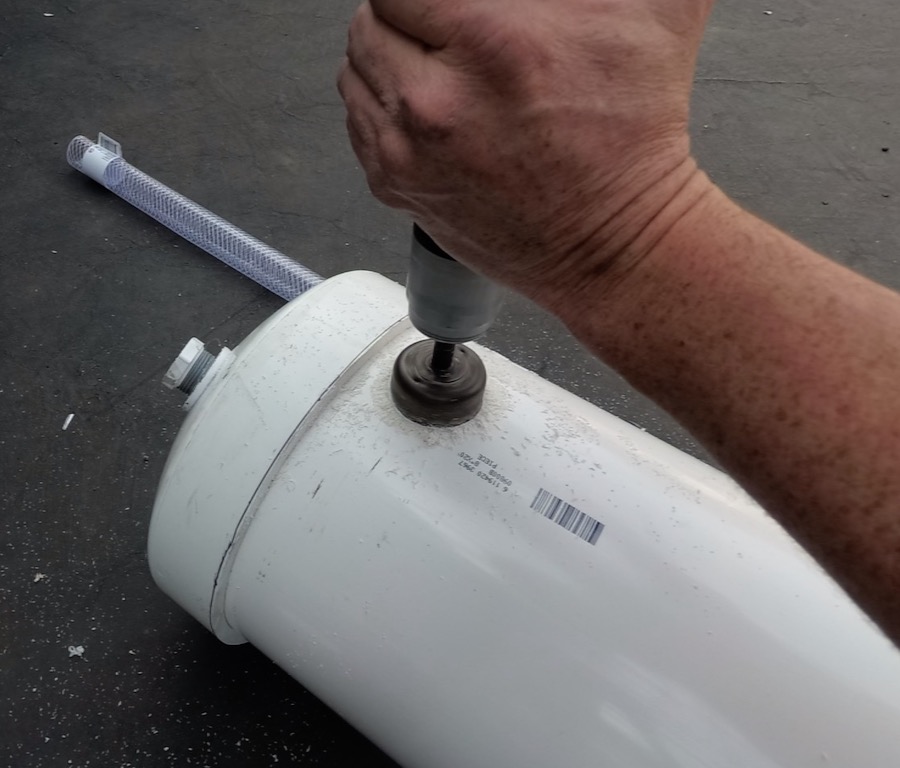
Add the Tank Fill Fitting
Our tank will be filled through some fittings inside the sliding door step. It made the most sense in our install to put the tank fill fittings as far back on the tank to reduce the length of the tubing. The PVC end caps are deeper than they need to be for this application, so we cut the rear end cap down. With the end cap temporarily in place, we marked a location and drilled for the tank inlet. We used a hole saw with a pilot bit to drill a hole to accommodate the 1″ NPT bushing. You want the fitment to be tight, so use a file to ease-up to the correct size hole. You don’t want to rely on glue alone to seal your penetration.
We cut the threaded bushings down to they are slightly thicker than the thickness of the pipe. This was done so the extra length of the bushing didn’t create a small standpipe inside the tank and prevent a full fill.
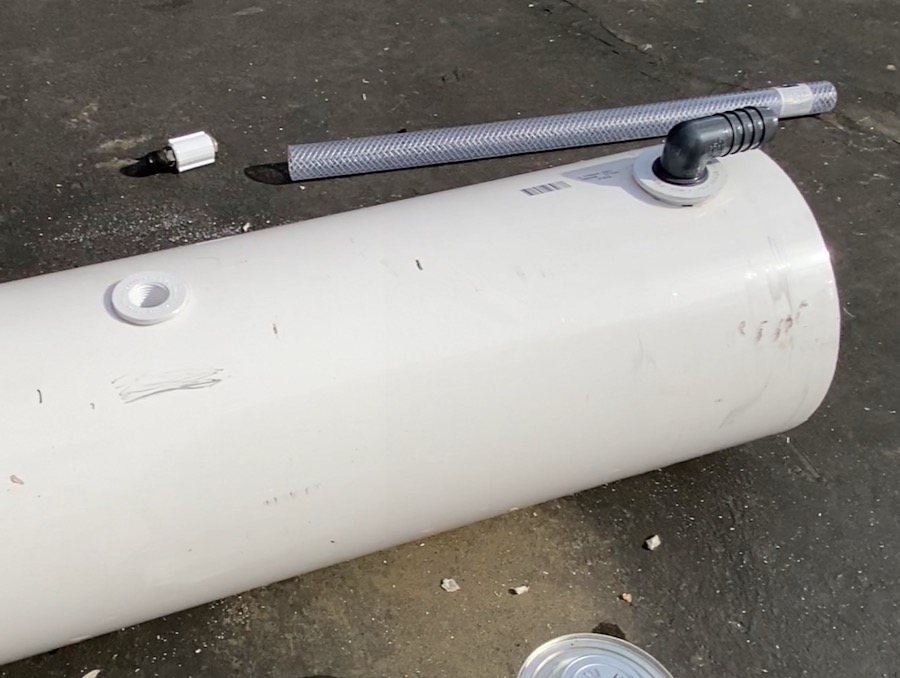
Before you glue in the fitting, put teflon tape on the 1″ elbow and secure thread into the 1″ bushing. This will allow you to glue in the bushing and ensure the elbow is pointed the correct direction. Put primer on the bushing and around the hole, then add the glue and quickly glue in place.
Add the Tank Vent Fitting
Using the same method as before, cut down the 1/2″ bushing and primer and glue it into the PVC pipe. Orientation does not matter here because no elbow is being used, just a plastic riser. When gluing be sure not to get glue in the threads!
The air vent should be as high above the tank as you can get it. We didn’t have room to go much higher than the height of the riser and the female to female coupler, but so far we haven’t seen any leaks through the vent. It’s possible that on really steep terrain that water could seep through the vent. Threaded fittings were used so if this were ever the case the riser could be swapped-out for an elbow and some tubing run up high into the engine compartment. We wanted to mention this as a possibility depending on your use case.
Put teflon tape on both ends of the riser and thread into the bushing in the tank. Thread the female to female coupler on to the riser and thread the air vent into the adapter.
Modify End Cap for Drain/Pump Pickup
A bushing should now be installed in the cap to allow the tank to drain. Orient it as low as possible, but be sure to account for the shoulder inside the cap. If this is being used as a gray water tank, we would probably use a 3/4″ bushing coupled to a 3/4″ electric ball valve to drain it.
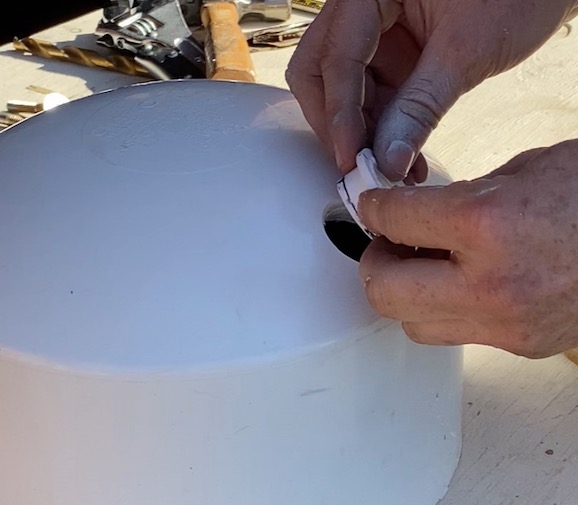
However our tank is being built as a fresh water tank. We have a 3/4″ bushing in our end cap, along with a 3/4″ to 1/2″ reducer to enable use a 1/2″ diverter valve. The diverter valve allows us to use this one location to act as both the drain and the pump pickup. You could simply use a 1/2″ bushing here instead. The thing to note here is the diverter valve is not high flow and thus the tank drains somewhat slow. Not a concern for fresh water, but there’s no reason to use a diverter valve unless you are building a freshwater tank.
On our setup the “straight-through” flow setting on the valve would drain the tank. The second output on the valve points up and this is where our freshwater hose routes to the water pump.
Glue on the End Caps
Once all of your desired fittings are installed in the tank, the end caps can be primered and glued in place. Be sure to be quick about the gluing, and have a rubber mallet handy just in case. Ours slid on easily by hand. Be extra cautious not to get glue in any of the threads. Also be sure you have the drain oriented at the bottom.
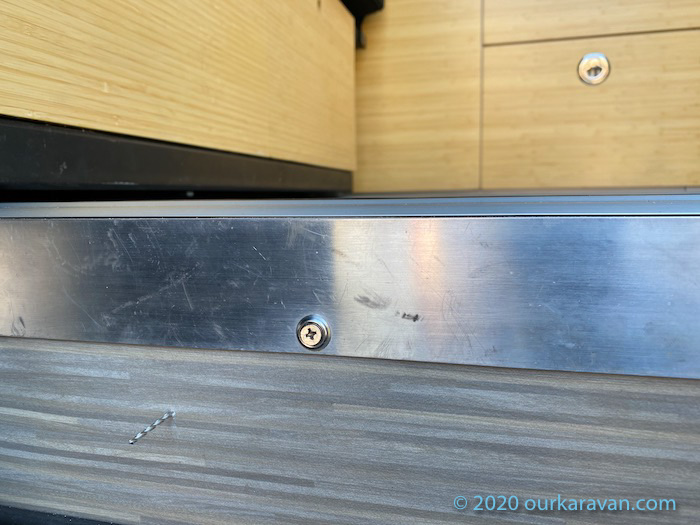
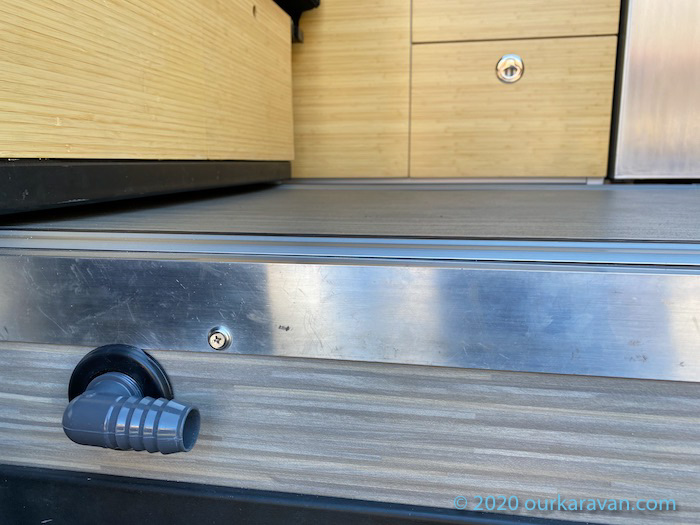
Install the Bulkhead Fitting in the Stepwell
Mark and drill the van sheetmetal for the bulkhead fitting. Be sure to leave enough room to spin the threaded locking ring in place. Also be sure to paint the bare van steel so it does not rust. The bulkhead fitting with the two 1-inch NPT elbows can now be threaded in place. We are still finalizing our design for the fill to accommodate both a pressure and gravity fill.
Great Job Ken!
What do you figure your capacity is on that tank?
Thanks!
Hi Phil, 8.8 gallons. I was limited to 40″ total length due to my Amp Powerstep. I think I figured a little over 12 gallons if you went the full length of the cavity.
Very creative and inexpensive idea! Thanks for sharing it. Did you consider putting in any water level sensors into your tank? Or some baffles to slow down sloshing especially when driving? Or a more flush water intake, especially given where you have placed it?
Hi Mark, thank you. Water level sensor is on the list. Can be as simple as a site gauge using clear tubing on one of the end caps to an ultrasonic system…some will read through tanks as thick as 3/4″. I just haven’t implemented one yet.
Sloshing hasn’t been an issue, I haven’t heard it once.
As for the intake, there will be a future shoe cabinet in that location and the final fill will be fitted to the side of that cabinet. I hope that helps! -Ken
7.5″ Fuel/Water Level Sending Unit – Genuine Marine S3 Electical Liquid Level Gauge Sensor Sender Unit for Truck, Generators or Gen Set, Bus (Standard American 240-33 ohms, 316 Stainless Steel)
Are you at all concerned about how close your Gray water tank is to the muffler? Can you send me an email at billyg813@gmail.com with thoughts?
No concerns. I did originally purchase some self-adhesive radiant barrier to apply to the side of the tank, but I’m finding it unnecessary to use it. You always could though.
Thanks. Mine is not pvc, but the plastic molding. Might as well add the extra layer of protection
I find this adhesive-backed heat barrier to be a good product: https://amzn.to/3cGvuGc
You mentioned that your fresh water is inside so it doesn’t freeze. What type of freeze prevention did you do for this tank and fittings?
None. If the water in this tank freezes it means I won’t be taking a shower. (Probably wouldn’t be taking one anyway if it were that cold.) My drinking/sink water is inside because if it were to freeze it would be a much bigger problem. This is one of the reasons I use a split system. I hope that helps! -Ken
If that tank froze, would it not split?
It’s below freezing at my house now and nothing has happened. But it makes me wonder, what happens to any RV tank when they freeze?
Hey Ken, thanks so much, I have ordered all the parts on your list and will make mine the same size given I want to put in the same AMP step. I was curious, did your buddy who built his for grey water put in a P-Trap to reduce smell? Trying to figure out what to do there. Thank you, can’t tell you how much time you saved me with all your videos
Hi Nick,
We both used the same Camco drain system, which has a shallow trap built-in. https://amzn.to/2PfGTRi It’s inexpensive and works well. Here’s the link to the entire water system store, in case you need the sink strainer and other parts: https://kit.co/ourkaravan/sink-and-water-system
Thank you for the kind words and for helping support Ourkaravan.com! -Ken
How did you connect the water pump between the sink and the shower?
Hi Khala, The pump only has two wires, a positive and negative. You can simply connect a switch across either the positive or the negative wires to open and close the circuit. I hope that makes sense. -Ken
The menu states this is also for grey water. Did you build a similar tank to catch the galley’s drain water and I missed it? In your kit I saw your part coming off the drain and into the floor.
Your site and videos are excellent and a contribution to the builder world – thanks.
Hi Tim, thank you for the kind words. I built this tank as a fresh water supply, but the leftover pipe was used to build a gray water tank for my friend’s van. They are functionally the same. -Ken
Thanks Ken this is such a great idea. I want to build one but not having any luck finding a place that is willing to sell me the 8″ pipe under 20 feet. I also called Ferguson no luck. 🙁
Probably depends on how lazy the staff are. I know a few others have obtained this pipe from Fergusons with no problems, but I guess it comes down to who’s working that day. 10-feet is their stated minimum.
One word . . . .GENIUS! :))
🙂
In your after 5 year with the Van video you mentioned someone was making a tank for this location now. I was planning to build two (both sides) like yours. But would be interested in knowing what’ else is out there. Can’t seem to find it online. Could you please share and save me some time… Thanks
For sure, it’s made by NW Conversions, and you can find them online.
I found it interesting when you said fresh or gray water can be stored in your PVC storage tank. I used to think differently about this and now it makes more sense. What you said about portable water storage tanks was really interesting to me.
At the same time I built my PVC freshwater tank my friend was simultaneously building one to use as gray water on his van. Works great!
Been following your build from beginning, thanks!
In process of installing the NW Conversion 11 gallon tank and I want the fill to come out the step like yours but did you ever figure out a thread in attachment to be able to fill with water jugs etc. We are never near a spigot…
Hi, I almost always fill with water jugs. I unscrew the brass cap at the end and insert a small funnel and fill that way. You should be able to do the same with your tank.
Thanks for following along! -Ken