
Simple Van Water System
Simple Sink Water System (Van or RV)

Background
The Karavan traveled over 10,000 miles before it was ever graced with a sink and water system. This gave us a lot of time to consider our needs and come up with a water system that would work best for us. We learned that portable, easily-refillable jerry-can style containers were just the ticket for our needs.
The Portable-Style Water System
A portable-style water system utilizing “jerry cans” has been a vanlife favorite for years. Most jerry cans are between 5 and 7 gallons in capacity. We often see these systems utilizing one or two jerry cans. Clearly this arrangement will result in lower total water storage than a typical RV with large bottom-mounted tanks. But perhaps there are some advantages that outweigh the lower capacity? This was certainly the case for us.
Pros of the portable water system, as we see it:
- Can be filled anywhere that water is available, including grocery store bottle fillers. Not dependent on available hose threads on the water spigot or ability to get the RV close to the water source;
- Easy to service. We remove our portable containers after each trip and let them completely dry-out. No worries of mold. The water lines are short and oriented in a vertical fashion, draining/winterizing takes only seconds;
- BPA-free tank construction;
- Tanks stored inside, no freezing (can be done with large tanks too);
- Simple to implement;
- Scalable–you can bring as many water containers as you desire for the type of trip you are taking.
Note: This site contains affiliate links for which I may be compensated.
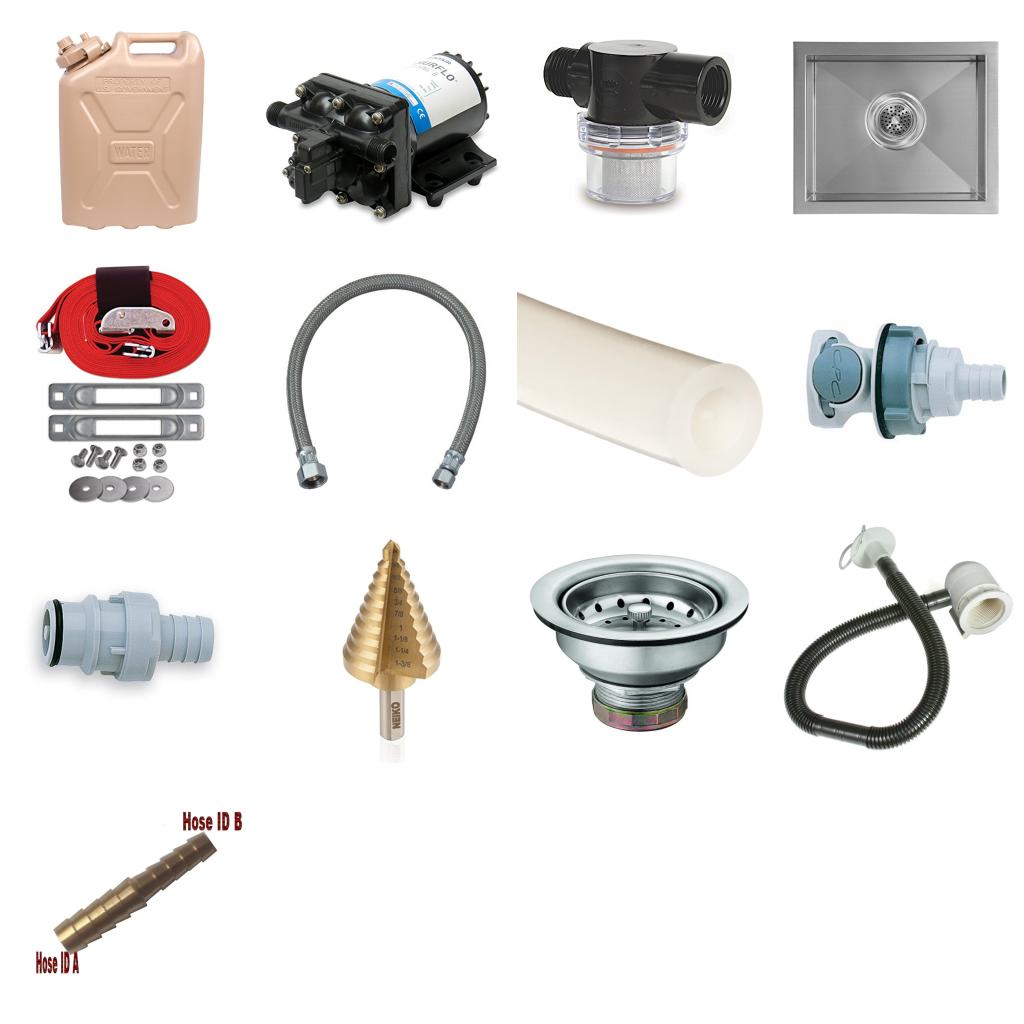
Parts required:
- 5-gallon Military Water Can
- Shurflo Water Pump
- Shurflo Water Pump Strainer
- Pump-to-Faucet Water Supply Line
- Dip Tube and Pre-Pump Food Grade Tubing (select 1/2″ inside diameter, 3/4″ outside diameter)
- Female Quick Release with Check Valve
- Male Quick Release with Check Valve
- Hose clamps and a 1/2″ barbed T-fitting
Tools required:
- Drill with Step-Bit
- Hacksaw
- Screw Driver
Optional:
A Note About the Water Containers
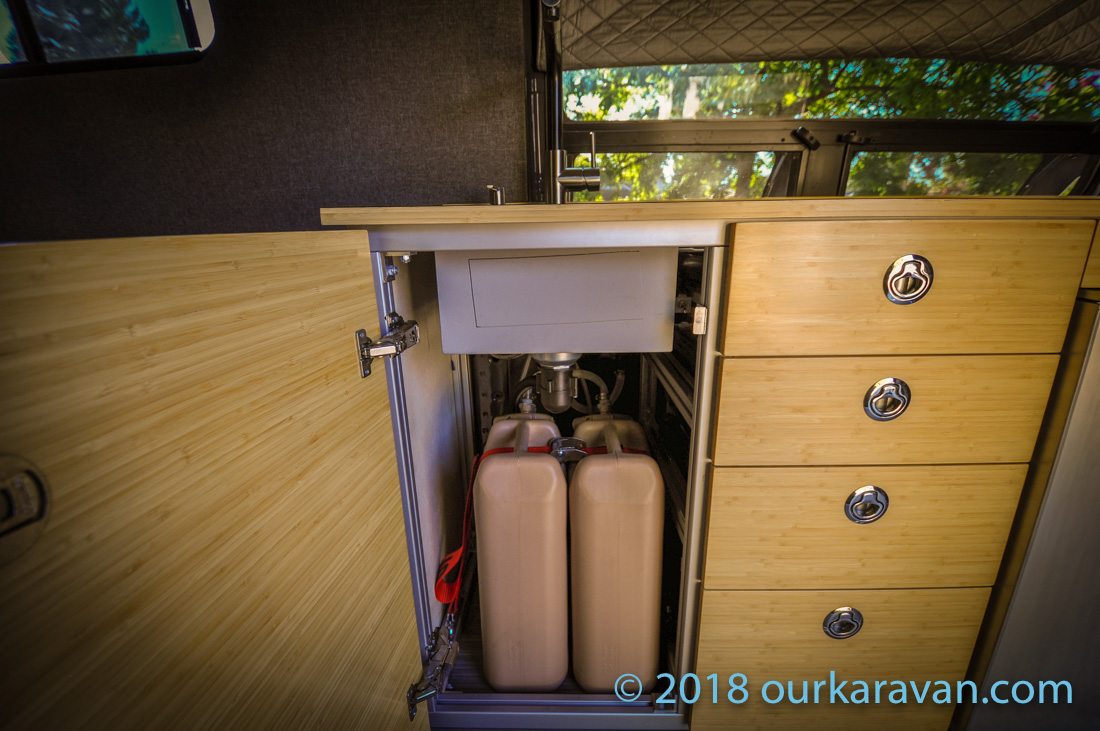
In the Karavan, we used two 5-gallon Scepter-style jerry cans. The U.S. military adopted Scepter’s cans as the new standard in the 1980’s, converting from metal to plastic. We chose the LCI 5-gallon jerry cans, which are either the same can issued to the U.S. military or at very least built to the same specifications. The Amazon reviews are very good, and we are very happy with the quality of the containers. These containers are leak-free and also have an integrated air relief valve to allow air in or out of the containers as they are being depleted or refilled. The 5-gallon size is relatively easy to transport when filled with water.
How to Implement the Jerry Can System
Refer to the Video Below. In short, you will remove the jerry can lids and cut off the threaded spout. Enlarge this hole to fit the female quick release mechanism. Next you will take the food grade tubing and insert one end onto the 1/2″ barb on the inside of the quick release you just installed. Cut to a length to allow it to touch the bottom of the jerry can. You now take a length of the tubing and push the male quick release on the end. Secure with a clamp. (Repeat again if using two jerry cans.) If using two jerry cans, extend enough tubing to reach a standard 1/2″ barbed T-fitting.
Two ends of the T connect to your jerry cans. The remaining end of the T connects to the 1/2″ barbed fitting on your water pump. Now screw on the stainless steel water line to the output side of the pump and connect it to your faucet. If, like us, you have no hot water at this time, you can simply attach the hot and cold lines to the faucet together. This will allow the faucet to expel water whether the handle is directed to the hot or cold side.
Water System Video on YouTube
Sink Plumbing Diagram
In the adjacent photo, the red lines are your suction lines that are T’d together and connect to the pump strainer (a filter). The strainer is connected directly to the pump inlet. After the water is lifted by the pump and pressurized, water leaves the pump outlet through the green stainless braided line. This connects to a T-fitting from the hardware store. Connected to the T are the hot and cold water lines (the yellow lines) that should come as part of the faucet assembly. If you eliminated the T and connected straight to the cold water line, your faucet would work on cold but not provide any water in the hot position. Tying these two together will provide water regardless of the faucet temperature setting. Finally, the blue hose is simply the pull-out faucet and is part of the faucet assembly.
Water Pump Electrical
Wiring the water pump is simple. There are two wires, a positive and a negative. The positive line is hooked to the Blue Sea fuse block that is located behind our galley. This provides a fused positive 12V power supply to the pump. The negative wire runs through a simple toggle switch (water pump switch) and the other end to the ground block of our Blue Sea fuse block. Done.

Faucet, Sink and Drain
Our faucet has been discontinued, however this pull-down faucet is very similar to what we use. (We rarely recommend products we aren’t actually using, but with good reviews and the Amazon return policy, the risk is pretty low.) The bar-style sink uses a Moen strainer connected to a Camco RV drain. Water temporarily drains to the ground through a hose. We put a container under the van to capture this water at this time. We will provide further information on the gray water system once it is in place.
Portable Water System Maintenance
Keeping the Water Containers Clean
When we return home from a trip, we open the cabinet below the sink and remove the two water containers. We remove the lids and dump the remaining water. At this point we usually turn the containers upside down in the kitchen and let them dry for a day. The screw-top is large enough that you can easily fit your entire hand and towel inside if you choose to dry them on-the-spot.
Keeping the Water Supply Lines Clean
The water lines connect to the two jerry cans using quick connects. One button push is all that is needed to disconnect the two supply lines from the jerry cans. The quick connects have built-in check valves so water does not drain from the lines when you disconnect them. That’s great for not making a mess, and also great because when you refill the jugs there is absolutely no priming needed to get the water flowing again. But when we arrive home from a trip and remove the jerry cans, we push on the ends of the check valves to completely drain the lines between the jerry can and the water pump. To drain the water between the water pump and the faucet, we simply turn on the faucet until the pump has drained all the water.
Taking these actions ensures that your water containers and lines are clean and suitable for drinking. Food-grade silicon tubing is used on the suction side of the system to eliminate rubber hose-type odor. Braided stainless lines are used from the pump to the sink. (The silicon hose is fine under suction but will not hold pressure.)
Water Systems we Ruled-Out
Cleanliness
A typical RV water system may include a relatively large (30-45 gallon) polyethylene water tank strapped under the vehicle. This type of system will yield the highest volume of water storage, but there are some down-sides. The first is tank cleanliness. With an externally-mounted tank, it is very difficult to completely evacuate both the tank and lines of water. It’s often the small amount of water left behind that encourages mold growth. Of course you could leave the tank full, but many of us van owners use our vans for far more than camping, so you’re lugging a bunch of water weight around when it’s not needed. A person that wants to be really on-top of this would add a small amount of bleach to the water tank to keep the mold growth down.
Bisphenol-A (BPA)
BPA stands for bisphenol A. BPA is an industrial chemical that has been used to make certain plastics and resins since the 1960s. Some research has shown that BPA can seep into food or beverages from containers that are made with BPA. Exposure to BPA is a concern because of possible health effects of BPA on the brain, behavior and prostate gland of fetuses, infants and children. Most RV water tanks are not BPA-free, so it may be advisible to carry separate drinking water containers if you have a standard RV water tank.
Freezing Water Lines
External water tanks and lines are also subject to freezing in cold conditions. Depending on the climate in which you are traveling, you may not have running water for part or all of the day. You could install heating mats in the tanks and on the lines, but now you’re increasing complexity and adding additional load on your electrical system.
Where to Fill Your Tanks?
Finally, and the most substantial one for us, is the difficulty in filling a tank of this sort when you’re out traveling. If you take relatively short trips, you may have enough water storage for this to not be an issue. In our case, we love taking extended trips to remote destinations. What we have found is finding a source for filling a large RV water tank can be challenging. Many campgrounds we visit have signage discouraging dish washing and filling RV water tanks. Some have water spigots that lack the threads needed to connect a hose to reach your RV. It’s enough of an issue that many companies sell a product called a “water bandit” that help you gain access to water in these situations, but the point is, it’s discouraged.
If you need a high capacity water system, your needs may out-weigh the downsides. In our case, we knew a standard RV water system would not be best for us.
Hot Water
We find that we do not require hot water at the sink. You could certainly use the supply from the jerry cans to feed a hot water heater, if you desire. For dishwashing in the sink, our electric water kettle would heat water more quickly and efficiently than an RV water heater. We realize this is not for everyone. In case you are wondering, we installed a separate water tank under the van (to conserve space) specifically for heated shower water.
Help Us Help You
We offer all of our write-ups and instructional videos for free. A lot of time, effort and money goes into developing and maintaining this website. If you find the information on this website helpful, you may use our various links when you are ready to make purchases. As Amazon Associates we will make earnings from qualifying purchases, however it costs you nothing to use them. Alternatively you may consider using the donate button below to make a simple Paypal payment, or message us if you prefer Venmo. We sincerely appreciate your visit as well as your support.
Thanks for reading and good luck with your water system!
Hey, thanks for taking the time to share your build and travels!
I have been building a similar water system and had the same experience with the water hose options from HD. I have the Everbuilt tubing now and in addition to the smell it is very stiff and hard to work with/route between the pump, etc. I am using your links above to order some parts from Amazon but I do not know what inside/outside diameter of the silicone tubing to order from the options they have listed. I have 1in OD and 3/4in ID for the Everbuilt tubing now to connect to the 1/2″ Shurflow pump and my tank but again it is stiff so I do not know if you went with 1/2″ inside and 3/4″ diameter and stretched it over as your pump and barbs are also 1/2″. Any help would be appreciated. Thanks
Hi Slate, I edited the description in my store to specify the 1/2″ ID and 3/4″ OD tubing. The 1/2″ ID fits both the pump fittings as well as the quick disconnects I am using in my system. They do have a 11/32″ OD but it would give you a thinner wall thickness, hence the reason to go with the 3/4″ OD. I hope that helps and appreciate use of the links, thank you!
Great tips and ideas! Do you have any recommendations on faucets?
Thank you! When I was shopping for a faucet I was looking at both the total height (not wanting one too high) and one that had a throat depth that would center the water in the middle of my sink. I do most all of my shopping on Amazon and simply looked until I found one that met my requirements. Unfortunately the specific one I have is no longer made. I’m not sure how helpful that was but I wanted to explain what I was looking for in a faucet. Happy shopping!
Did you jerry cans come with o-rings installed?
No o-rings. I have not experienced any leaking. You do need to crack open the screw vent at the top to let air in as the water comes out, but I’m thinking those must be baffled because I haven’t seen so much as a drip from them.
I like your galley and love the water system. I am planning on upgrading my 100 amp factory aux battery to a 200 amp system. What kind of amperage does your refrigerator pull?
Also, if I put in a distribution block, I assume I would connect it to the aux connectors under the drivers seat?
Thanks. Love your site.
Hi Joe, the refrigerator pulls 3.6 amps when running. There is an initial compressor start-up that uses more but it’s so quick that it does not register on my battery monitor.
If you want to run accessories from the MB Aux battery, then yes, you tap the connector under the driver’s seat. I am running my powerstep, my audio amplifier and my Espar diesel heater from that tap. I believe there’s a 40A limit at that connector.
Thanks for following along! -Ken
Where did you get the quick connects? Do they have them at Lowe’s or Home Depot?
Want to make they are drinking water safe.
The quick connects have built-in check valves so water does not drain from the lines when you disconnect them.
I have links to all of the parts in this article. HD does not carry them.
Hi Ken!
Superb work and awesome detailed presentation! Also working on a similar system on my 144 MB. Love the sink drain location; can you help in finding the body plug where you fit your drain? Is it a series of plugs situated on the inside face of the side wall? You just punch it or drill?
Thanks, from Quebec.
Thank you! I did a video that shows the entire water system build as well as how to locate the body plug for the sink drain. https://www.youtube.com/watch?v=ddQim8dF4No
If that doesn’t address your question please let me know. No need to punch or drill!! Simply pop the rubber plug out and you have access to the internal wall of the van for running the tubing. -Ken
Thanks for all your work in putting together the site. I have been working on a Sprinter build and your site has been an awesome resource. I am running a very similar water system to you. I am struggling to fish the grey water hose through the body plug. Do you have any tips on how you were able to do it?
Are you using 3/4’OD 1/2′ ID tubing? Did you feed the tube from under the van up behind the galley or from behind the galley down through the hole?
Thanks in advance!
Hi Andrew,
I’ll start by saying it’s an exercise in patience and you’ll be swearing at me for days to come. I popped the body plug out of the bottom of the van, inserted a fish tape (the one in the tools section here: https://kit.com/ourkaravan/van-building-tools ), and fished it up and toward the rear of the van. The fish tape will have to make what is essentially a 180-degree turn up in the wall. If you have a second person it might warrant them reaching in from inside the van to see if they can feel the fish tape. Once it has daylighted I attached a string to it and pulled it through. I very securely taped the string to the hose from under the van, and once inside the van I pulled the hose through. I seem to remember wetting the hose to lubricate it. It wasn’t easy but once you figure out the circuitous route it has to take it’s just a matter of fishing it through.
I want to say you have the hose size right…the OD is almost a perfect fit to pass through the body plug under the van. Take a quick measurement of that and ensure it’s over 3/4″ before buying. Maybe you can report back for others. Good luck!
I haven’t tried it, but you could use a magnet on a string like these internal cable routing tools… https://smile.amazon.com/s?k=internal+cable+routing+kit
I liked what you said about how it would be smart to think about how you will keep your water tank clean. I didn’t realize tath you need to get some chemicals to do that. I wonder if you need to do that with water tanks that collect rainwater.
I believe they make chemicals specifically for the rainwater collection system. But yes, aside from using bleach in your under-mount tanks, it’s difficult to know what sort of condition they are in since you can’t see in.
The sink you used, I purchased as well, but came with some really screwy retainers to hold it in place. Did you use these, others, or use just an adhesive? I’m not really sure what to do or how to mount using the provided clips. Thanks
If you can figure out what those clips do, please let me know! I used sikaflex construction adhesive under the lip of the sink and glued it to the countertop. It’s a permanent installation, and when I remove the countertop, the sink basin comes with it. Just keep that in mind when planning for future repairs/enhancements.
Great stuff, I’ll be replicating some of this into a Ram Promaster that I’m
Thanks Drew and good luck!
KEN,
I AM FINISHING UP MY BUILD. I GOT A LOT OF INFORMATION FROM YOU. THANK YOU!!!! I CHOSE NOT TO INSTALLA PRESSURIZED WATER SYSTEM IN THE VAN. DO YOU THINK I COULD USE THAT CAMCO DRAIN HOSE TO GO INTO A GREY WATER TANK. I DON’T SEE WHY.
THANKS FOR YOUR RESPONSE
I don’t see why not either. The hose itself is rather thin plastic, so I think it’s best to think of it as having a ten year lifespan, so if you intend for it to pass through the floor I would make sure it is serviceable.
This is exactly what we were looking for! Thanks for the info. Do you have an idea of the approx. cost of the whole system?
Begining to budget 🙂
Hi Jessica,
It depends on the size of your system, as this can be scaled to as many water containers as you wish. Because prices always change and vary by location, I would load this page and add the items to your cart to see how it comes out. https://ourkaravan.com/van_water_system/. Let me know if you need anything; lots of happy people using this system. -Ken
Of all the van build sites I’ve looked at, yours is the best! Thank you for all the hard work in building the site and sharing info! Does the pump turn on automatically when the faucet turns on and pressure changes or does it require a switch on the side of the cabinet to turn the pump on?
Thank you!
Mike
Hi Mike, there is a switch on the side of the cabinet to act as the master power. However once the pump is switched on, the pump automatically cycles as the water is turned on and off at the sink. -Ken
Hi Ken, I copied your system and it basically works however the water doesn’t come
streaming out rather it sputters out. Any ideas what could be wrong? Are the air valves on the jerry cans supposed to be open or closed?
The air valves need to be cracked open slightly so air can come in as the water is withdrawn. Make sure all of your hoses are tight and not sucking in air, and with these issues addressed it should work great. Check for kinks too, but I’m sure you’ve done that. Please report back. -Ken
Hey, very interesting and very well explained water system. We’re starting to build our own van and are looking into all kinds of water systems. We are leaning towards the portable water system with multiple water tanks. However we will be needing larger water amount (around 26-30 gallons). So we have a couple of questions about sych water system:
1. Is it possible to connect 4 or 5 water tanks in the same way? Or maybe have one larger tank (25 gallons) and ane smaller (5 gallons)?
2. Do all the tanks need to be filled equally and what happens if one tank is filled to the max and the second one just half (if having two same size tanks) full? Would we need to disconect the empty tank so the pump doesn’t start sucking air?
Hi, yes you can connect as many tanks as you need. I recommend keeping the plumbing as close to the same length between tanks so they will drain at the same rate. The two hoses that dip into my tank are the same length before they hit the “T” that leads to the pump, so water withdrawal is always the same. One nice thing is you can use only one tank and because the others have check valves, so you can use as few as you like. I’m not sure exactly what would happen in your scenario, but if one tank emptied if you unplug the quick release to that empty tank the valve will shut as if the tank never existed. I hope that helps! -Ken
Thanks for the detailed instructions! We’re following your design and having a hard time finding the tee fitting that the faucet hot and cold lines thread into. Do you happen to know the size and where you got it?
I picked that part up from Home Depot. I would carry your supply lines in with with you and match it to what they have in the plumbing isle.
Will do. Thanks!
So do the two jugs drain down at the same time equally? What about eliminating the T-fitting and just run off one jug at a time? That way you could switch over when one jug is empty, and remove it to fill from water stored elsewhere in the van?
They do drain equally. The key is to keep the lines after the T the same length.
You can do what you’re proposing. Alternatively, because the quick connects have check valves in them I can disconnect either line and only use one jug without any change in water delivery. It’s pretty slick! -Ken
There is merit in the idea of a single fitting and manually swapping between two jugs, especially if you travel into areas with fewer services. It will make you more aware of your water consumption and should reduce the likelihood of accidentally running out of water.
This is true. I stretch my water use pretty far…getting on average 6-7 days with two people using the 10 gallons as our sole water source and of course all cooking and cleaning needs. I have learned to save the most water in modifying how I do dishes. -Ken
I am having trouble locating the 1/2″ female NPSM to 1/2″ male barb fitting that you installed on the intake side of the water pump strainer. It is not linked in your parts list and an Amazon search isn’t working. Any suggestions? Thanks.
I’m having the same issue as you. I tried picking something up from HD but it
is leaking. Did you figure out what part works for coming off of the strainer?
Valerie, my Shurflo came with this part, but I believe this is what you are looking for: https://amzn.to/3mHxfwd
Hello Ken! This is so helpful! I’m excited to get started on trying to slowly and carefully set this up and I’d like to try using one of the jerry cans as the greywater tank–would one need to replace the spout and modify the jerry can in this case as well, do you think? many thanks!
I would recommend using different couplers if using this for gray water. I think the internal ball valve built into the quick release (designed to keep the pressurized water in the line from draining onto the floor when you disconnect) would get easily clogged with food particles. Otherwise the rest of the setup would be fine. Of course no need for food-grade tubing either if using for gray water. -Ken
Thank you for your site, it helps alot! Do you think this system would work with a manual pump instead of an electric one? Thanks for your advice!
Yes, simply extend the lines to your manual pump in lieu of the electric and it will work great. -Ken
Hi – great, simple system. Trying to figure out why your standard config is 50″ long – we have the Iceco JP50, and without handles it is only 21-22″ long dimension – that plus the sink cabinet, should be able to do this in about a 40-42″ width, right? 50 is too much for the layout we have sketched. Thx for the input.
Hi, this kit is based around the 55L Dometic that is 28-1/2″ wide with the handles. I gave a little buffer in case the fridge were to shift a bit and to allow people the option to use some of the popular coolers. -Ken
Just recently came upon your video’s, great stuff! Have you come up with a permanent plan for the grey water? I did not read anything, unless I missed it.
Thanks, Scott
I have a plan, just need to implement it. I’ve found a 7 gallon tank I am likely to use as I do not generate a lot of gray water.
Thanks for following along! -Ken
thanks for sharing your plan. I followed it mostly, these Colder quick disconnects are EXPENSIVE now if you want them anytime within the next four months..
Also there is no reason to step down to 1/2″ from the Camco RV drain. I picked up some 3/4″ID braided nylon tubing and ran that through the Sprinter’s body plug. This should also help with draining quicker. Have not been able to test my system yet, still waiting for the male disconnects from Colder. Had to pay $30 each on Amazon…
You got 3/4″ ID to fit through the body plug? My 1/2″ tubing was within 1/16″ of not fitting. Or did you drill it out some?
That makes sense then. Mine is a T1N. Right back past the slider door step there is two body plugs, 1 inch and 4 inches. Sink is working great by the way!
Gotcha…I knew nothing larger than 1/2″ ID would fit through on an NCV3. Thanks for the feedback on the sink system, it is pretty slick! -Ken
Great build and great video. Will definitely be donating (once I get it implemented in my van!).
How have you liked the 10 gallon capacity? Part of me wants to just go with a 5 gallon supply can for the sink and a 5 gallon gray water tank next to it (just like yours, but one would be gray water instead of 2 supply tanks). I’m not planning on living in it so I think refills should be easy.
I was then thinking of having another can in the back under the bed to use for the outdoor shower and clean-up hose.
Hi, the 10 gallons works great for us, we usually get about 5-7 days out of it with two of us.
Personally I would rather not have gray water in the van, if for no other reason it could overflow if you don’t watch the capacity. Just a thought. -Ken
Thanks for the reply! I will explore an under-mounted gray water tank at some point.
Another quick question: do you feel you need an accumulator with the sureflo aqua king junior 2.0 pump?
Hi Drew, Shurflo’s literature states specifically that an accumulator is not necessary and therefore not recommended when used with a 4-diapgragm pump such as this one. -Ken
I believe the manual states “If cycling cannot be minimized consider removing plumbing restrictions or simply install a SHURFLO Accumulator.” for the 4128 series pump (Aqua King II Junior 2.0).
It says no accumulator for the 4138 series pumps (Aqua King II Standard 3.0).
Hmm, the 4128 (Aqua King II Jr 2.0) instructions I have say no accumulator is needed; and I would swear I remember reading an accumulator is not recommended when combined with a 4-diapgragm pump. See the installation tips on page 1 here, also mentioned on page 2: https://www.pentair.com/content/dam/extranet/web/nam/shurflo/manuals/911-1052-aqua-king-marine-fresh-water-pump-iom.pdf
Seems to be conflicting information.
FYI- the link in your page above is to the Aqua King II Junior 2.0.
Not sure if you meant to link the Aqua King II Standard 3.0.
Yea the manual is for both the 4128 and 4138. I think the “no accumulator needed” line at the end of Page 1 is meant for 4138. But it specifically says an accumulator can be used for 4128 on the last line of Page 2. Conflicting info for sure; they should clarify.
Anyway, it doesn’t matter since it’s working for you! Thanks!
Confusing indeed, thanks for the information. -Ken
Hi Ken,
Thanks for the great information on your van build. I was wondering if you noticed any kind of off flavor / taste in the water?
Maybe for the first gallon I ran through it but not after. You could add a water filtration system to this as easily as any other water system. I might do that someday. -Ken
Hi Ken, I copied your water system in my sprinter van and it worked great from the start with no leaks. I now have an Aliner camper and have installed the Shurflo pump but I can’t figure out what to use coming off the strainer up to the 5 gallon bottle with the quick release. I picked up a connector from HD but it leaks. Also my quick disconnect fitting from Amazon just got returned because it doesn’t stop the flow of water when disconnected. Hopefully that was a defect and the new one will work with no problem. Please can you let me know what part to buy coming from the strainer up to the water bottle? I don’t believe that was described or listed in your parts needed.
Thank you so much.
Regards.
Valerie
Hi Valerie, I responded up above but will post again in case you didn’t see it. My Shurflo pump came with one of these: https://amzn.to/3mHxfwd. It’s the right thread to go from the suction side of the strainer down to your water containers.
I’m glad the system worked well for you! The quick release must have been a fluke…first time I’ve heard of one leaking. Amazon should take care of you! -Ken
I followed the design here, but I discovered something interesting. On the intake side, I am using the exact same silicon tubing recommended here, but when I added hose clamps to connect the ends to the pump and the quick-disconnect valve, the system lost pressure and started leaking due to air in the lines. I removed the hose clamps, and it started working again. Do you have any suggestions about how to attach the ends of the silicon hosing such that it stays in place, but doesn’t accumulate air?
Hi Taylor, I have no clamps connecting the tubing between the disconnect barb and the pick-up hose *inside* the tank, but all of my external connections have clamps. Is this how yours is? It’s hard to imagine a clamp actually creating an air leak. Be sure all connections are tight, the lid on the tanks are tight, and you slightly open the bleeder screw on the tanks so air can come in as water comes out. I can help diagnose if you’re still having a problem. -Ken
Hi Ken. I like this setup and I think it will work well in my van. Since you posted this video, have you researched and or added any type of water filtration to this system?
Thanks,
Kevin
Hi Kevin,
The water setup is working great; lots of people using it at this point. I did actually contemplate adding a filter setup. Have you done any research? I’m thinking two stage may be all I need.
Did you use the standard top mount sink clips or some other mounting technique?
To be honest I did not understand how the clips would work in my application, so I used a GE iron grip silicone to attach it to the countertop. It’s been 8 years and holding so far!
Write up still one of the best today. I was curious why you chose the shurflo 2.0gpm over the 3.0gpm. With the 3.0 being more popular it’s $70 on Amazon where the 2.0 is $120. I’m wondering if it’s worth spending the extra money to get the lower flow 2.0 gpm. This is for sink only. Maybe a rinse off hose in the future.
I can’t think of any real disadvantage of the 3 gpm other than you’ll use more water when the tap is wide-open. (Probably only an issue if you have kids.) The pump is also more likely to pulse if the pump capacity exceeds the discharge of the sink, but I don’t see that as a big deal either. Let us know how it goes, and thank you for the kind words!
Your entire site is great and gives me confidence as I begin my build. Curious as to the Blue Sea distributor that you used. 6 circuit plus negative? I expect to have the water pump, a fridge, some LEDs and maybe an induction stove hooked up to it. Also thinking, like some others, of using one of the jerry cans for the gray water tank. I figure that under most circumstances it won’t fill up faster than the supply can drains–and usually much slower.
Hi, if you’re referring to the Blue Sea fuse blocks, they are available in 6 or 12. I would go with the larger one so you have room to add circuits later. As for under-sink gray water, many do it. And I agree, if you have 5 gallons of fresh and 5 gray, you should be fine, especially if you drink from the sink as we do. Thank you for the kind words!
Another question: You say you “dropped in” your sink, but it’s listed as an undermount sink. Did you simply treat it as a drop-in and apply glue under the flange?
Correct, my sink is surface mounted using GE Irongrip silicone. 8 years later and all is well. -Ken