

Diesel Heater Advantages
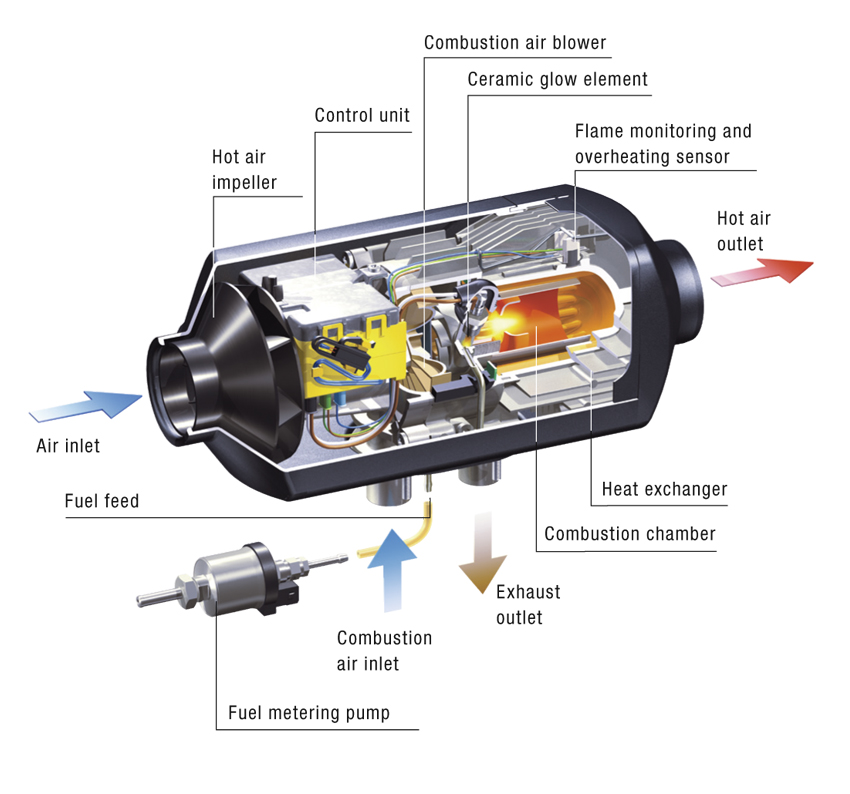
The Espar diesel heater is easily our favorite feature of the van. It provides warm, dry air while sipping diesel fuel and consuming very little electricity. Because combustion occurs outside of the vehicle, no moisture is being added to the interior, as you might experience with propane combustion via a portable propane heater. It is also much safer as it won’t deprive the cabin of oxygen.
A fuel pump draws fuel from the van’s diesel fuel tank and provides it for combustion inside the unit. A fan draws air from outside into the unit, passes it over a heat exchanger and expels it into the cabin. A wall-mounted thermostat regulates temperature, much like you are used to at home. The image below illustrates its operation.
Before we dive-in, you may want to watch our YouTube video as a project overview. The video is linked near the bottom of this article. Note that this video was for the older D2 heater, so the wiring is simplified in the newer S2 model.
Getting Started – Mounting the Diesel Heater
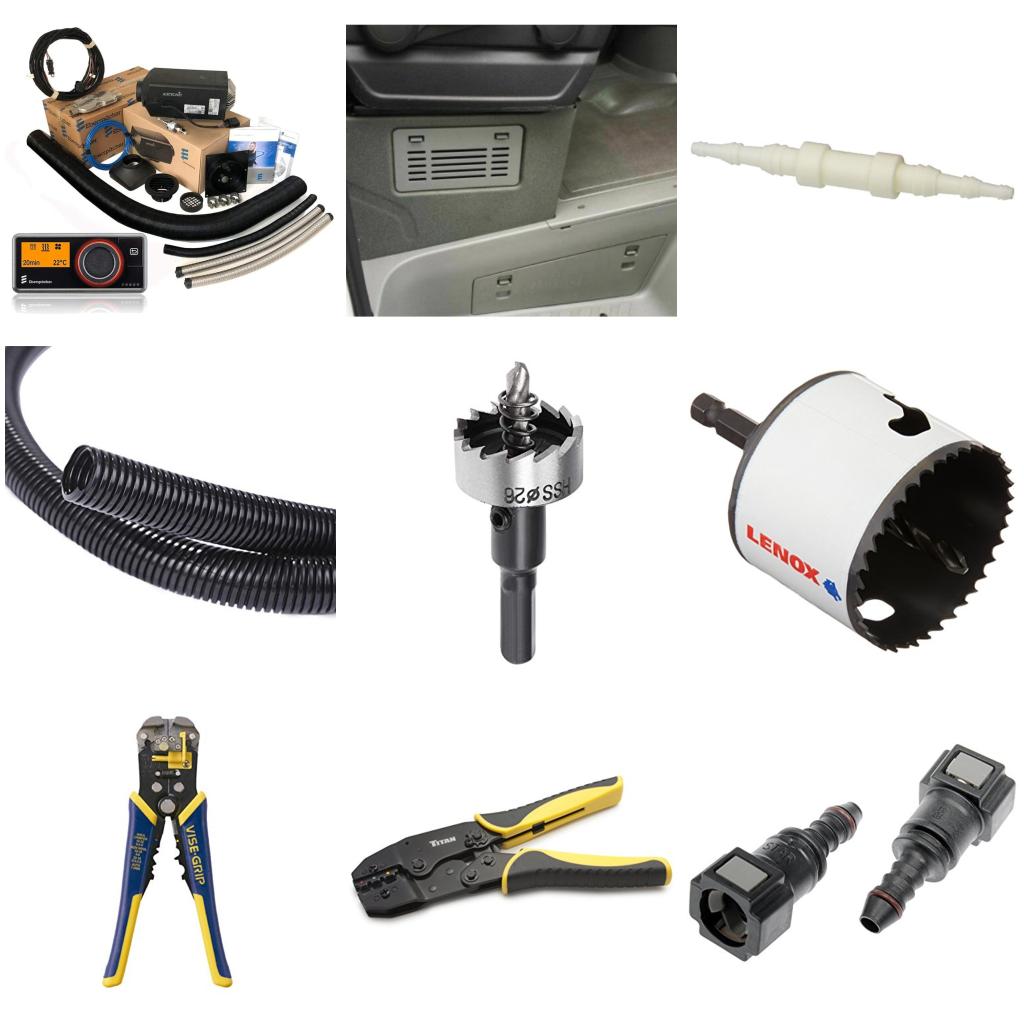
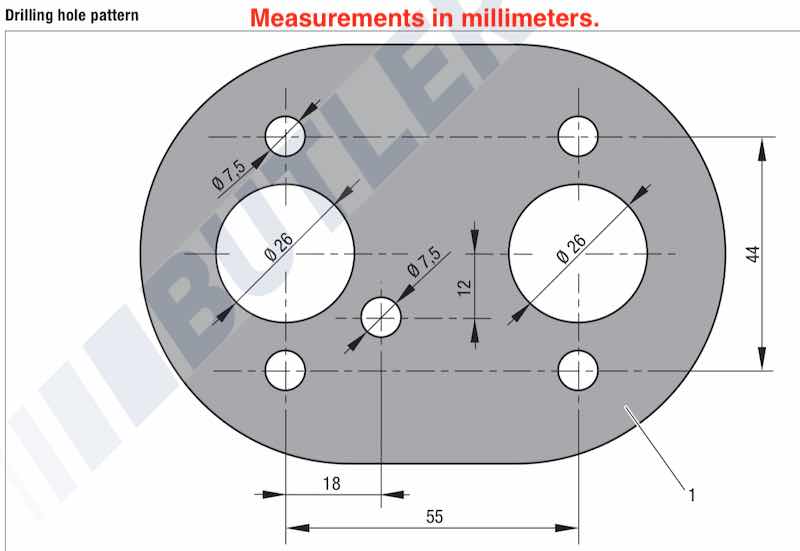
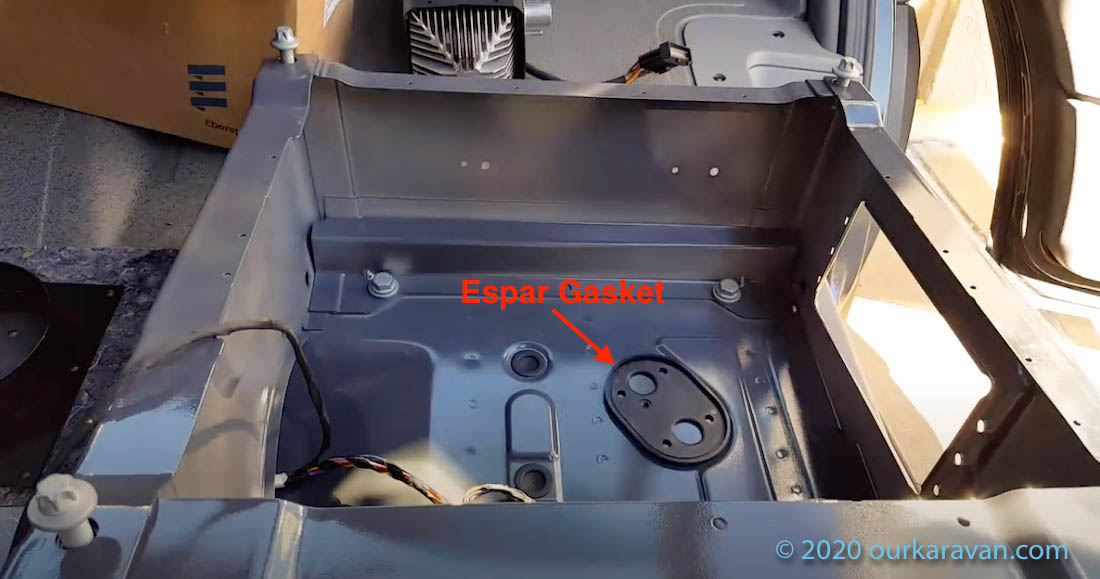
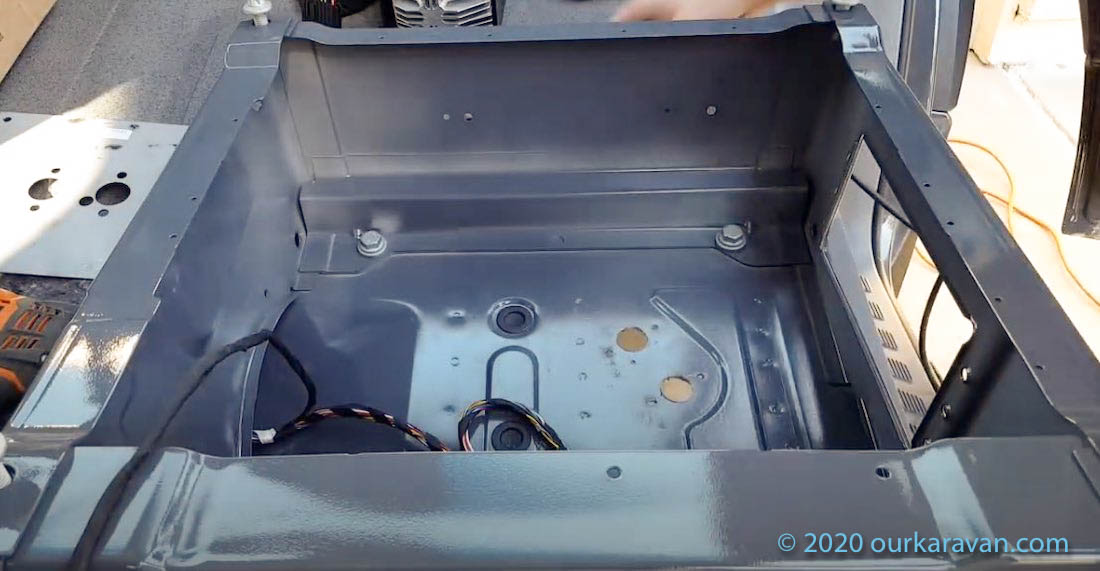
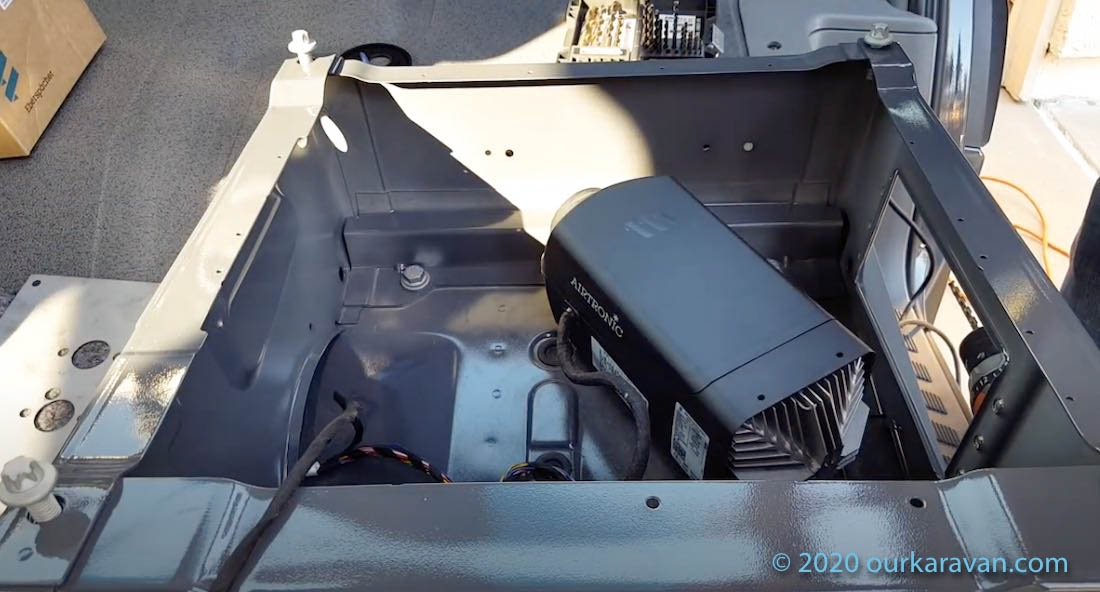
The diesel heater is commonly mounted inside the passenger seat pedestal of the Sprinter. Other locations can be utilized so long as there is space under the chassis for routing the intake and exhaust hoses. The heater must be mounted flat on the floor. Ours is mounted with the gasket laying inside a factory stamping, as shown in the photo below. Before drilling, double-check there is room for the heater unit as well as the hardware that goes under the van.
Using the rubber gasket as a template, mark and drill the two 26mm holes for the intake and exhaust, a 1/4″ hole for the fuel line and four 19/64″ holes for the mounting studs. (You might be able to use a 5/16″ bit for the latter, but check first.) Be sure to paint the bare metal of the holes so they do not rust.
Installing the Air Intake and Exhaust
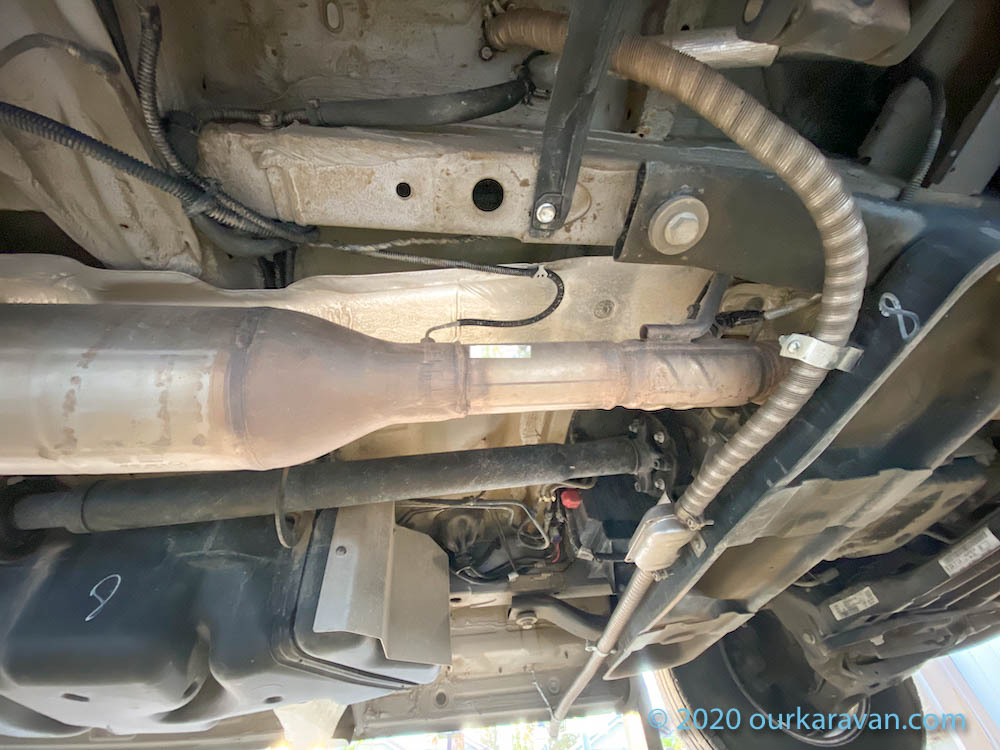
We originally mounted the exhaust with the exit near the sliding door. (This orientation is shown in our YouTube video.) However, we later installed an Amp Powerstep, which required relocating the exhaust. In doing so, we found an excellent location on the transmission crossmember to mount the muffler. (This only works on the 2WD models.) The original exhaust tubing was long enough to reach the muffler inlet. However, we purchased an additional meter of exhaust hose to extend it to the driver’s side. Wherever you choose to route your exhaust, keep it as flat/level as possible. Any low points in the exhaust will collect condensation and eventually rust the tubing.
Mounting the Fuel Pump
The Espar dosing pump draws fuel from the fuel tank and pumps it to the heater for combustion. Accordingly, the next step in our install is to find a location under the chassis to mount the fuel dosing pump. The fuel pump should be mounted as close to the source where the fuel will be tapped. In the case of a Mercedes Sprinter, that is near the front of the fuel tank. Espar requires the fuel pump be mounted at angle between 15 and 35 degrees to prevent formation of air bubbles in the fuel system. Pay special attention to your specific manual as to the proper flow direction for your pump. This is important because the orientation of the newer S2 is the opposite of the older D2. The pump can be mounted using a lag bolt or self-tapping screw.
Hooking up the Fuel System – Fuel Tank to the Espar Fuel Pump
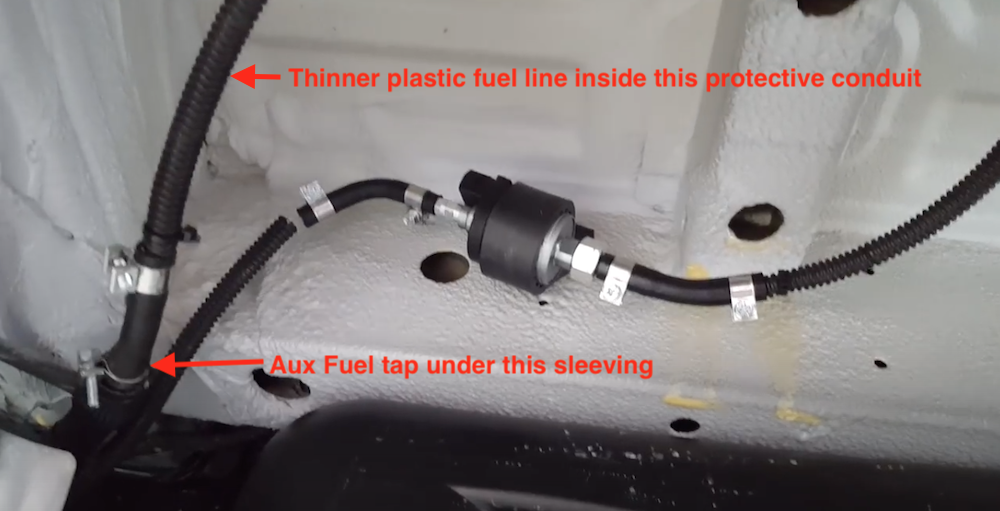
The next step is to install the fuel system. All U.S. NCV3 and VS30 diesel Sprinters have an auxiliary fuel tap that makes connecting a diesel heater very simple. Some Canadian models lack the fuel tap, and I’m not sure gasoline Sprinters have one. On the NCV3 (2007-2018) Sprinters the fuel tap is hanging near the front left corner of the tank. On the VS30 (2019+) it is near a crossmember forward of the fuel tank.
We will be changing tubing size several times–bear with us. Remove the plastic rubber cap on the Mercedes Auxiliary fuel tap. Next, click the Dorman adapter onto the fuel tap. Use the short section of thicker fuel hose included in the kit and slide it over the barb of the Dorman adapter. On the other end of the short fuel hose slide on the white adapter and secure both ends with the provided hose clamps. On the other end of the white adapter, clamp on a short section of the medium-sized hose. The blue thinner hose (included with the S2–the D2 uses white hose), will slide inside the medium black hose and is secured with a clamp. Once again we use a short section of the medium black hose to connect the thin fuel line to the inlet of the fuel pump.
Be sure to follow the manual on correct flow direction of the pump. Some models have an arrow indicating the flow direction.
Recap
Did you get that? Connected to the Mercedes fuel tap are: Dorman quick connect –> 6″ section of thicker fuel hose –> white adapter –> short section of medium black fuel hose –> enough blue fuel line to reach fuel pump –> short section of medium black fuel line connected to fuel pump. There are other ways to achieve this depending on how your kit was equipped.
Routing the Fuel Line – Pump Outlet to Heater
On the outlet side of the fuel pump you will once again use a short medium-sized rubber fuel hose followed by the blue fuel line the rest of the way to the fuel inlet on the heater. It will take another section of medium black hose to make the attachment at the heater unit. We placed the small plastic fuel line inside wire loom to help protect it. Keep the line as tight against the underbody as possible as it will be passing over the driveshaft as well as the very hot exhaust system. We used a couple of M10-1.5 bolts inserted into factory nuts in the chassis to lightly pinch the fuel line against the body. See our YouTube video for more detail on how we routed our fuel line.
Espar Electrical Hookup
Next up is the electrical. This was the toughest part on our older D2 install, but it has gotten much easier with the newer S2 model. The D2 will likely be discontinued, so if you’re here to install an older D2, please refer to the wiring we discussed in our YouTube video below. Except for the electrical, the installation of the D2 and S2 are otherwise identical. The D2 was a bear to figure out–different controller options, and optional temperature sensors and high altitude sensors made the wiring quite complicated. Thank goodness the newer S2 is all incorporated in one harness.
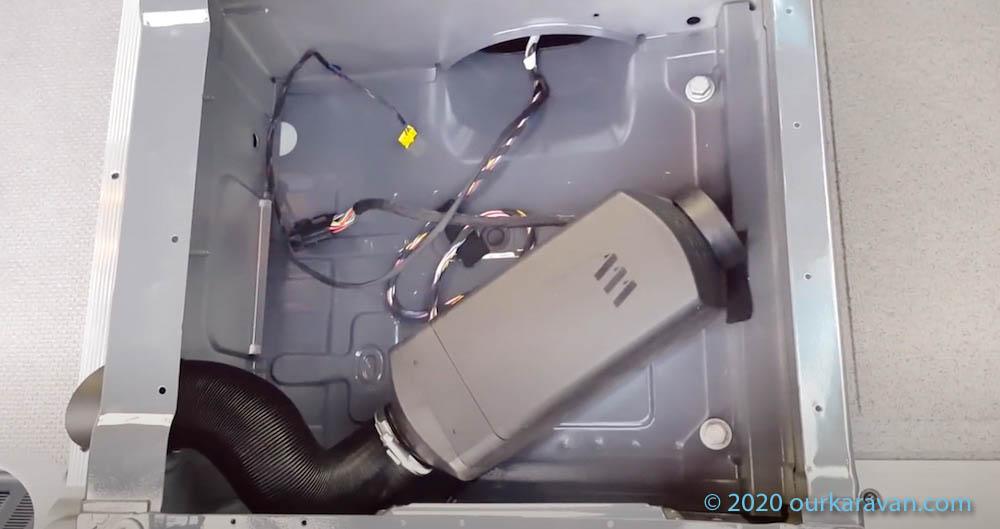
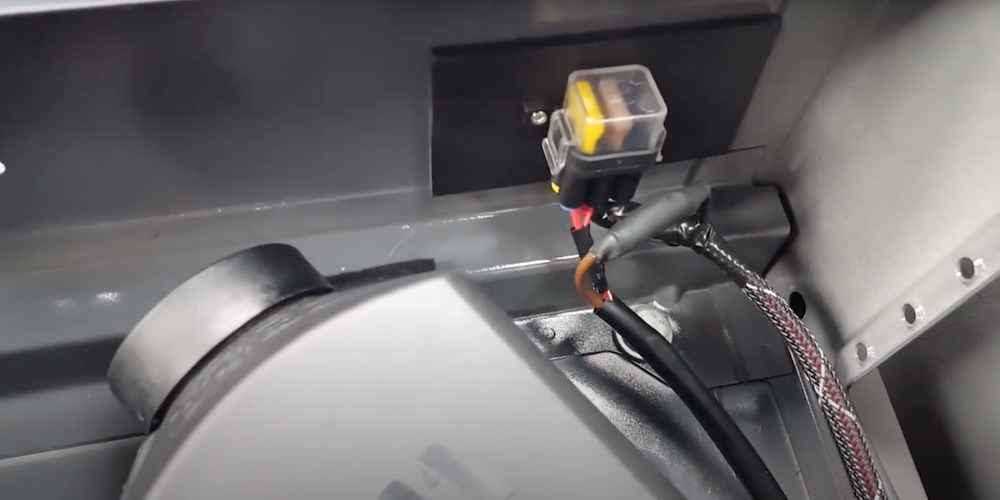
There are four components to the wiring harness. The first component is the fat plug that simply plugs into the heater unit itself. Second, a 2-wire harness gets routed to the fuel pump. Third, a four-wire harness plugs directly into the thermostat (Easy Start Pro). Finally, a three-wire harness with two sizes of red wire and one brown wire are the power and ground. (The plug with resistor loop is apparently for diagnostic and is not used.)
Making the Espar Wire Connections
The first step is to plug the large flat plug in the harness into the heater unit. Done!
The two wire harness (usually with gray and brown leads) goes to the fuel pump. We found it best to remove the section of floor between the driver and passenger seat pedestals. Thankfully, there is a plastic wiring raceway perfect for routing the wire. With the wire in this track, look for the big rubber boot inside the driver’s seat pedestal. Next, go under the van, locate the rubber boot and cut the zip tie. You can now feed the 2-wire harness under the van. Route the harness to the fuel pump. Now click the two ends of this 2-wire loom into the included plastic harness-end. Orientation of the pins within the plug/harness does not matter. Once clicked in your harness is complete and can be plugged into the fuel pump. Pull up the slack back into the cabin and resecure the zip tie on the factory rubber boot.
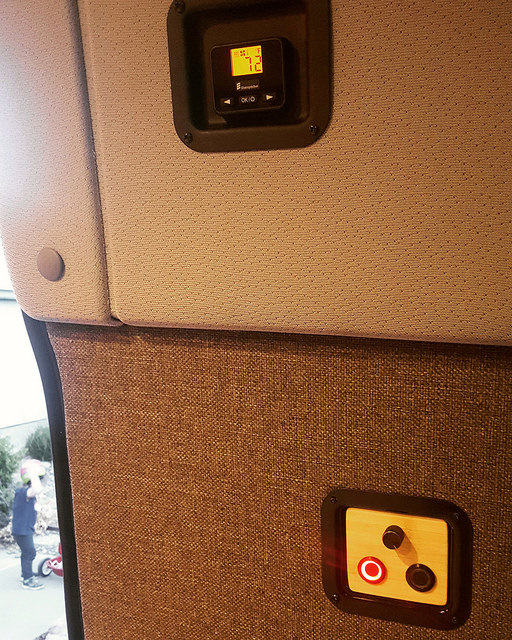
Connecting the Thermostat (Easy Start Pro)
The thermostat will be used to turn the heater on and off, and it measures the temperature of the air to perform the thermostatic function. Find a convenient location to mount the thermostat. Ideally it would be exposed to free-air so the thermostat can correctly measure the air temperature. Connecting the thermostat to the harness is as simple as plugging it straight into the corresponding plug in the harness. Done!
Providing Power to the Espar Harness
Next, we need to provide 12-volt power to the Espar harness. The supply wire will carry a max load of 25 amps, so 10-12 gauge wire should work for most applications. We used duplex wire, which means a positive and negative wire in the same sheath. Connect the red positive wire to a 12V power supply and connect the black ground wire to your system ground. We routed this wire into the passenger seat pedestal where the Espar unit resides.
Locate the two single red wires included in your kit–the ones with metal terminal-ends. Cut this harness to size. (We only kept 8″ or so of this harness.) Remove the insulation from both wires using a wire stripper. Now crimp or solder BOTH of these to the red power wire you just brought from your power source. Now grab the fuse holder included in the kit. Insert the 20 amp and 5 amp fuse into the fuse holder. Finally, connect the larger sized wire to one side of the 20 amp fuse and connect the thinner red wire to the same side of the 5 amp fuse.
Connecting the Heater Unit to the Power Source
Find the three wire harness coming from the heater unit that includes two sizes of red wire and a brown wire. There are two steel wire connectors included in the kit. Crimp these onto the large red and smaller red wires that are part of the heater harness. Similar to what we did before, attach the larger red wire to the other side of the 20 amp fuse. Connect the smaller red wire to the other side of the 5 amp fuse.
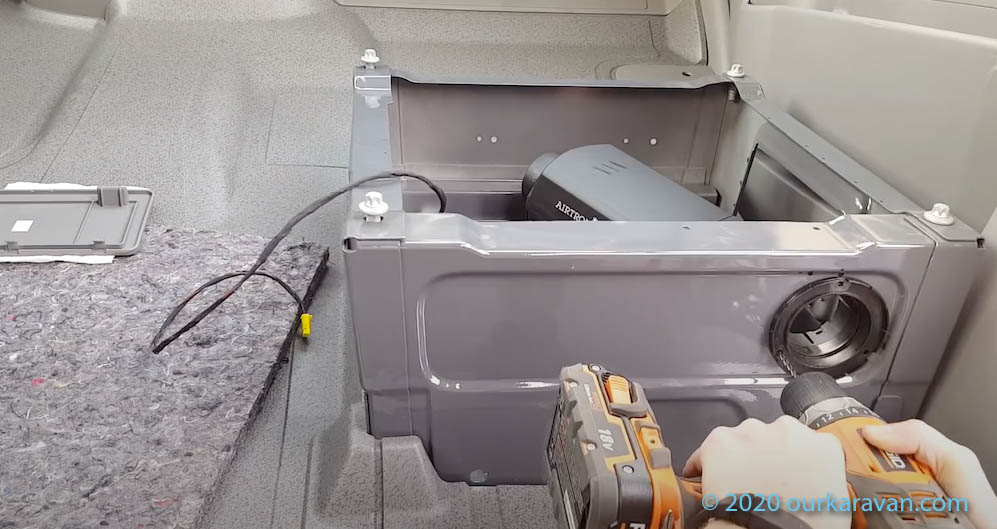
Now we need to provide system ground. In the duplex wire you brought over from your power source, simply connect the negative (black) wire to the brown wire in the Espar harness. You have now provided both fused power and ground to the heater. Mount the fuse block where it is will be accessible in the event of a blown fuse. Our fuse block is mounted on the inside of the seat pedestal and is accessible through the small removable door in the side of the seat pedestal.
Final Touches
You may want to consider replacing the solid seat pedestal door with this vented one (eBay link). It will allow free air flow to the heater unit for more efficeint operation.
Content Creation
We are doing our best to offer as much information as possible for free. A lot of time, effort and money goes into developing and maintaining this website. If you find the information on this website helpful, you may use our various links when you are ready to make purchases. As Amazon Associates we will make earnings from qualifying purchases, however it costs you nothing to use them. Alternatively you may consider using the donate button below to make a simple Paypal payment, or message us if you prefer Venmo. We sincerely appreciate your visit as well as your support.
Thank you very much for so detailed and informative instructions!
Hi Ken,
After seeing this video, I feel confident I should be able to do it by following your directions.
Thanks for very clear instructional video.
Thank you Sanjay! -Ken
Hi Ken…. My 2020 sprinter came with an auxiliary battery under the passenger seat (in addition to the starter battery under the hood). I haven’t taken the seat off yet so I don’t know yet if there’s room for the heater with the battery there. Have you come across anybody who has addressed this auxiliary battery…. Like what does it power? Can the battery be relocated under the hood so that the heater can be installed under the seat? Thanks!
Good question. I ordered the Auxiliary battery when I ordered my van, but on the NCV3 Sprinters the Aux battery is under the hood. From the factory it only powers the rear 12V outlet (if you have that option) on an NCV3. I really like the Aux battery and use it to power the amplifier for my audio system, my Amp folding power steps, my backup charging system, and I have an emergency tie-in just in case my house battery dies and I need to run my fridge, lighting and sink off it temporarily. I have never seen it installed in a VS30 Sprinter, so not sure how much room, if any, there is for a heater. -Ken
Where did you get that louvred seat box side panel? Thanks= great instructions
Hi, I have a link near the bottom of the article in the “final touches” section.
https://ourkaravan.com/espar-s2-d2-install/
-Ken
I keep getting a fuel error on my east start. Connections are undamaged, pump in proper orientation, etc. but we hit our reserve tank (got in a bind couple nights ago). Despite the tank being filled fully still getting the error.
Do I need to prime the fuel line? Unsure what to do here. Thanks.
That’s a good question, I have not encountered any starting errors yet. When I first installed the espar it took a few tries to get everything primed and working. I’m sure you’ve done this already but I’d try letting it start and self-prime a few times.
My first time starting the unit, i got a fuel line error 5 times. on the 6th time, it fired up and ran perfectly. I stopped and started it 10 more times, no issues. Thanks to ourkaravan for this write up, helped me a lot.
chris
I connected my Espar to the vehicle battery – Im a bit nervous about this. ive got a VS-30, it only has 1 battery under the drivers feet. my house battery system is only connected to the vehicle battery by way of a DC/DC charger. Any idea on the current draw when using the heater overnight? i know that changes with temperatures and such, but have you ever run into an issue using the heater overnight? Ive thought about moving the Espar to the house system… its a 200Ah, no solar charing, only DC/DC from the van at this point.
Recollection is the Espar pulls somewhere around 12 amps when it’s starting up cold the first time (lighting the glow plug), then power draw varies from about 1/2 amp up to about 3 amps. I had mine on the Mercedes Aux battery (same battery as the starting battery), but after a number of years with no problems I became increasingly concerned about that battery handling the power draw when it’s really cold out. My house battery is inside and I didn’t have that concern, so I moved mine over the house battery fairly recently. Peace of mind more than anything.
Ken, did you drill through transmission cross-member to install brackets for exhaust? Mine does not have any holes in those places…. Thx!
Yes I did…just be sure not to drill through anything behind the cross member. Recollection is the fiberglass leaf spring is back there.
Hi,
This is so well laid out.. thank you.. What’s that clamp box thing that connects two exhaust hoses under the van?
Hi, those are electrical conduit holders, available at box stores. I simply bolted them to the cross member. -Ken
Hi,
At least for the current model, the 2-1/2″ hole saw diameter is incorrect. It should be a 2-3/4″ hole saw. The outer step on the plastic fitting is 66 mm, not 62 mm.
20 minutes with a Dremel tool fixed the issue.
Thanks for all the info!
Greg
Thanks for sharing. I wonder if they are supplying slightly different outlet vents now…good for others to know before they buy a hole saw. -Ken
Ken, many thanks for this detailed video! There were some big things you mentioned, electrical chase between the seats, running the control unit wire above the slider door, and many small things (too many to list) that helped save me a bunch of time in the install for my Espar Airtronic Heater Kit AS3 D2L (Diesel). Just and FYI for anyone else … DO NOT reconnect the battery terminal when the seats are out. You may get a fault light for the airbag. I reconnected the battery to electronically lock the doors after one day, when the seat was out/connections unhooked, only to get the fault light when installing the seat and connectors after the project was done. Other than that the project was a success…this was a multi day project for sure.
John
🙂