


Why Extruded Aluminum?
There are three main reasons we chose extruded aluminum construction over wood. The first is a high strength-to-weight ratio. Aluminum is very strong and is securely bolted to the support ribs of the van. We see this as a safety feature should the unthinkable happen on the highway. The floor and end caps of our cabinets use lightweight 1/4″ plywood, reducing weight.
We find the extruded aluminum relatively easy to work with, and is the second reason we use it. We have basically no woodworking skills yet we’ve been able to build a strong and beautiful cabinet system.
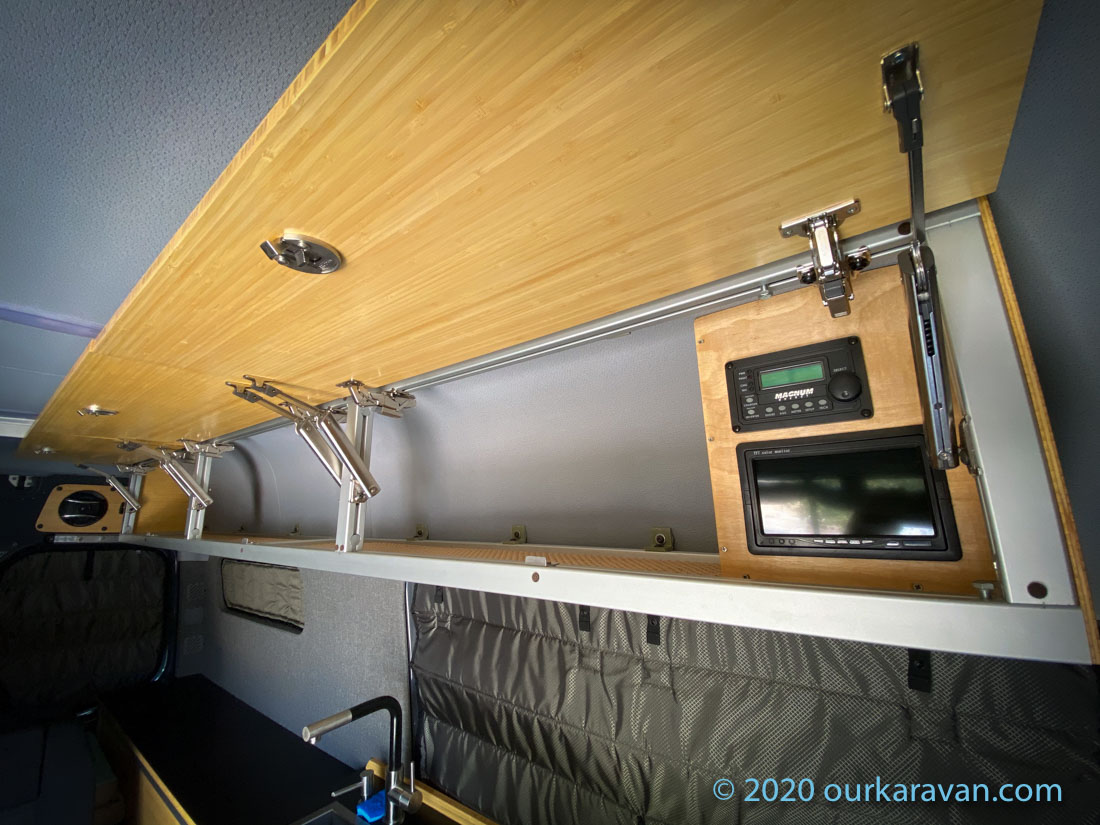
Finally, the T-slot aluminum looks modern and classy. A small reveal was left around our cabinets to showoff the aluminum, and we think it looks darned good. The photo to the right shows the final product after the aluminum frame was skinned in bamboo.
Overhead Cabinet Dimensions
Our overhead cabinet is almost 9-1/2 feet long and 12-1/2 inches deep. There are three cabinet doors are on self-supporting soft open and close struts. The depth of the cabinet strikes a good balance between internal storage and sufficient standing-room when preparing food in the galley. This cabinet is designed to work with the factory Sprinter headliner. That said, it can be adapted to work without one. (Our Sprinter did not come with the factory headliner, we found ours used on the Sprinter-Source Forums.) The factory headliner provides an OEM look, it is lightweight and the corners are already formed to the van saving many hours of work!
Materials
1@ 112″ section of 1575-series 80/20. (This is the support bar that goes behind the factory headliner.)
1@ 112″ section of 1502-LS 80/20. (This is the lower support bar away from the van wall. The 2 solid faces point toward the van interior and down.)
2@ 112″ section of 1503-LS 80/20. (One is the lower support bar nearest the headliner with the solid side facing down. The second piece is the upper support bar against the headliner, with the solid side facing toward the van interior.)
A Word on Profile Lengths
Before we dive-in, you may want to watch our YouTube video as a project overview. The video is linked near the bottom of this article.
Getting Started – Mounting the Lower Attachment Rail
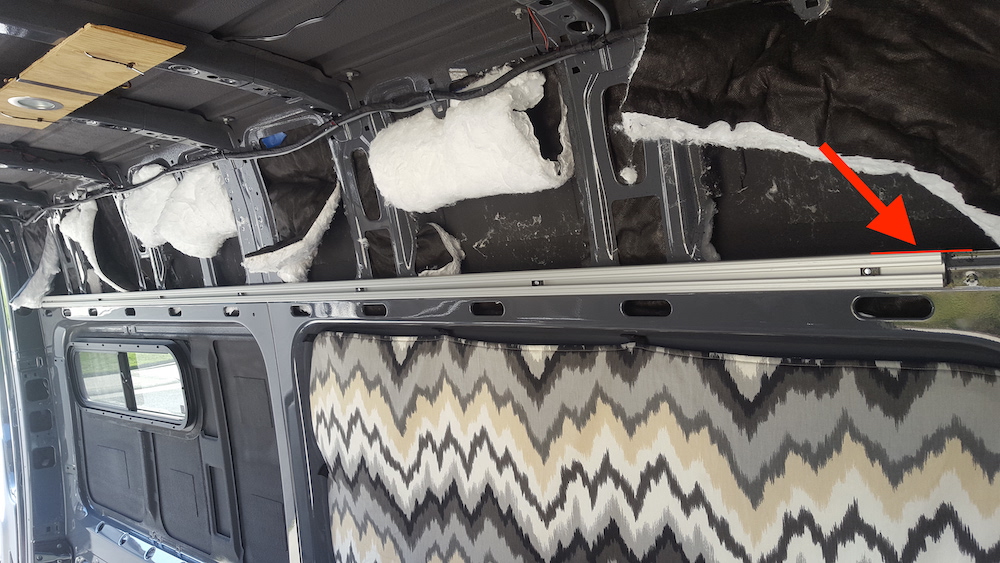
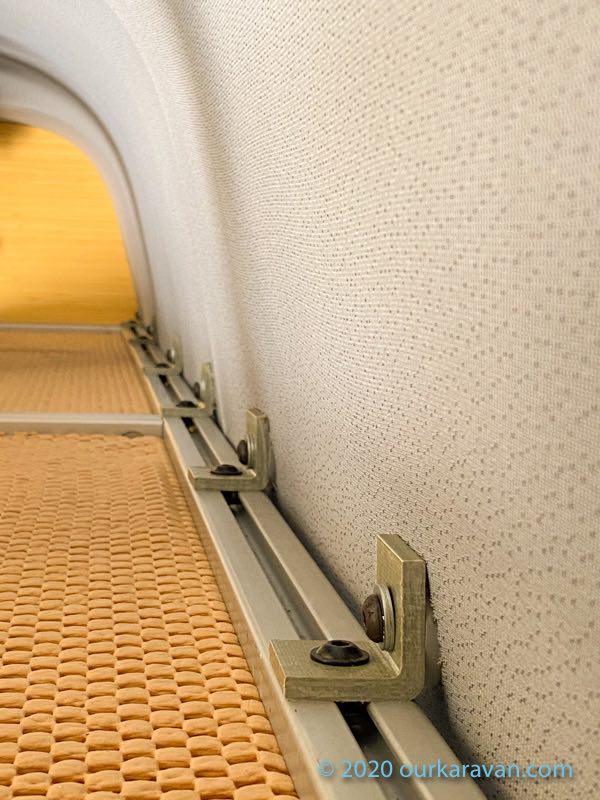
We will begin by bolting a length of 80/20 1575-series (we will refer to this as the “half profile”) to the wall of the van. This provides a “track” to serve as the lower wall mount of the cabinet. Clamp the half-profile to the wall. Position it vertically so it aligns with the bottom of the upper wall cavity. The red line depicts this alignment.
Slide eight T-nuts into the track; ours are positioned approximately every 17-1/2 inches. We will be bolting through the van wall into this structure from the backside. Be sure you place the T-nuts where you can gain access from the wall cavity.
Drilling and Fastening to the Wall
Mask off the area to prevent drill shavings from falling into the cavities of the van, which can eventually form rust. Drill through the aluminum and through the van wall. Be sure to use a stop collar so you don’t drill through the side of the van! Paint the holes you drilled to prevent rust. Using eight 5/16″ bolts with some thread-lock, fasten the aluminum profile to the van wall. (Refer to the 3D model further down in this article for detail.) The bolts thread into the T-nuts from the backside.
Preparing the Lower Support Rail
By installing roll-in T-nuts in the slot, we provide threads for the lower part of the cabinet. We use roll-in T-nuts because the bolt will be at an 8.5 degree angle to the profile, and it can roll in the channel to accommodate the angle. You can pop these in without having to slide them from the ends of the T-slot. Spread them out so the load on the cabinet is distributed evenly onto the profile. We put a piece of blue painter’s tape on the wall of the van to mark the horizontal locations of the roll-in T-nuts. Be sure to put them below headliner-level so you can see them with the headliner in place. (See our YouTube video for more detail.)
Preparing the Upper Support
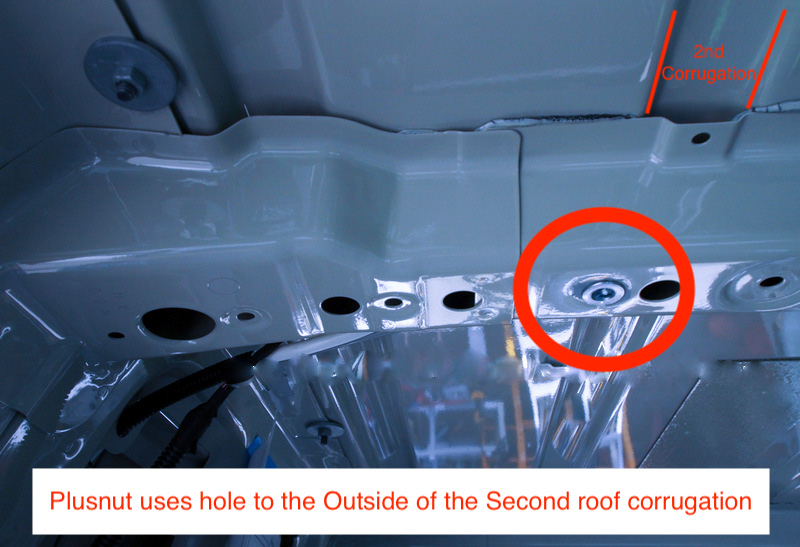
We used some existing holes in the ceiling of the van for the upper cabinet mount. The hole needs to be enlarged with a drill to install the 5/16-18 bulbed plusnut. As shown in the photo, we used a hole to the outside of the second corrugation in the roof. We used five roof supports, and thus five total plus nuts. Our plusnuts came with a simple install tool, but you can also use a plusnut install tool.
Installing the Headliner
If you are using the factory headliner, you may now begin reinstallation (You are done insulating, right?) The Mercedes headliner goes back in starting with the rear section. With the rear section in place, use a long straight-edge and line up the visible section of the 80/20 with the center of the slot and align it with the blue painter’s tape. Now you can use an awl to poke a hole in the headliner and confirm you’re centered on the T-nut. When you drill through the headliner, be sure it is centered on the T-nut, as vertical alignment is critical. If you’re off horizontally, you can always slide the T-nut over. This process is shown in the video linked at the bottom of this article at about the 6 minute mark.
We used a foam cutter to cut the threads of the headliner. The foam cutter does not cut completely through the headliner, it just cuts the treads of the fabric. You could cut with a box knife if you are careful.
Don’t forget to cut the headliner out for the plusnuts directly above you. The headliner is flexible, so we simply bent it down to locate the plusnut, then marked and drilled in the same fashion as described above. Continue adding sections of the headliner, cutting out the eight 1.5″ holes in the sidewalls and five 1.5″ holes overhead as you go.
Cutting Angled PVC Spacers
The half-profile of 80/20 is sitting at the same 81.5 degree angle as the van wall. We need to cut eight 8.5 degree spacers to prevent our cabinet from being angled. To achieve this, use a miter saw set to an 8.5 degree bevel. The spacer should be 1″ thick at the thickest part. Cut five 2 degree spacers to account for the angle of the roof ribs. (Where your plusnuts are located.) This spacer should be 1/2″ thick at the thickest part. Drill each spacer so a 5/16″ bolt can pass through the center. The hole should be slightly oversized to accommodate the slight angle of the bolt passing through.
Cut and Install the Angled Attachment Brackets
Now we need to make angle brackets to attach our 80/20 framing. We used 1/4″ thick fiberglass angle (1-1/2″ x 1-1/2″ in a 5-foot length.) We chose structural fiberglass because it helps isolate the 80/20 framing from the van sheet metal. The van will heat and cool with the outside conditions. Aluminum is very efficient at transferring heat, which means it will absorb hot and cold from the skin of the van. Conversely, fiberglass is much less efficient at heat transfer and helps to thermally isolate the 80/20 from the van sheetmetal. That said, you can use aluminum angle.
We cut thirteen total brackets using the same non-ferrous blade we used to cut the 80/20. Be sure to wear a respirator when cutting fiberglass. Eight brackets were cut for the lower attachment and five for the upper attachment. The brackets are 1-1/2″ wide. A hole is drilled in the bracket to accept the 5/16″ bolt. The holes should be placed 1/2″ from the inside corner of the bracket. If you change this dimension it will change other associated dimensions.
Bolting on the 80/20 Profiles
With the headliner installed you can now bolt up the brackets and spacers. Use 1-3/4″ long button head cap screws and two washers through the fiberglass angle and PVC spacer into the half-profile behind the headliner. (The two washers are to prevent the bolt from bottoming-out in the half-profile before it’s tight.)
For the five overhead brackets, slip one washer over a 1-3/4″ long button head cap screw, then through the fiberglass angle, 1/2″ PVC spacer and tighten into the plusnut. If you’re following along with our YouTube video, we are at 12 minutes and 15 seconds. You should now have brackets attached to the upper and lower mounts, as shown below.
Time to Frame!
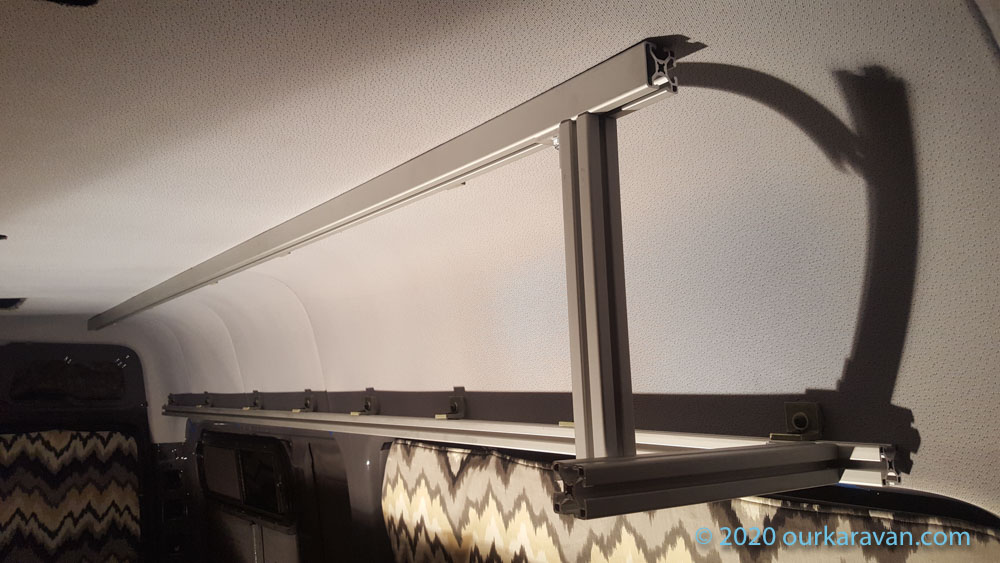
Take one of your 1503 profiles and slide in eight T-nuts. Using some 0.687″ long button head cap screws, fasten to the wall brackets. (The solid, unslotted surface should point down.) Take a second 1503 profile and attach it to the upper mounting brackets. Solid surface faces out toward the van interior.
Stop and Measure
At this point you could cut the vertical supports and bolt it all together. However we recommend taking a straight-edge and confirming that the 11-5/8″ long vertical supports and 9-1/2″ long horizontal supports would all align at 90-degrees to the bottom outer piece of 80/20. If it doesn’t you can shorten or lengthen these pieces to ensure they hit at 90-degree angles. The photo above illustrates how you can check these dimensions.
Bolting it all Together
You could bolt the framing together using aluminum angles as we did on our galley kitchen. However, it won’t look as good compared to using the hidden “anchor fasteners” from 80/20. Anchor Fasteners do require milling, which we will describe next. Another option that does not require milling includes the 80/20 “hidden corner connectors.”
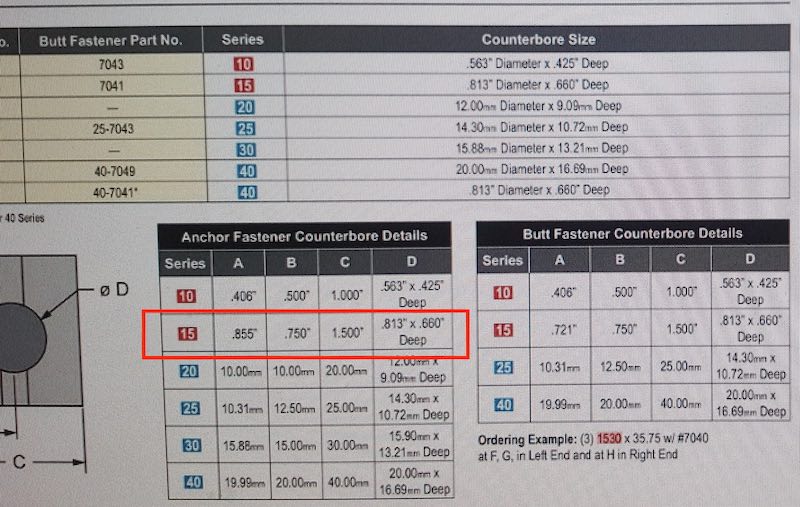
Milling for Hidden Anchor Fasteners
Anchor fasteners are a cam-like device that drop into a milled hole and fasten into a T-nut. This requires a milling bit and a drill press to accomplish. 80/20’s specs for milling a 15-series 80/20 profile are shown here. You need a 0.66″ deep hole located 0.813″ back from the end of the profile. Begin by marking a scrap of 80/20 as close to 0.813″ as you can get. Slowly mill the hole, stopping occasionally and dropping the anchor fastener in to check depth. You want the anchor fastener to be very slightly recessed into the hole. Once you have reached that depth, turn off the drill press, bottom the bit in the hole and set the mechanical lock on the drill press so it can’t drill past this depth. You have now set the cutting depth.
Now drop a T-nut into a second 80/20 profile and fasten the two together at a right angle. If the anchor fastener does not have good thread engagement in the T-nut, you drilled too far from the end of the profile. If the profiles do not fit tightly together, you did not drill far enough from the end. Work with some scraps until you get good fitment. We made a jig out of 80/20 to make this process quick and repeatable. See our video at the 14 minute mark for more detail.
Assembly Time
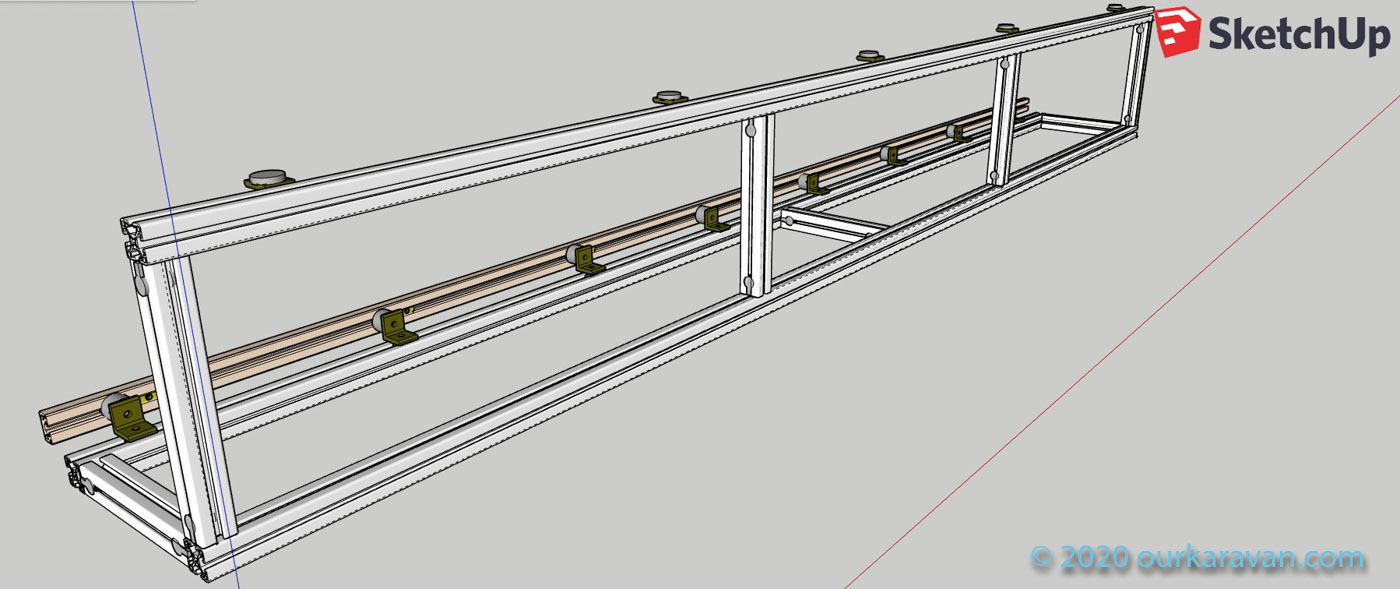
It’s finally time to build-out the rest of the cabinet structure. Now that you’ve tested that the 11-5/8″ vertical supports and 9-1/2″ horizontal would meet at right angles to the bottom outer profile, go ahead and cut four 11-5/8″ 1503 profiles. Cut three 9-1/2″ 1503 profiles for the horizontal “floor” profiles. If you’re milling for anchor fasteners you will mill two opposing sides, top and bottom, ensuring the non-slotted side would face toward the inside of the van. (See the 3D model)
For the 9-1/2″ long horizontal profiles, mill the middle profile on two opposing sides top and bottom, ensuring the non-slotted side would face down. The two end profiles only accept one milling per side. You can’t mill the inside because once you’ve slid the floor into place you would have no way to tighten them. Non-slotted side faces down–one will be a forward profile and one will be at the rear of the cabinet, so mill accordingly. Again, see the model.
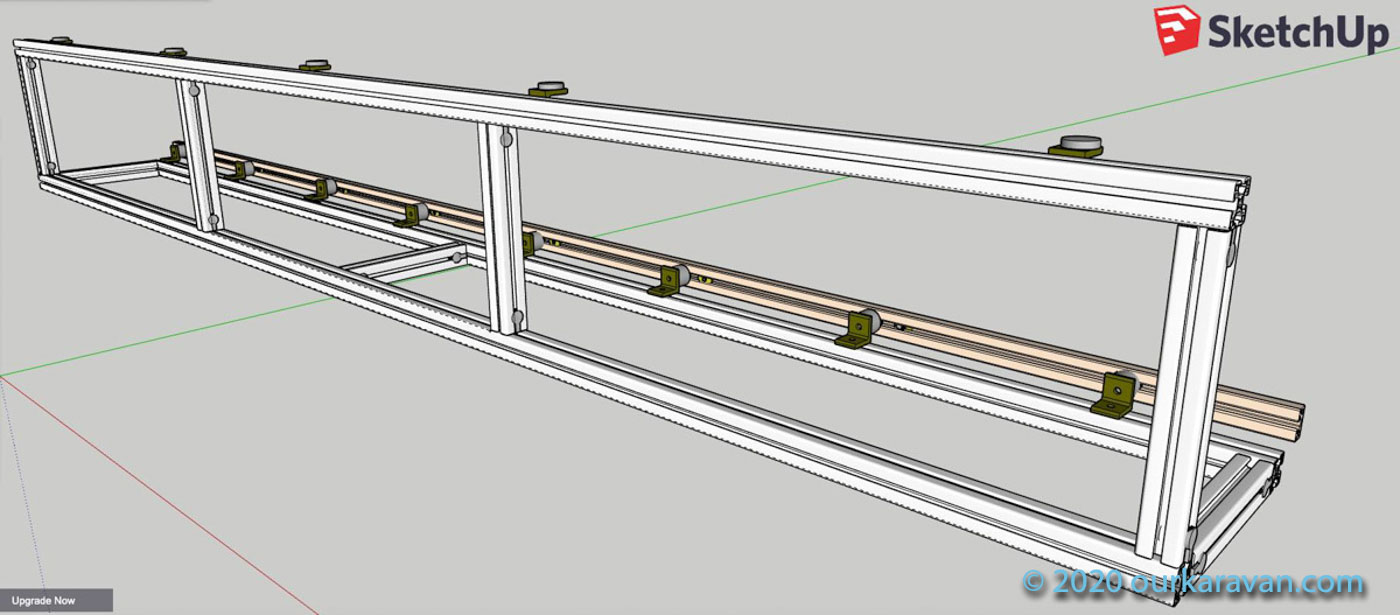
Ourkaravan 80/20 Overhead Cabinet Plans
We used the “Light-Smooth” 80/20 profiles exclusively in this galley build. The 3-slot 1503-LS and 2-slot 1502-LS are used so the T-slot is not exposed in places where it matters. The Sketchup model only depicts the 4-slot variety as it was the only profile available in the 3D model. Please keep that in mind when building. Output from the model is depicted below. You can click to enlarge each image.

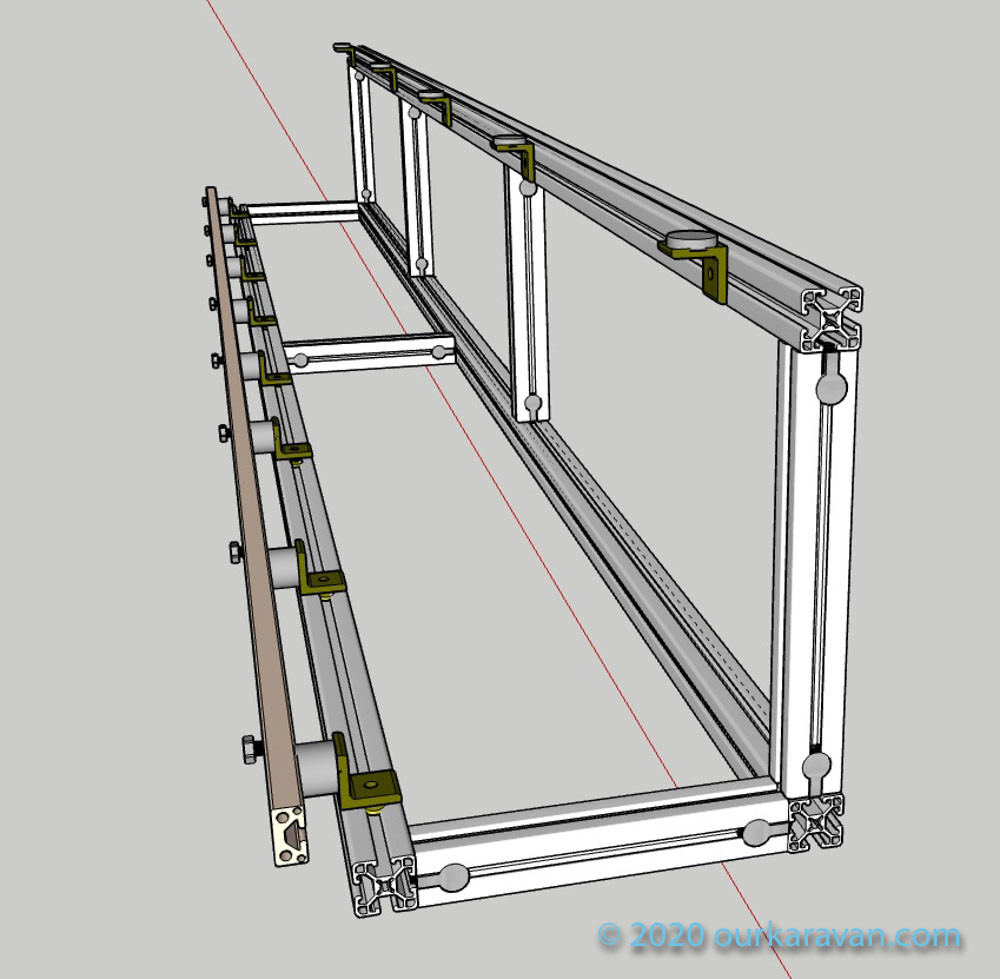
Understanding the Model
Final Product
The final product is shown below. It’s been three years since we completed this project and there isn’t a thing we would change. To learn how to attach the lift hardware and finish the cabinetry in wood, see this article.
The Round Rod link on Amazon lists the product as out of stock. I believe this is an equivalent from McMaster Carr: https://www.mcmaster.com/plastic-round-stock/high-temperature-cpvc-rods/.
Did you ever have problems with your drill press shaking when cutting the anchor bore holes in the extrusions? Or is the problem just my drill press…?
You might try a different speed, or using more cutting oil. I looked up the best speed for aluminum and set my drill press as close to that as I could get. Mine is old-school, which meant moving a belt to different sized pulleys to change the speed.
Love all your content! What size drill bit/hole is needed for the 5/16 plus nuts? 1/2″?
I used to know but of course have since forgotten. I would read the product description…I want to say it was 11/32″ but I can’t be certain.
Awesome series. Do you have an estimation of how much the parts cost came out to for these cabinets?
Hi, I recommend adding the appropriate lengths of 80/20 to your amazon shopping cart and letting it calculate current prices with shipping to your area. I describe that process here: https://ourkaravan.com/8020-extruded-aluminum-van-cabinets/
Thank you for being so thorough. I was wondering if this could be done with 10 series instead of 15? How much difference would the load capability be? Appreciate your input.
Hi Gail, the answer is yes it could. I have worked with 10 series once and never went back to it after working with the 15 series. I prefer not only the look of solidity, but the fasteners are much stronger on the 15 series, the profiles are available in a wider array of styles and there are more fastener options as well. I discuss the differences in the 10 and 15 series in this article: https://ourkaravan.com/8020-extruded-aluminum-van-cabinets/
What did you use for hinges and hydraulic struts?
Hi Dale, the cabinet hardware is described here: https://ourkaravan.com/attaching-cabinet-hardware-to-8020/
-Ken
platform bed out of 80/20 ?
Sure, anything is possible!
Hey! Just curious if you get any rattling of the 1/4″ plywood you installed for the “floor” of the cabinets? Any tricks or tips to stop any noise?
Thanks
No rattling. When I was doing the install I noticed there was enough gap between the 1/4″ plywood and the slot that it most certainly would have rattled. I ended up putting some of that rubberized anti-slip mat as a floor for the cabinet, and was able to use a putty knife to shove it between the wood and slot, completely eliminating any possibility of rattling. -Ken
Can you give approximate weight of the cabinet finished, or just the 8020 framing weight?
Thanks
t
Of course!
Framing: 34.9 lbs
Anchor fasteners: 2.3 lbs
Total framing weight: 37.2 lbs
Bamboo doors (112″ x 14″): 30.6 lbs
Total weight with doors: 67.8 lbs
Can you post a copy of the sketch-up file? Thanks!
Unfortunately the sketchup file is nowhere to be found. I’ve found sketchup to be helpful in illustrating to others how 80/20 assemblies are made, but quite frankly I prefer to simply draw-out my designs to save time. Sketchup is great but it’s clunky for 80/20 design work. -Ken
I think there’s a mistake in the PVC spacer. If the van wall is sitting at 91.5 degrees then the PVC spacer should be cut at 1.5 degree angle to cancel the additional 1.5 degrees from the van wall. The 8.5 degree angle will overcompensate.
Hi Biao, the van wall is tilted 8.5 degrees from straight-up-and-down at the point where I measured it. That should mean the van wall is 81.5 degrees. 8.5 was the right angle for my situation. -Ken
That’s what I was saying. In the “Cutting Angled PVC Spacers” section it was mentioned “The half-profile of 80/20 is sitting at the same 91.5 degree angle as the van wall.” I think it should be 81.5 degree angle here.
Ah, I see the error…I corrected it, thanks for pointing this out.
Thanks for the structural fiberglass idea. I didn’t know there was such a thing.
I’m noticing the stuff everywhere. I was on a hike recently and found a pedestrian bridge over a creek made from the stuff. I’m sure humans lugged the parts in, so lightweight was critical.
Know anyone in or near North Western Montana
That is able to assemble this system in a 2023
Ford Crew Transit
I don’t but maybe someone can chime-in. As far as assembly, I think it’s pretty equivalent to putting together some IKEA furniture, except there’s only one fastener type.
May I please asked where you purchased the bamboo sheet/door?
I purchased from both Hughes Hardwoods in Rancho Cordova, CA and Auburn Hardwoods in Auburn, CA. Neither store had any trouble ordering it, so based on that I would think most good hardwood stores could obtain it for you.
What a great video. We just had new overhead cabinets put in our Sprinter by ‘professional’ and they made a big botch of it! Nothing compared to yours!! Told my wide we will live with it for a few years and do it ourselves; your way.
Couple of questions if I may:
1. Is there a follow up video?
2. How difficult is it to remove the headlining? Any special tools required? I do my own old car upholstery but have never worked on a sprinter.
Once again what a brilliant video and your calm, precise presentation is great!!! Many thanks, Marcel
Hi Marcel, I don’t have a follow-up specific to the cabinets but I did a general video about how the van is holding up after six years of use. The cabinets have held up great, nothing to say other than they are rock solid and look as good as day 1. The headliner can be removed with simple $6 trim removal tools for popping loose the plastic fasteners. There are replacement fasteners available on eBay that are almost identical and cost next to nothing. Just know there is an order to removal and reinstallation. I discuss that order here: https://ourkaravan.com/8020-overhead-cabinet-framing/
Good luck and thank you for the kind words. -Ken
Hi Ken,
first, thank you for all the information you have been providing. I have a question regarding the anchor fastener: can it be installed on the flat (not slotted) surface of the 1502-LS profile? Or will only the slotted side support it?
Thank you.
Jacek
Good question. My guess is it can only go on a slotted face. While the hole for the fastener could easily be milled, it still depends on the slot for the rest of the fastener. -Ken
Thank you for all of your time and effort compiling these instructions and parts lists!
You are welcome, thank you for following along!
Did you use a 2-flute or 4-flute end mill for anchor fasteners, and why you chose the one you did? Home Depot no longer carries the one you linked to. Do you have another recommendation? Thank you.
Mine is a 4-flute that I bought on amazon, which is no longer available. I have not used this one but it has the same specs: https://amzn.to/4d1jYEk