


Completed Galley Cabinet
Ourkaravan Galley in Sketchup 3D Modeling
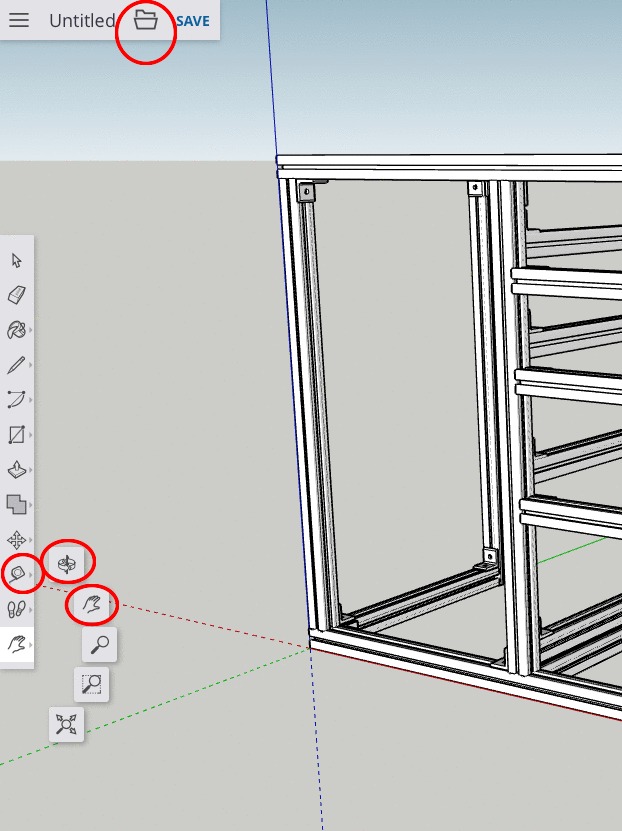
You may download the Ourkaravan Sketchup Model (.skp) file for free and load it in Sketchup. You can use the Google Sketchup website to view the file, with no download required. In Sketchup, click on the folder icon at the top of the window and click “insert,” linking the file you downloaded. You can do a lot with just the pan tool (the hand), the orbit tool (the two arrows pointing around the axis) and the tape measure tool, which will allow you to measure any component on the model. You can also use the scroll wheel on your mouse to zoom in on any part of the model. These main features are circled in red below.
We are doing our best to offer as much information as possible for free. If you find the information on this website helpful, you may consider using the donate button below. We sincerely appreciate your support. Alternatively, you may click on the 80/20 links when you’re ready to buy. As Amazon Associates we will make earnings from qualifying purchases.
Did you bolt the cabinets to the wall, floor both? Do you think stock IKEA drawers could be mounted vs building like you have done. I love the 8020 method of construction. Thank you in advance for your help.
Hi Karen,
The lower cabinets are bolted through the sidewall of the van. Essentially, there are four legs in the galley and each leg has a carriage bolt inserted into the slot of the 80/20, which passes through a hole I drilled in the van wall, with a small backing plate and nut on each one. The backing plate just acts as a large washer, that way if an accident were to occur the nut wouldn’t just pull through the sheetmetal. The cabinet is also bolted to the floor in two places, using the factory d-ring tie-down locations. I just ran an angle bracket off the framing over to the tie-down and ran the bolt through it. It’s all very solid. I hope that helps!
As for drawers, I suspect you could use any number of drawers and drawer slides, as the important part is having something to mount the drawer slides to–the 80/20 cross bars can be moved where needed to support those. The biggest challenge will be building the drawer openings to the right dimension to accommodate the pre-made drawers you buy. I did the opposite–I decided what size drawers I wanted and built to that dimension.
We are just starting our build (in a Ford Transit) and stumbled upon your youtube channel and website and both have been a huge help with design and build ideas. We will for sure be using your galley and likely exactly as is, it’s what we’ve been imagining since we started dreaming of a switch to a van. We purchased a few items through your affiliate links, the least we can do!
Thanks!
Thank you Luke, I appreciate the message! I really appreciate the support as well. Make sure you let us know your van is coming along. One of these days I need to think about organizing a meet up. -Ken
Thanks so much for all this information. May I ask what attachment method you used for the plyboo skins?
Thanks!
New write-up coming this week to show exactly that! Thanks for following along.
I have purchased a Ford Transit and I plan to use 80/20 to build all the structure including a lifting bed. I was looking into using sketch-up to design and was wondering if you created the extrusions in sketch-up or if you downloaded them somewhere. You’re galley design is awesome and I will inspire my build on it although I have different needs.
I think you are doing a great job with your web site. I’ve watch most of your YouTube videos and those are great too. I will definitely use your links for purchasing material knowing that you will get a little something out of it.
Hi, I have the .skp Sketchup file on the website in the writeup that show the 3d drawings. You should be able to click and download it and make any modifications you wish. Give it a try and let me know if you have any issues. I really appreciate the positive feedback!
I built a similar cabinet, but the frame seems to rattle a bit. I only have it bolted to wall, perhaps bolting to the floor tie downs will help.
Did you experience any rattling from the aluminum frame?
Rattling means something is loose. Have you checked all of the connection points? I did have rattling initially and discovered one angle bracket was only finger tight. Haven’t had any rattles since.
Love that galley! Wondering if you can share what the cost was?
To be honest I have yet to add it up. I am finishing up the last of the cabinetry now and plan to do a write-up once it’s all done. It’s difficult to break it out right now since the battery box, entire galley, the rear cabinetry, overhead cabinetry and roof rack are all made from 80/20. Stay tuned!
Hi Ken Sir,
Planning on following up your idea but with a Cruise 85 fridge (little smaller) as my version will be a little smaller.
How did you attached the fridge to the main 80/20 structure?
Hi, the Cruise 130 has 2 plugs on each side of the refrigerator, on the inside of the unit. I pulled the upper plugs, passed a small bolt through an angle bracket attached to the 80/20, then reinserted the insulating hole plug. That’s it!
Hi, thanks so much for putting this up! When you ‘skinned the frame’ with bamboo,’ did you wind up glueing the bamboo to the frame (like the strip next to the fridge)? Thanks!
Yes, the piece to the right is fastened to the frame with 3M very high bond (VHB) tape. It’s the only place I have used VHB so far.
Is that fridge sitting on the floor? Which one is it?
The fridge is sitting about 3/8″ off the floor. I did that because the bottom of the door has to clear the tracks that run across my floor. It’s basically sitting on strips of 1/4″ plywood that has my flooring glued to either side. The fridge is an Isotherm Cruise 130 Elegance.
Hey man. I am a big fan not only of your project and conversion, but the way you explain it and share with the rest. So thanks a lot for that. I have recently purchased a 2016 4×4 Sprinter (in Munich, where I live) and will be starting the conversion very soon. I wanted to ask your opinion on a subject I have not found info. I am a bit reluctant to put my 80/20 structures straight against the metal wall of the van without an interface to prevent scratches, I know they are tight and there will be very little movement between them, but I still would like to have some 1-2 mm rubbery type of interface. Have you done anything like this? do you have any advice?
Hi Rafa,
I have done essentially that. For my galley, I have some small strips of closed cell foam between the aluminum and the body. It’s mainly there in an attempt to thermally isolate the aluminum from the body so it doesn’t absorb as much heat/cold through the van’s steel. The overhead cabinets use fiberglass angle to achieve the same thing (and won’t scratch the paint as easily as the aluminum), and I have also used some PVC spacers that the overheads mount to so it doesn’t crush the headliner. If you watch my overhead cabinet framing video on youtube you should be able to see how those are implemented. Good luck and thanks for the complements!
Excellent! thanks so much for your response!
Hi Ken,
I’ve started framing my Promaster with 8020 and have begun building off of 1545 along the back walls as the entire lower cabinetry will tie into this. There will be overlapping 1545 the will protrude over the passenger door as the basis of the galley cabinet
I was looking at Sketchup (Make AutoCAD look like grade 1 math) and was wondering if you could recommend how you learned it? Its intimidating….
Hi Jon,
I watched a couple of tutorials on youtube to get the basics of Sketchup, however if I used it today I would probably have to re-learn 80% of it. It’s not the easiest to learn or use when modeling 80/20. I’ve heard “framexpert” is much more user-friendly for modeling 80/20, but it only works on PCs and I use Mac. Not sure which platform you are on but give that one a try?
Hi Ken,
I’ve got both. I talked to the guys at 8020 and they use AutoCAD with their plugin. Apparently its quite easy with the plugin. I’ll try frame expert, I think I can build the van faster than designing it with Sketchup))
Hi Ken,
I downloaded and tried Framexpert. I accomplished more in 10 minutes than 4 hours with Sketchup. You could do you entire galley in less than an hour.
I’ll do my entire build in an evening. I am not sure why 8020 is not promoting the hell out of this tool
Oh good, glad to hear! Sketchup worked but was not the ideal tool. I wish there were a Mac version of the framexpert software.
Maybe I’ve missed it in another video or in the comments section but how did you attach your exterior wood panels to your frame you built with the 80/20?
Hi Zack, the exposed ends of the 80/20 are designed to be tapped with 5/16-18 threads. I did exactly that with a tap and used button head Allen bolts to bolt the cabinet end caps in place. -ken
Hi there,
I’m doing a very similar kitchen galley to yours and have a dometic fridge that looks just like yours. How did you secure the fridge to the floor and/or wall of the van? I’m in the process of connecting the 8020 framing around it but I need to secure the fridge down first. Any recommendations you have would be awesome. Thank you !!
Hi, my Isotherm refrigerator has four holes, two on each side, that pass through the fridge near the front. (none at the rear). I slightly enlarged the holes and passed a very small bolt through the fridge and through an aluminum angle bracket attached to the 80/20, with a nylock nut on the back-side. I only used two of the four mounting points as it’s very secure and can’t go anywhere. I hope that helps!
Thank you so much for the details on your build! It’s tremendously helpful (and am buying from your Kit store!). Have you had any problems with efficiency or ventilation putting your Isotherm directly on the ground and up against the back wall? I’m doing the same thing, and was concerned it may draw more power without air flow. Thanks!
Hi Kelsey,
Isotherm recommends some breathing room all-around. It’s hard to tell but I have somewhere around 1/2″ of space between the floor and the bottom of the isotherm. Also, I drilled some ventilation holes in the backwall of the van so the fridge could breathe through the wall in addition to the side vent I have in the side panel. My fridge works hard when parked in the sun in 100 degree weather. I’d play it safe and leave plenty of ventilation.
Thank you very much for the support via the links, much appreciated. Let me know if there’s anything I can help with.
May I ask if the Sketchup work that you did is available for download and editing? – my project is not the same – its a Renault Master but I thought at least the 8020 components would be drawn already for me to use. I have only just today downloaded Ketchup so I am at ground zero. thanks Don
Hi Don, yes the link to the sketchup is available. It’s not the easiest software to learn but I muddled my way through it. There are quite a few helpful videos on YouTube if you want to make the time for it. -Ken
So glad I found your website and videos – they are wonderful. We have almost no experience with this kind of work, but are doing the build of our 2020 Transit van because we can’t afford to have a pro do it, and we want to keep it simple. I’m sold on the 80/20 and can’t wait to get started. Thank you so much for the wealth of information and plans!!!!!
Congratulations on the van and for the kind comment. Take your time and it will come out great, and we are here if you need anything. -Ken
Hello Ken,
Both I and my wife have read and watched tons of contents (and the story) that you have graciously shared. Much appreciated. You mentioned you built the frame according to the size of the drawers you were going to purchase. Do you have a recommendation as to where we could purchase them? I think I will also pick the drawer size before I design the galley. If possible I’d like to readily available faces as well. Thanks again.
-Cal
Hi Cal, I think what I was trying to say is you would normally build the drawer compartment around the size of commonly-available drawers, but in this case the Blum drawers I used allow you to build them to any specification. Doing it this way means your drawer compartment can be virtually any size. I have a separate article on building drawers if you haven’t seen it>. https://ourkaravan.com/building-drawers/
We also have the cabinet framing pre-cut and available as a bolt together kit if that interests you. Thank you for all of the kind words! -Ken
Hi Ken, outstanding series buddy! What wall treatment did you mount behind your cabinets other than the foam to break the heat bridge? Or all the walls insulated and with the bare metal left exposed but hidden by the cabinet?
Alan
Hi Alan, if you were to remove the drawers in the galley you would see the bare metal. There are so many wires, hoses and drain lines that making a wall panel didn’t really seem worth the effort. However, behind the rear cabinetry it is fully upholstered as you actually see back there when the cabinet is open. -Ken
Did You consider using 80/20 serie 10 instead?
Hi Jean, yes we have used it. We discovered the 10 series has some downsides not present in the 15 series. I talk a bit about it in this article: https://ourkaravan.com/8020-extruded-aluminum-van-cabinets/
-Ken
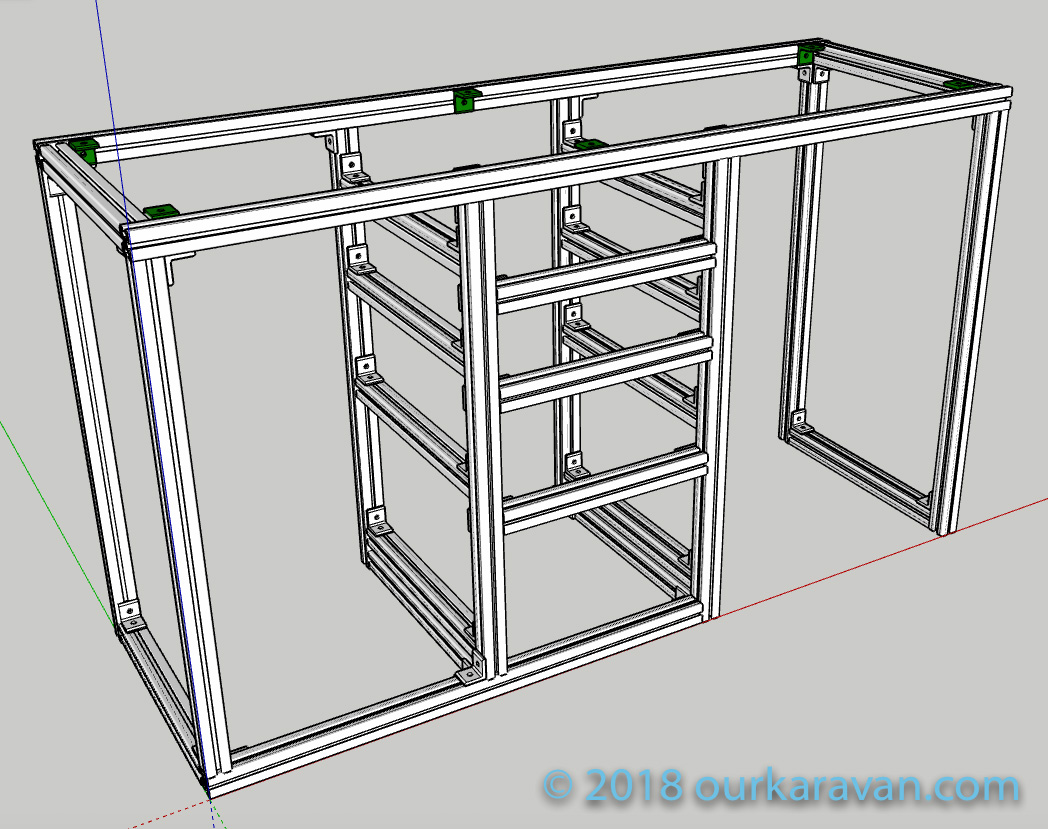
Ken. Thanks for making the kit. We are working with the Heitek folks on some mods. Quick Q. Do you think the front bars are necessary between the drawers. Given the drawers overlay the framing anyway, it seems those front bars are not really serving a purpose. Structurally, maybe more stability? I look forward to your opinion on this.
–Sean
Hi Sean, the front bars offer a place to install a catch for the slam latches. Without them you would need to get creative on how to get the drawers to latch to the framing for secure driving. I’ve tried magnets and they don’t cut it. If you didn’t mind the strange aesthetic of the latches mounted to the side of the drawer box rather than centered at the top, that could work. You could also use a thinner profile such as a 1575 series, however you’d have to determine whether or not anchor fasteners would work on those–L-brackets won’t because they will impede the drawer operation.
To answer your question, those profiles are not needed to structural rigidity–this frame is solid. -Ken
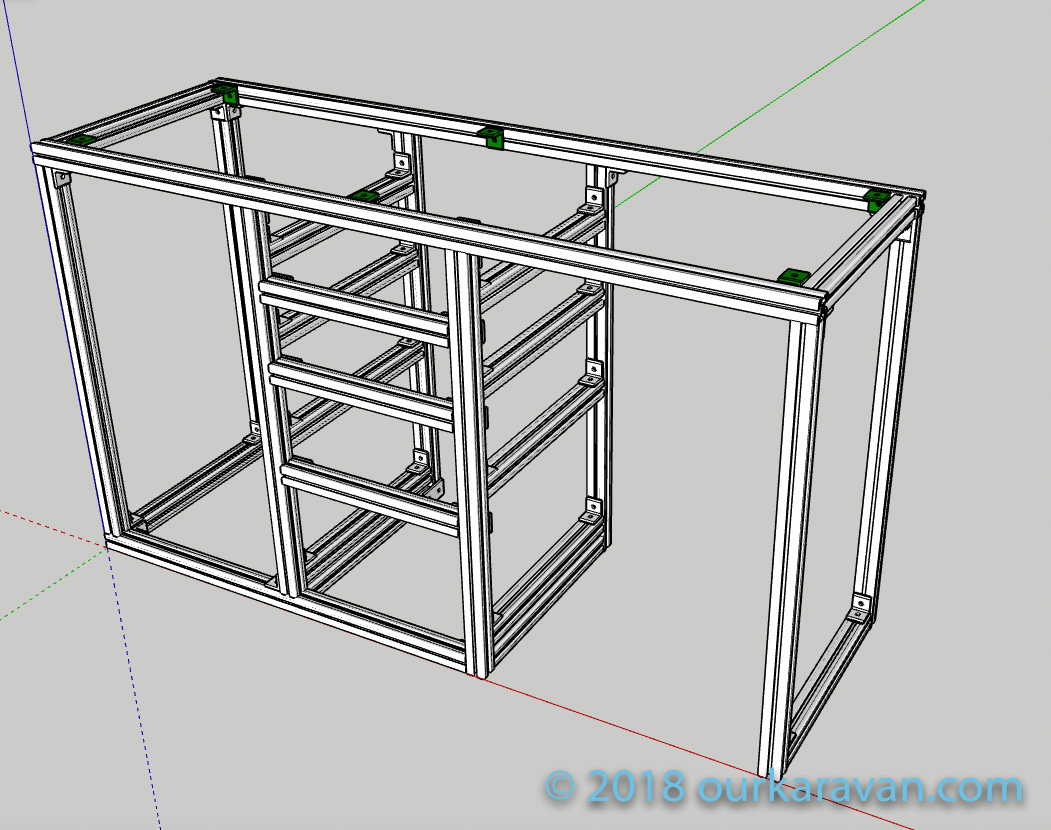
Ken, always enjoy your videos and the way you present them (good work). I was wondering how/why you determined whether to have the “downlegs” go all the way to the floor, or rest on a crossbar? I would think that having the weight resting on a crossbar would be the “desired normal”, but, I’m sure that esthetics plays a part, as well as function.
Any insight would be appreciated in designing.
Thanks,
Ken
Hi Ken, you’re right, just a mix of aesthetics and strength where it’s needed and lighter weight where it’s not needed. There is no wrong to do it, as long as the entire structure is well-supported in the event of a vehicle crash.
Thanks for the kind words and good luck with your build! -Ken
Thanks for the tips, Ken! I just watched a downer video on 80:20 due to costs mostly, your strategy for making the connectors takes care of a lot of that! I would buy a kit if it was 40″ wide ;-). I have a 144″ Sprinter, so only have 40″ with (inside flares).
Aluminum has definitely not been immune to raising material prices. As far as galley width, what are you looking to do? If you’re just looking for a slide-out fridge section with a drawer above it (basically the water system removed), we can do that. There’s a contact page on my website where you can email me if you want to do something like this. -Ken
Absolutely love this site – great ideas and the YouTube video is clear and concise
Thank you!!
Hey guys. I have roughly the same cabinet design. how did you cover the 8020 on the swinging door. Did you find a latch that overlays the entire 1.5 inc extrusion or did you use trim pieces. It looks like you have one on the right side of the fridge. Did you use adhesive or is it a mechanical attachment. Thanks so much,
Paul
Hi Paul,
I’m not sure I understand your first question but regarding the second–the bamboo strip to the right of the fridge is held on with a few small pieces of 3M VHB tape. -Ken
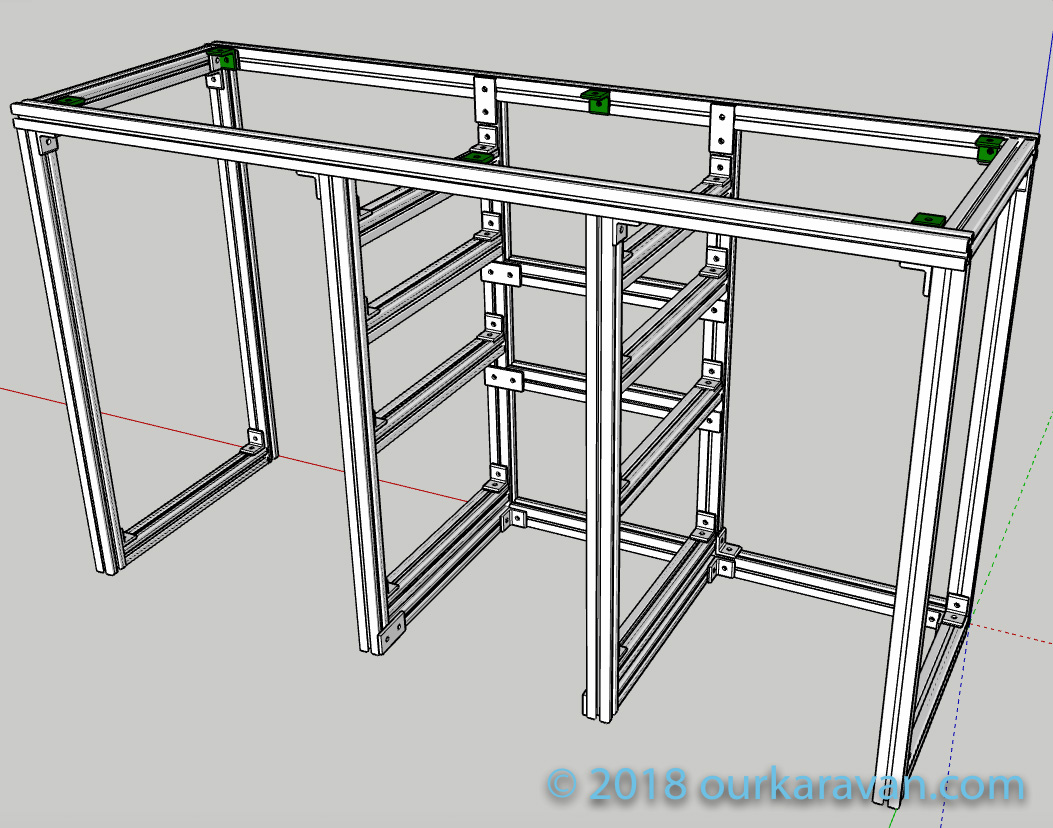
How wide is the sink space and the fridge space?
The fridge opening, in-between the framing members, is 21.5.” The sink area is 16″ between the framing, and drawer compartment is 15″.