Simple Hot Water Shower System

Simple Hot Water Shower System for Van and RVs

OurKaravan Logo

Background

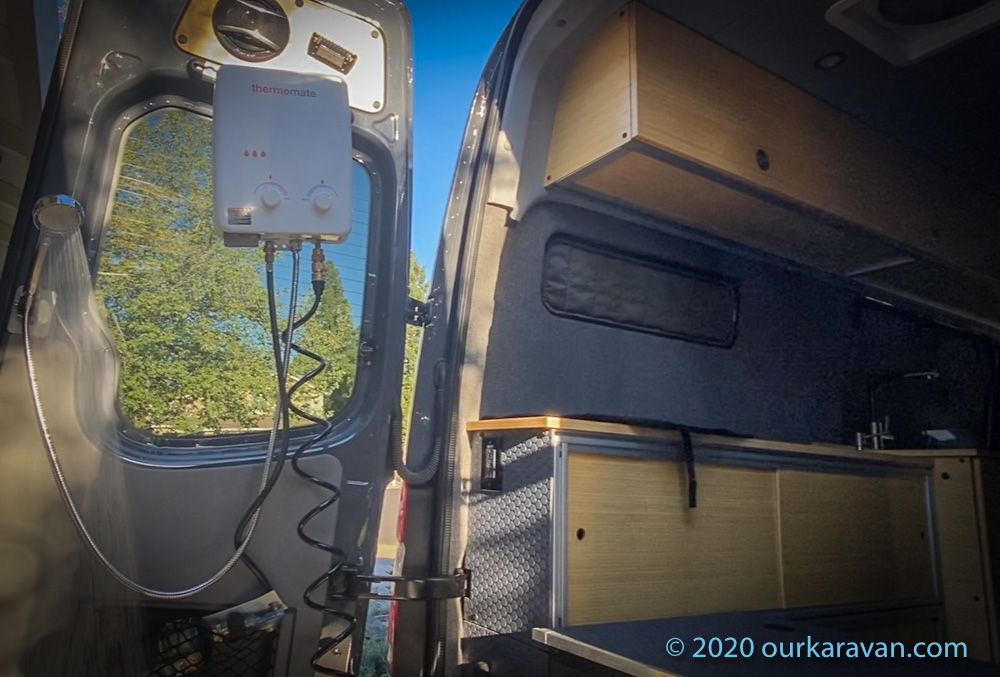
We recently added a simple hot water shower system to the Karavan.  The ability to take a hot shower after a run, hike or bike feels like a luxury.  We decided a simple propane-powered instant hot water heater was the best route for us for several reasons:

    • Inexpensive compared to diesel heating or the electrical system required to run an electric unit;
    • Easy to Implement–no tempering valves, winterizing loops, etc;
    • Takes up less space in the van (critical to us);
    • Provides instant hot water

simple hot water shower system

How Our Water Systems Work

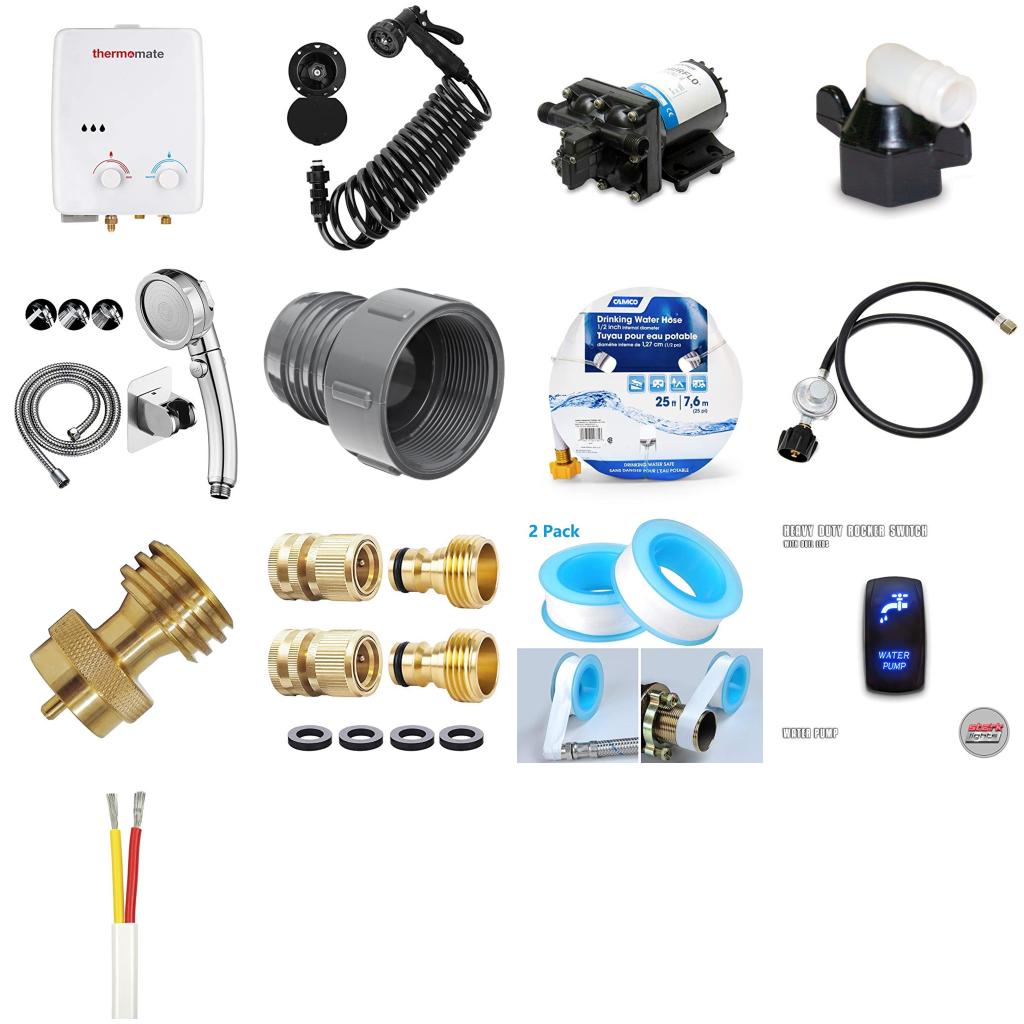
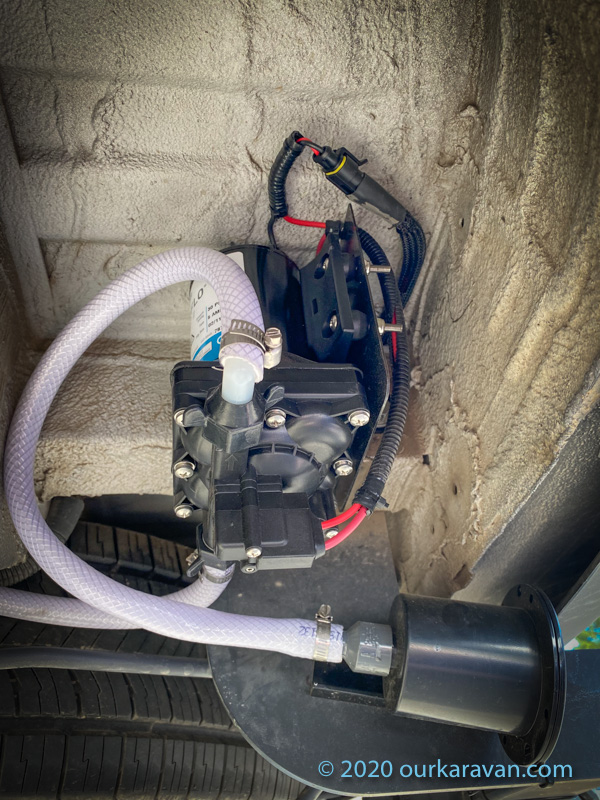
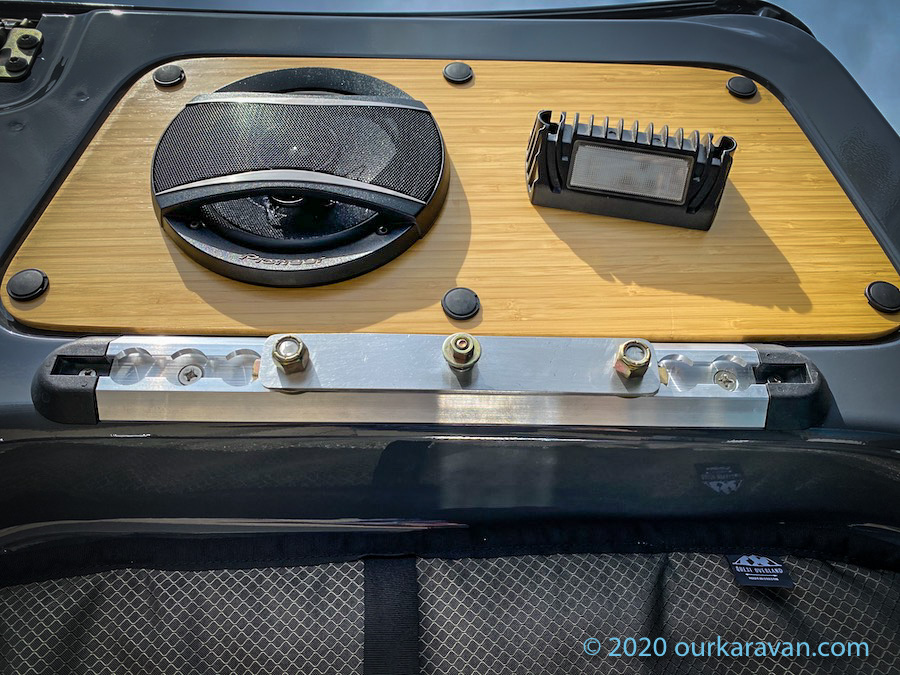
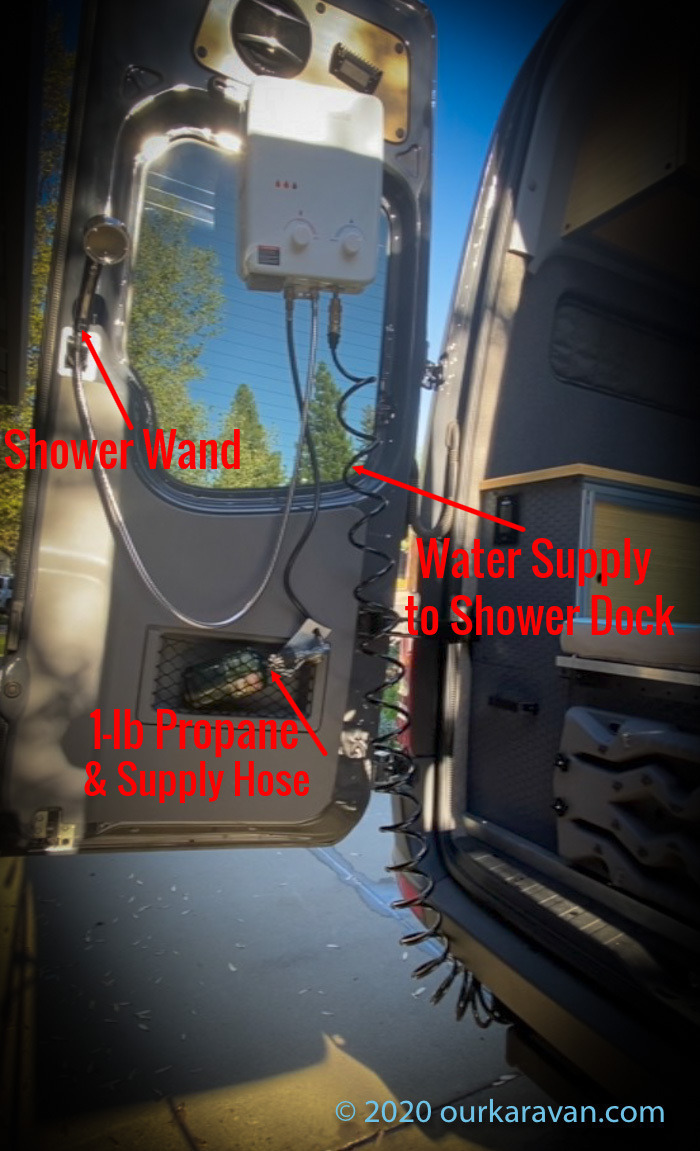
Water is supplied to the hot water heater from a dedicated 8.8 gallon water tank that we built from 8″ PVC Pipe.  (Our sink is plumbed for drinking water from a separate portable jerry can system.)  Hot water is picked up from the tank by a water pump and delivered to a dock port on the rear of the van.  Showering occurs between the open rear doors of the van.  This article provides all the details you need to replicate this simple system.

Note:  This site contains affiliate links for which I may be compensated.

Parts required:

Propane-Related:

Electrical-Related:

Before you begin we recommend watching our 8 minute video below to orient yourself before diving into the build detailed in the text below.

Simple Hot Water System Video on YouTube

Choosing the Hot Water Heater

We did a good amount of research before selecting this particular hot water heater. Compared to the competition, this hot water heater features an all-copper heat exchanger and a more advanced magnetic flow sensor.  (In the video above I showed some comparisons of the construction.)  The magnetic flow sensor can precisely detect water flow.  This is important because we will be using the “pause” button on the shower wand to start and stop the flow of water.  The flow of water is what triggers the water heater to automatically light the burner.  It will light-off with only 2.5psi of pressure, while the competition’s rubber diaphragm sensors often require 25-30 psi.  

What we Know About Propane Instant Hot Water Heaters and RV Water Pressure

The problem some users have with their propane instant hot water heaters is related to flow detection.  Many RV water pumps are only spec’d to provide 35 psi of water pressure.  When you turn the water on via the shower wand, it may take a bit of time for the pump to build up 35 psi necessary to light the burner.  You may be familiar with the pulsing the RV water pumps do to maintain pressure.  Often these pulses allow the water pressure to dip enough to turn off the burner on the water heater.  This is due to higher water pressure required to push on the rubber diaphragm to trigger the flow sensor.

In summary, the magnetic flow sensor in the unit we chose is not constructed of rubber and will last longer than the rubber diaphragm-type.  In general we think the copper construction and the more precise magnetic flow valve makes this a great heater for use in a van or RV.  

Planning your Component Layout

The first step in planning your outdoor outdoor rear shower is to decide where to mount your water pump.  We decided to mount ours to the chassis on the driver’s side rear corner.  The backing plate for the trailer hitch is very easily removable.  From there you can either bolt or weld a bracket to hold the pump.  Because our battery is also at the rear corner of the van, it was easy to puncture a hole in a big round plastic body plug and fish the electrical wiring into the battery box.  We secured the pump to the bracket with four stainless steel bolts with unlock nuts.

Routing Water Supply Lines

With the pump mounted you can now connect the water pump to your water tank.  We needed a 1/2″ female NPT to 1/2″ barb to connect to our tank.  Although our system is intended only for shower water, we used drinking water parts.  We recommend this 1/2″ drinking water hose.  The hose was routed through various existing holes in the frame crossmembers and required just a few zipties to keep the hose over the parking brake cables.  The hose meets the water pump through a 90-degree elbow that attaches to the pump.    For the pump, used the same 2 GPM Shurflo pump that pressurizes our drinking water system.  

The water leaves the pressure side of the pump through a second 90-degree elbow. A short section of hose brings the water to another 1/2″ barb to 1/2″ NPT fitting and to our quick-release shower port.  This port has a door to keep dirt out and has a valve so the system can remain pressurized without water pouring out when you disconnect.  

Mounting the Quick Release Shower Port

To mount the spray port to the trailer hitch we drilled two small holes through the trailer hitch bracket and two matching holes in the body of the spray port.  Some leftover aluminum U-channel sat in-between in the hitch and the spray port to make the round contraption square, basically.  Two stainless steel bolts with unlock nuts attach the spray port to the hitch bracket.

Water pump on sprinter van

Running the Electrical

As described earlier, we punctured a hole in a big round plastic body plug near the rear corner of the van.  Through this we fished the electrical wiring into the battery box.  The wiring goes through a simple 12V water pump switch and connects to our Blue Sea fused distribution box.  Our water pump switch is located inside the battery box so it is not turned on accidentally.  Kids, ya know.  At the pump we wired a 2-wire connector to make it easier to service should the pump ever require removal.

Mounting the Hot Water Heater 

We installed Airline Track (L-Track) above the rear doors, which we detail in this article. We chose to mount the water heater above head-height.  The primary reason is we will have a head-height shower curtain go around the entire perimeter of the open rear doors.  If the curtain were low, the curtain could easily be melted or burned by the heat coming off the water heater.  

Through the use of two L-track stud fittings, we made a simple mount to hang the water heater from it’s picture-like hanger.  Two holes were added to a strip of aluminum so the stud fittings could pass through.  One additional hole was drilled in the center and we placed a bolt with a nut, from which the heater hangs.  Because it’s me, I rounded the corners of the aluminum to make it look nice.

L-track water heater mount
Simple Hot water system diagram

Putting Garden Quick Connects on the Hot Water Heater (optional)

The water heater came with a brass adapter to convert the water inlet to a garden hose fitting.  To that we attached a male garden hose quick connect.  This makes connecting the water supply fast and easy.  We unscrewed the spray nozzle on the coiled hose that came in the spray dock kit and threaded the female quick release on the other end.  Now the coiled hose can be mated to the hot water heater inlet via quick connect.   At this point you have a quick connect between the hot water heater and the coiled hose, and the other end of the coiled hose plugs into the dock by the trailer hitch.   Be sure to use teflon tape between all of the threaded water fittings. 

The hot water heater also came with a brass adapter to convert the water outlet (the hot water) to garden hose thread.  To this we attached a female garden quick connect.  However we need an adapter to covert the end of the shower head kit to garden hose with this adapter.  Onto this you can thread the male quick connect.  Now the shower wand will quick connect to the water heater.

Connecting to the Liquid Propane (LP) Supply

The last step is to thread the gas line onto the hot water heater.  Route this to your Liquid Propane (LP) supply, or if you’re using 1-lb bottles like we are, thread the propane adapter into the regulator end of the LP hose and leave it there.  The regulator then screws onto the 1-lb propane bottle.  ALWAYS DO THIS LAST.  If you connect the regulator to the canister first, gas will escape the other end that is not connected.  We simply put the propane bottle in the factory rear door cubby while showering.  This same cubby is used to transport the supply and shower wands when the heater is not in use.  


Storing the Hot Water Heater

The hot water heater is not something that we use on a day-to-day basis.  As such we store it under our sink with our 5-gallon water jerry cans.  That setup can be seen in the video.  Certainly you can hard-mount it if you desire. We ended up putting our tire traction boards in the space we had originally intended for the hot water, as the former is much harder to store.  

Getting Set Up

To use our shower we hang the hot water heater on the rear door.  We plug the coiled hose into the quick connect shower dock mounted to the trailer hitch and the other end quick-connects to the water heater.  The shower wand also quick-connects to the heater.  The shower wand then rests in a tilting holder that is attached to the rear door with it’s self-adhesive backing.  We screw the propane supply line to the bottom of the heater, then screw the regulator end (with the adapter attached) to a 1-lb propane bottle.  It’s shower time!

Using the Hot Water Heater

We start by making sure the pause switch is engaged on the shower wand. Turn on the water pump switch.  From the time you unpause the shower wand, it takes about 4 seconds from a cold start to get hot water.  Not bad!  We use a small initial amount of water to get wet, then pause the shower wand.  We soap-up our hair, then unpause it to rinse the bio-degradable shampoo out.  Pause again to soap-up then do a final rinse.  Each time you unpause the wand the hot water delivers hot water instantly with no waste or delay.  We love it, performs even better than we expected!  

Thank you for following along.  Enjoy your build and we hope to see you around soon.

Propane Safety

It doesn’t take a rocket scientist to know that liquified propane is dangerous and should be handled carefully.  We use thread-on brass caps on our 1-lb propane bottles when traveling.  Permanently wired into our electrical system is a dual Propane (LP) and Carbon Monoxide (CO) alarm.  We highly recommend you use one too.  Use common sense and judgement when dealing with propane.  Ourkaravan.com accepts no responsibility or liability for your install; see our disclaimer at the bottom of the main van build page.   Many, but not all, “camp appliances” including hot water heaters are gas-regulated to 11″ of water column.  As such we recommend use of a low-pressure LP regulator even though it may not always be required.  

Help Us Help You

We offer all of our write-ups and instructional videos for free.  A lot of time, effort and money goes into developing and maintaining this website.  If you find the information on this website helpful, you may use our various links when you are ready to make purchases.  As Amazon Associates we will make earnings from qualifying purchases, however it costs you nothing to use them.  Alternatively you may consider using the donate button below to make a simple Paypal payment, or message us if you prefer Venmo.  We sincerely appreciate your visit as well as your support.

This Post Has 23 Comments

  1. Chris

    How does the propane H/W heater perform at altitude?

  2. Larry

    How hot is the exhaust from the propane heater? You mention you are worried about melting the shower curtain. Could it be used in a well ventilated cabinet?

    1. ourkaravan

      It’s pretty hot. I’ve seen videos of people using them inside large cabinets, but honestly, I would caution pretty highly against it. For a moment I had considered using it under my sink, but that was until I used it.
      Are you looking for hot water at the sink? I’m thinking an Insinkerator brand hot water dispenser modified to hook up to your existing faucet might be a good way to go. It’s essentially a 0.6 gallon hot water heater with a 750W element.

      1. joseph

        I’m thinking about trying that, but there is likely a switch or sensor in the factory dispenser faucet. Still researching.

  3. Bryan

    How long does your 1lb tank last you?

    1. ourkaravan

      It’s not clear yet but after a few showers the tank still has plenty in it. I’ll report back when I find out, but of course my travel has slowed at the moment due to covid.

  4. Michael

    Nice job!

    Have you considered installing nylon “caterpillar grommet” inside of the body flanges and frame members that the hoses pass through underneath the vehicle, in order to avoid any chafing of the water hoses against the metal edges of the van body while driving (i.e. from vibration)? This material is cheap and easy to install, even after the hoses have already been routed through the body and frame parts, and could avoid inconvenient water leaks later.

    Also, in the video, I noticed that the tail ends of many of the black zip-ties used underneath the vehicle have been cut “long”, sometimes with a sharp and pointy end. Perhaps you’ve already corrected this, but many of my friends and co-workers in the electrical, electronics, and aviation industries have learned the value of cutting these zip-tie tail-ends down to roughly 1/8″ or less with an ordinary pair of diagonal wire-cutters, and then following up immediately with a pair of straight-across toenail clippers (not the scissors-type). Toenail clippers are significantly cheaper and more widely-available than flush-cut diagonal pliers, and can sometimes get into tight spaces that flush-cut diagonal cutters can’t. Toenail clippers allow you to cut the tail-ends flush with the surface of the zip-tie ratchet-end, leaving no sharp pointy bits sticking out. This rather useful knowledge has often been gained only after numerous minor involuntary blood donations caused by scraping one’s knuckles across the nylon “blade” of an installed zip-tie, but I would like to save you that rather painful learning curve as a “thank you” for all of the useful information I’ve gleaned from your website. In the long run, a simple pair of toenail clippers can save a lot of band-aids and inadvertent exclamations of language that might be deemed inappropriate for young ears. (Trimming all of the zip-ties installed by the previous owner was one of my first “small projects” on the used 4X4 Sportsmobile that my wife and I bought last year.)

    1. ourkaravan

      Thank you, I really appreciate the helpful information. I was not aware of the toenail clipper trick, always love hearing the trade secrets! I will look into caterpillar grommets too, I’m not familiar with that terminology.

  5. Stacey

    How did you make the bracket it sits in under the sink?

    1. ourkaravan

      Hi Stacey, I used the tie-down kit linked in the article. I simply installed the two anchor points in the slot of the aluminum framing I’ve been using. If you aren’t using that, you could screw it to the plywood of your cabinets to retain the water containers. I hope that helps! -Ken

  6. Lily

    Hi Ken – I’m also interested in this setup, but for an indoor shower. Do you have any thoughts on how it might be kept safe and vented inside a van?

    1. ourkaravan

      Hi Lily, the heater would need good ventilation to deal with the heat that raises out the top. I really wouldn’t recommend a permanently-installed interior installation in a compact space like a van.

  7. Ryan James

    Ken, we’re pretty deep into your shower build and bought all the parts. How often do you check this?

    1. ourkaravan

      I check this fairly regularly, but am traveling right now. I see you emailed me, that’s the best way at the moment. -Ken

  8. Drew

    What do you do to protect the exterior water parts when temps dip below freezing?

    1. ourkaravan

      Hi Drew, I have not had any freezing-related failures at this point, 6 years-in. There is no freeze protection here as all of the tanks and hardware are outside. If it’s that cold I likely won’t want to take an outside shower. -Ken

      1. drew

        Cool, thanks! I imagine the pump would be damaged if it contained water in it and it all froze? Are you saying you haven’t spent extended time in below freezing weather with water in the pump, or that an extended freeze didn’t damage it?

        1. ourkaravan

          A little of both…I have not spent extended time below freezing but I have of course been in places where it froze overnight and no problems so far. In my mind, it did not make sense to route water from my exterior-mounted tank into the van, and back out.

  9. Phil Simon

    Thanks Ken. Another really great setup. Question about the “Thermomate AZ132”:

    I don’t see anywhere in the description on the US Amazon site about a copper heat exchanger. (Though the Canadian and European Amazon sites do discuss that.) Also, the description does show a very low flow capability but does not describe the type of flow sensor that this unit uses.

    Where did you find the information and diagrams you show in your video? I’m wondering if Thermomate has “cheapened” the materials they use on the US units since you bought yours.
    Thanks again. Awesome site!

    1. ourkaravan

      Hi Phil,
      The product description on their website still describes the magnetic flow sensor, however I don’t see mention of the heat exchanger construction. The unit looks exactly the same as before, so it’s hard to imagine that they changed much. That said, it’s tough to know. I suppose you could always return it–be sure to let us know what you find! And thank you for the kind words! -Ken

  10. Phil

    I was able to contact a Thermomate tech support. They assured me that it had both a copper heat exchanger and magnetic flow sensor. I guess it’s only the very discerning consumer (i. e. You) that cares about this stuff so they don’t make a big deal about it in the listing. Really appreciate your work.

    1. ourkaravan

      Ha, I definitely consider myself a discerning consumer. Thanks for confirming–enjoy the setup!

Leave a Reply