


Upholstered Wall Panel Cost
The cost to upholster the rear walls, C and D pillars, both sides of our headliner shelf and various small trim pieces in our 144″ wheelbase Sprinter was as follows: (prices updated May 2022)
- 10 yards of fabric + 10 yards of closed cell foam: $277 (plus tax, if applicable, and shipping)
- Adhesive gun + adapter + adhesive: $130
- Stapler + 1/4″ staples: $25
Total: $432, plus whatever plywood you choose for the walls.
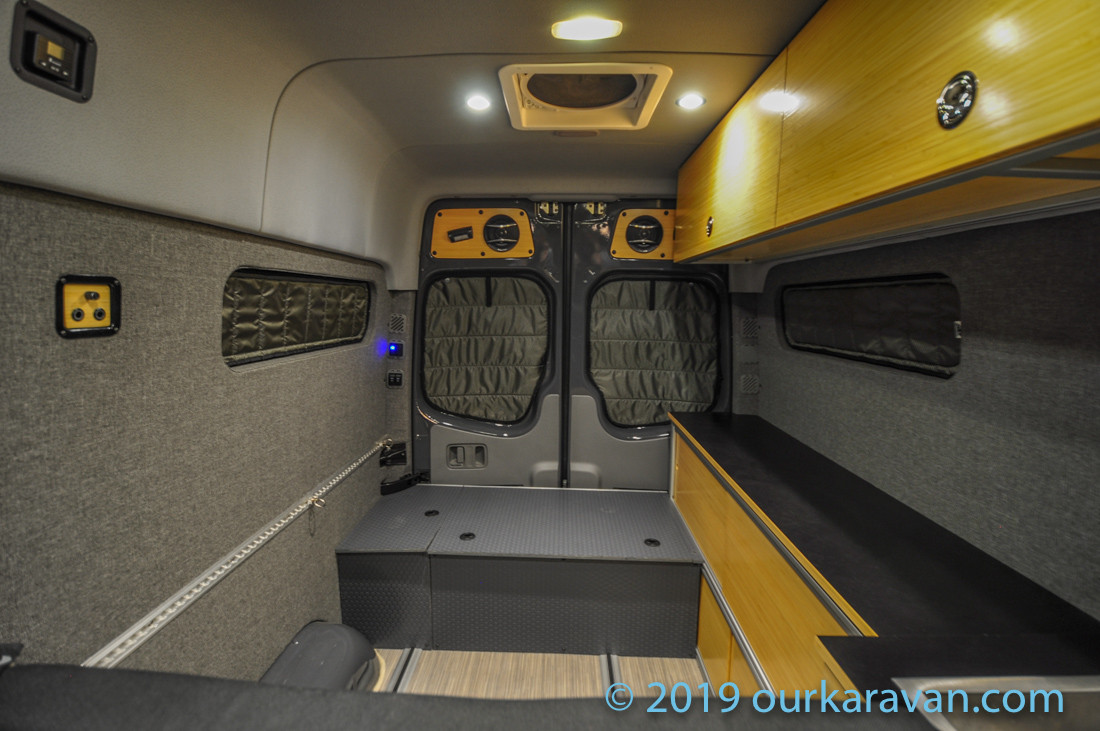
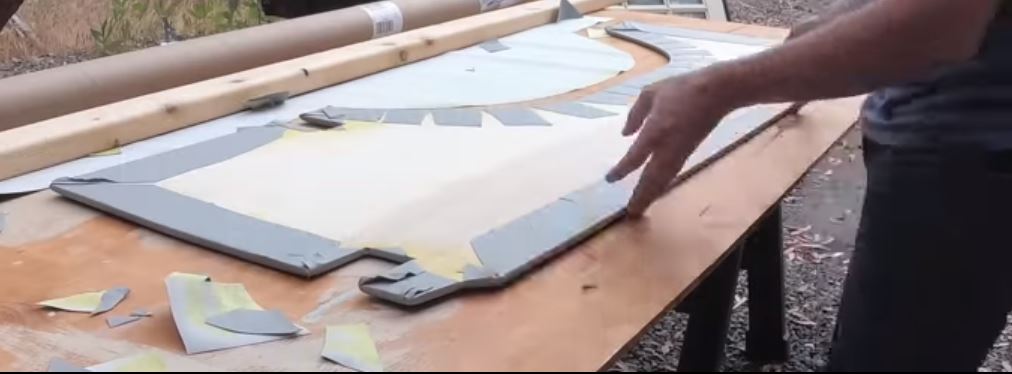
Note: 10 yards covered essentially the rear half of the van walls plus a headliner shelf we made. We have some left-over material. There is no fabric on the sliding door or below the opposing “crew van window.” Our OEM Mercedes headliner comes down the wall about 18″ saving some material. Be sure to calculate material for your needs. The photo above shows the extent of upholstery in our van. In addition, upholstery is on the headliner shelf, (both sides), on the steel pillar behind the sliding door, and the complete D-pillar at the rear of the van, as well as the wall panel behind the cabinet on the right side of the photo.
A Note about Materials
The fabric upholstery is sold by the lineal yard. The rolls are 54″ wide. 1 lineal yard would be a roll 54″ wide by 36″ long. We ordered 10 lineal yards to do the walls and the headliner shelf in our 144″ wheelbase Sprinter van. The cost of 10 yards of fabric is just over $130 as of May 2022.
About the glue — resist the temptation to use 3M-90 or other spray can-based adhesives. In the longterm, such products will not withstand the temperature variations in an automobile. If the glue does not hold, you’ll be re-buying all the material and having to tear your van apart to fix it. The Dap Weldwood is what professional automotive upholsterers use. When we made a mistake and tried to separate the glued upholstery from the panel, the Dap adhesive actually ripped the wood fibers out. It’s strong stuff!
Making a Cardboard Wall Panel Template
Begin by measuring the width and height of each area where a wall panel will reside. Keep in mind you will be limited by the size of a sheet of plywood, most being 4×8-feet. Much of the fabric is sold in 54″ wide rolls, and any length you desire. Draw and cut the rough shape onto cardboard. You can now measure and trim-out for things like wheel arches. For complicated angles or curved surfaces, scribe to get a perfect translation from the surface to your wall panel.
With our cardboard template complete, you can now trace the outline onto your wood panel. We used 5.2mm plywood from a local hardwood store for our panels. If you have ANY questions about fitment, be sure to cut large, as you can always remove material later. Keep in mind you will be wrapping the upholstery around the edges, so leave about a 1/8″ gap to account for the thickness of the fabric.
If you are doing cut-outs for windows, see our YouTube video for an easy trick.
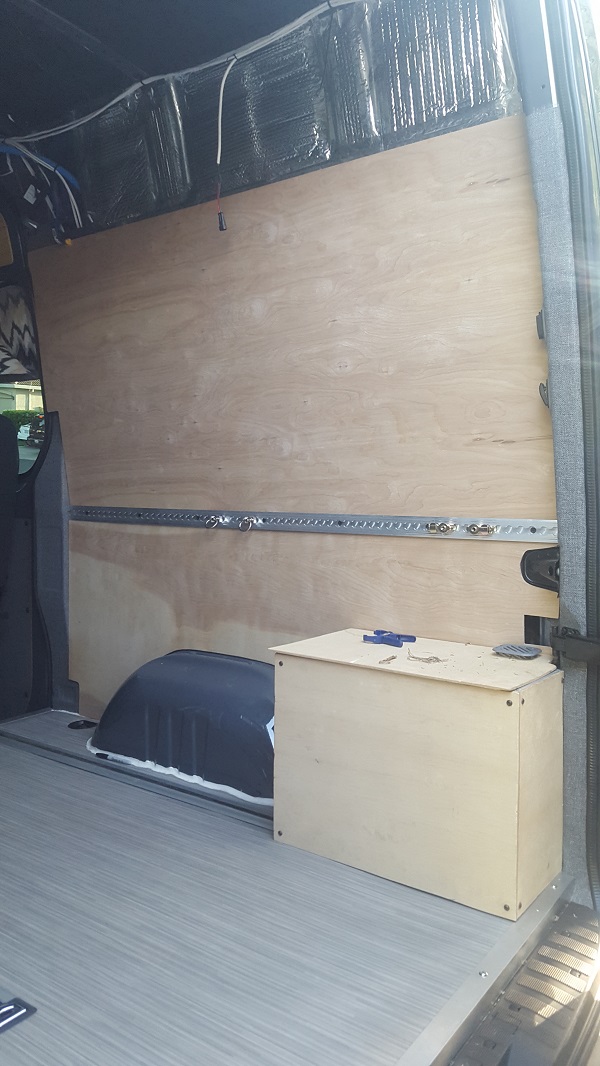
Securing the Wall Panel to the Van
Our wall panels have only three screws each to hold them in place. The L-track retains the top of the lower wall panel and the bottom of the upper wall panel. The factory headliner holds the top of the wall panel in place. We used one screw into the van metal near the front of the wall panel and two screws in the rear near the D-pillar. Your needs may be different depending on the size of your wall panels and your specific cabinetry layout.
Now is the time to drill the necessary holes in the wooden wall panel to fasten it to the van.
Preparing the 1/8″ Closed Cell Foam
The 1/8″ foam under the upholstery offers a nice padded feel, without looking over-tufted. The foam we used is 1/8″ landau closed cell foam. This is literally the same waterproof foam used on those padded vinyl roofs of the cars from the 1970s. (Millenials, just google “landau roof” to see what American manufacturers did to cars in that era.)
Unroll the closed cell foam onto a large, flat surface. Place your wooden wall panel on top of the foam. Trace the wall panel onto the fabric with an ink pen. DO NOT cut the foam yet.
The outline you just drew on the foam is only to let you know where to spray the adhesive. Contact adhesive needs to be applied to both the wall panel and the foam in order to work.
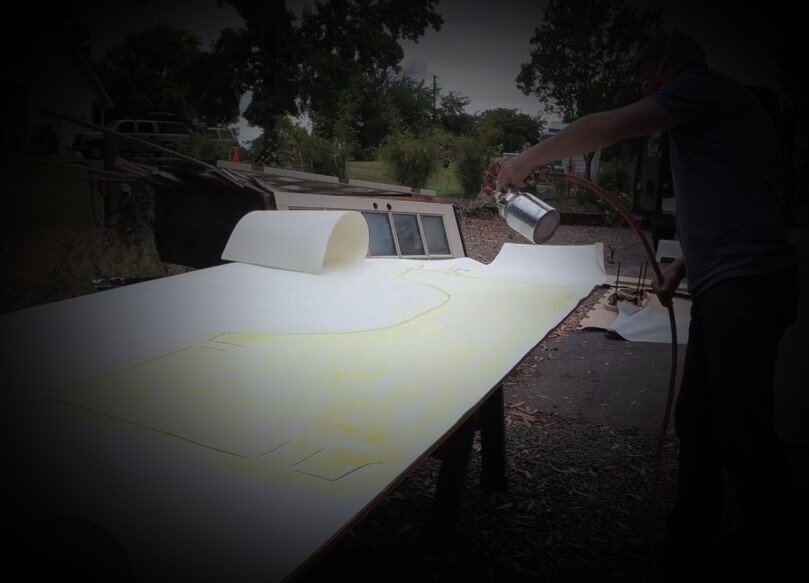
Gluing the Closed Cell Foam to the Wall Panel
Using the pneumatic spray gun connected to an air compressor, spray the upholstery glue on the side of the wall panel that will accept the fabric. Set the wall panel aside and spray the glue inside the marked lines on the foam. It’s okay if you overspray, this step is just to reduce the amount of glue you waste. Pick up the wall panel, aim it best you can over the marked lines on the foam, and drop it in place. Once you drop it, there’s no going-back. Your foam is now glued to the panel.
Using a utility knife, cut the foam around the wall panel. This is far easier than had you tried to cut the foam first and attempt to align both with the contact cement in place. You would likely have failed, because we sure did.
Cut the foam to the same dimension as the wall panel. This way you don’t have to attempt to fold the foam around the corners of the wall panel. We tried that too and it did not go well.
Congratulations, you now have a wall panel trimmed in closed cell foam!
Gluing the Upholstery to your Wall Panel
With the upholstery, mimic what you did with the foam. Lay the fabric face-down on a flat surface. Trace the outline of the wall panel onto the back of the fabric. Now spray the contact adhesive on the side of the wooden wall panel that will accept the upholstery. Set the wall panel aside. Spray adhesive on the back of the fabric. You only need contact adhesive within the lines you drew, and extending at least a few inches beyond. This is because you need enough material to wrap around the panel and glue on the back.
As you did with the foam, drop the wall panel down flat onto your fabric, ensuring you at least close to the lines you drew on the fabric. Now you can trim off the excess fabric, leaving at least a few inches of extra fabric around the perimeter.
This YouTube video was very helpful in showing how to cut and fold the corners of the fabric to get a very professional looking result. You will see my attempt to replicate that in my own YouTube video. At this point you’ll need to spray some adhesive around the perimeter of the wooden panel to give the fabric you wrap a place to adhere. Take your time cutting and wrapping the corners–the glue works just fine even if some time has passed. Now staple the fabric to the wood. The photo below shows the backside of the wall panel before I stapled the corners.
Finishing Touches
Flip the wall panel over and use your hand or a roller to ensure the fabric is adhering to the rest of the wall panel. If you used a flat surface that was large enough to accommodate your entire panel, and you dropped it in place as described, you should have a very nice finished product.
The final step is to clear the foam and upholstery from the mounting holes you drilled earlier. Do not attempt to use a drill, it will grab the fibers and stretch the material. I used a soldering iron to simply melt a hole through the upholstery and foam, using the hole in the wood as my guide. You could also use the heated point of a hot glue gun or even by heating up an awl and passing it through the material.

With the panel upholstered and holes in place, you’re done! Screw the wall panel in place and enjoy your handy work!
What type of wood did you use? Did you treat it or buy it with some sort of finish?
I used a 5.2mm plywood from a local hardwood store. I did not treat the wood for fear of off-gassing, but if I were starting over today I would at least research the topic. I did remove a wall panel recently and there it looked exactly like it did 3 years ago.
The best product to use for this, if you fear that moisture/mold may be an issue is expanded PVC sheets. They sell it in 4×8 sheets at your local plastics retailer. It’s great stuff. I have used the 1/8, 1/4, and 3/8 thickness in various places in my van. It can be cut, drilled, ‘edged/tapered’ (with a router) and multiple other things and it’s basically the same tools required as if you were using wood. I use a jigsaw most of the time, or a table saw. All my wall panels are expanded PVC covered in foam and then fabric as well.
Good idea, it’s no doubt lighter weight as well. I found that 5.2mm plywood offered the best combination of flexibility to conform to the wall yet still dimensionally stable. Curious what thickness PVC you would recommend.
Aside from moisture/mold resistance what would be the advantage of PVC over plywood? I only checked one seller but 1/8 4×8 sheet of PVC is about $120 vs about $12 for plywood at HD. Plywood is also better at sound deadening. I’d think plywood would be better for attaching things with screws, etc. PVC might be too flexible as well adding more shake to the walls.
What did you do about the tabs on the factory headliner the hold it in place (the ones at the bottom that push into the oval holes in the steel)? Did you have to cut holes in the wood panel for them to go into? Thanks for posting all of this info, it’s extremely helpful.
Eric
The tabs are still there but the top of my wall panels were cutback so as to not cover up the holes where the tabs go. You can see it starting at 11:49 in this video: https://www.youtube.com/watch?v=bG2jt1Ru19A
Let me know if that doesn’t make sense, and thanks! 😉
Nice, I see that now. Good work, and thanks for the help!
Did you use self tapping screws to attach the panels directly to the wall? Love your build and write ups!
Hi, yes, I used three self-tapping screws in each wall panel. One toward the front of the van, in the middle of the panel. The other two are oriented vertically at the rear of the van near the D-pillar. They are mainly there to help the panel conform to the curvature of the van wall. Thank you for the kind words, and good luck!
Ken, I’ve enjoyed watching your videos and picking up ideas as I go along. In fact, when I ordered my Sprinter, I ordered it with the factory headliner as I really like the factory look and how nice your van’s interior looks. I installed my wall panels a few days ago, and I was planning on re-installing the headliner today. However, I ran into an issue, and i am hoping you can help me out. I find that the thickness of my wall panels, (which is 1/4 inch plywood, the 1/8 inch foam, and the tweed fabric) is preventing me from installing the rear section of headliner. It looks like I need to trim a little of the headliner off of both side. Did you encounter this issue as well? Do all the sections of headliner need to be trimmed as well? Perhaps you covered this in one of your videos; but I don’t recall seeing it.
Hi Lyle, thank you for the kind words. I remember it being a tight fit but it all went together fine. What you may consider doing is cutting the foam off the back of the wall panel where it wraps around–it might be just thick enough to be causing you problems. There’s a couple of inches at the top of the panel that you’ll never see because it’s behind the headliner, so any changes you make shouldn’t be visible. I hope that helps. -Ken
Hey Ken, quick question after several years of road travels, have the panels in your van had any issue with separation due to heat and humidity? I made my panels exactly as you described ( they looked great ) but used a 3m spray adhesive and they sagged within a month…. bad mistake 🙂 I’m in the need of a pandemic project and am pulling out my panels and trying again with the spray gun and the adhesive you recommended. Before I get knee deep in this I just wanted to know if your panels have held up with out sagging ( glue release) . Thank you !
Hi Scott, no, the Dap Weldwood glue will splinter the plywood before it will loose adhesion, ask me how I know. I used 3M-90 to to glue some cloth direct to the metal (that is holding fine), to glue cloth to my headliner shelf (still holding up as of now), but also to attach material to my window trim rings and that has not held up. 3M-90 isn’t nearly as strong as the Weldwood stuff, you will be happy with it. Thanks for stopping in!
Do you have a tutorial on how you did your ceiling or was it quite similar? I can’t quite figure out how to make the seams between the wall and ceiling panels to look finished!
Hi Christine, the ceiling is the stock Mercedes-Benz headliner. It’s an option in cargo and crew vans and standard in passenger vans. I bought mine used for $150 on the Sprinter Source forums. They come up from time to time. I bought one for the exact reason you mentioned–it’s quite a time-saver!
Awesome work .
Curious how you fabricated your window trim rings and secured them to the wall panel and van walls.
J
Hi, I covered that in a video here: https://www.youtube.com/watch?v=bG2jt1Ru19A. -Ken
Thanks a million for all you do on this site and your youtube channel.
You mention that you used self-tapping screws to help secure the panels. Could you please be more specific? Size, type, etc.? Maybe a link to a source in the store? Thanks again!
Best,
Pat
Hi Pat, I used something very similar to this: https://www.homedepot.com/p/Everbilt-8-x-1-1-4-in-Phillips-Oval-Head-Black-Phosphate-Sheet-Metal-Screw-2-Pack-831928/204856571 , I believe a #8 3/4″ long. The finish washer gives it a nice look. Thanks for visiting! -Ken
Hello! Thanks for all the info. We just glued the foam to the wood and then rolled the glue onto the same fabric that you purchased. After I waited for it to get tacky, I turned it over and the glue had gone through the fabric in a bunch of places. Have you had this problem? Is it because I rolled it instead of spraying? We bought the spray gun, just wanted to try a smaller panel first (luckily), and rolling was easiest. Any input would be appreciated! Thanks.
Hi Cami, I didn’t have that issue but it may have to do more with the amount of glue applied than the method used. Perhaps cut a small swath of fabric and experiment–it doesn’t take a ton of product but it does need to be applied on both surfaces. -Ken
How did you handle the window sill/trim around your newly installed forward T-vent windows? I have a van with OEM windows on the sliding door and opposite, but am struggling to come up with a solution to transition from paneling to the window itself – looks like you have some trim ring for those larger T-vent windows that you then upholstered? Did you manufacture yourself or order them along with your windows? RB components doesn’t seem to have trim rings for those larger, T-vent/full-size windows. Thanks for all your info and documentation, it’s made my life so much easier to at least have an idea to start from!
Hi, I left the sheetmetal around the windows so I can use the Quest Overland magnetic window shades. I’m not sure how well the magnets would stick if they were upholstered. Thank you for the very kind comments, hope to see you back.
where did you find DAP in California??
I ordered mine on Amazon. They delivered it despite some wording that made me wonder if they would ship it.
Nice job on the upholstered wall panels! I’ve got the same in my van and wonder what type of hardware you’ve found to hang a small towel bar and/or small hooks into the wall panels. Not sure what works well with plywood and don’t want to mess it up. Thx!
Hi James,
I would use some kind of backing plate behind the wall to add strength and spread the load. Perhaps some thin aluminum or even thicker wood glued/epoxied to the back. -Ken
Great info, thank you! One question: how dust-absorbent is the fabric, and is it easy to clean thoroughly by vacuuming?
Hi, I would say it’s no more absorbent than any other cloth-type fabric, and it cleans relatively easily. That said if you expect a lot of dust or a particularly dirty environment you might also want to consider using marine vinyl. -Ken
Hi James, Amazing job!
I had a quick question – when I did this to my van I had some problems with bubbling from the foam and then you could totally see it when the fabric is placed on top- did you have this problem? Also what is that handy roller you use for the window frame.
Alex
Hi, I have not seen this. Did you use the same foam and adhesive I did? It sounds like a product compatibility problem, or perhaps there was too much glue? The roller is cheap-o thing I had used to roll the panel dampener into the van; here it is: https://amzn.to/3pqylbh
Hi, I see you said ont use 3m as it wont hold up to the temperature changes – what about in an application like you did wrapping the C pilar would you still use 3m on the c pilar or did you have issues with it ?
Hi Stephanie,
I’ve heard 3M-90 does not hold up well in hot environments on large panels. I have used 3M90 now on the upholstery on my overhead cab shelf and everywhere that upholstery is directly-glued to sheetmetal, such as a small strip behind the sliding door and the D-pillars. Both of those places are on smaller-sized panels. I realize I’m taking risks there but so far it has held up well.
got it. I am planning on wrapping my pilars like you and was curious if you had second thoughts about using the 3m, if i should look to use something else
For small panels I think the 3M-90 is fine. If you want to be extra certain you can’t beat the Dap Landau adhesive I used on the regular wall panels. It’s just a lot of set-up and cleaning tools just to adhere small sections of fabric.
Ken, awesome resource and first class build. The DAP Landau spec sheet indicates coverage of ~237 sq. ft./gallon. If I sum my panel areas and multiply by 4 (panel to foam and foam to upholstery) I get something like 3 gallons for my project. That seems like too much. Roughly how much Dap Landau adhesive did you use for you project?
I never bought more than one gallon, however I can’t recall exactly how much was left. What size van? Thanks for the kind words! -Ken
I am wondering if you remember what size/type compressor you used for the DAP Weldwood? I debated about 3M 90 vs. the DAP and tried the 3M with foam on a small panel as a test. I had the same bubbling someone mentioned above and thought maybe it was worth the investment to go the DAP/compressor route. However, I do not own a compressor so I will have to either borrow or invest in buying one. There is a huge range in both volume (gallons) and/or PSI and I just haven’t been able to find any solid info on what works best with this type of spraying. p.s. Thank you so much for all your detailed write ups and explanations!
Hi Andrea, I wish I could tell you specifics but I borrowed a friend’s compressor. For the purpose of spraying wall panels I don’t believe you need anything fancy. If you have to pause occasionally for the compressor to catch up the adhesive will stick just fine.
I have used 3m_90 for small panels but I don’t feel it is sufficient for larger panels. I hope that helps! -Ken
Thanks for sharing your wisdom with us on this site and your YouTube channel — I don’t think I’d be comfortable tackling most parts of my van build without your detailed tips and instructions. I tried to order the DAP Weldwood sprayable contact adhesive, but they won’t ship it to CA. Do you have any other recommendations on sprayable products that would hold up?
Hi Rob, try a hot rod or upholstery shop. The ones in my area all seem to use it.
I’ve done a bit of auto upholstery about a decade ago, and my go to was the DAP. The main difference I see between the can stuff and the stuff I spray out of a spray gun, it’s the same as painting. There is just ALOT more glue coming out and a lot more even. The reason smaller spaces work well with can stuff, is because the glue coverage tend to be more generous on smaller pieces, versus larger fanning spray coming out of the can. IMHO..ymmv
Thank you Yun, I appreciate the insight. I used the spray can 3M-90 on some smaller upholstered pieces out of convenience and it has been fine. I’ve heard the spray can glue does not work as well on larger panels and while I assumed it was the holding power of the glue, perhaps it has just as much to do with the evenness at which it comes out of the gun. Either way, thanks!
Hi,
Would there be a disadvantage to installing the plywood wall panels first and then just screwing the upholstered foam panels directly to the walls?
I don’t think the end-product will look very good. The adhesive will maintain the density of the foam. If the foam is simply floating on the wood it will appear wavy in some spots and then compressed around the screw locations.
Can you elaborate on control panel cutouts you made? I love that they match your cabinets! Is it just a trim ring that holds down a 1/4″ plate cutout to fit the ring?
Thanks! I used these: https://amzn.to/3ukOCB1
The lighting control simply has a 1/4″ piece of bamboo trimmed to fit inside. While it looks nice, I had to do it because the rotary dimmer switch was deeper than the wall cavity of the van. This mounted it out far enough to allow the switch to fit.
Those plates are available in various sizes and styles–I used a vented version for my battery box. -Ken
Thank you so much, your information is incredibly helpful. Did you upholster all of your panels at the same or did you do them in multiple sessions? I’m wondering if you have any suggestions for cleaning or storing the spray gun if it’s going to take multiple days to upholster. Thank you!
Hi Stella,
I did most of it in one day. You can open up the gun and pour the leftover back in the container. to clean, swirl some mineral spirits around in the can and wipe out with paper towels. Then spray straight mineral sprits through the gun. I’ve loaned my gun to several others and it still works great.
Thanks for the kind words! -Ken
I’m using this for my 2021 Ford Transit. Love the idea. But when ordering, I put “10” for linear feet in the quantity and the total was $700+?!! That can’t be right.
I think you need to convert from yards to linear feet. $700 definitely is not right.
Hi Ken,
I created panels for my 170″ passenger van conversion and your step by step guide was VERY helpful. Thank you!
One question… The glue has a very strong smell, even after the finished panels are in the van. I wasn’t expecting this and am curious if the smell faded over time in your installation, or if you found anything that neutralized the smell? Thanks again! – Kyle
Hi Kyle,
The smell will definitely dissipate. I left the windows cracked open and fan running in reverse to help speed up that process. The only smell I still occasionally get is the rubber coin flooring I used on the rear compartment that seems to off-gas when it’s exposed directly to sunlight. Thank you for the kind words! -Ken
Thanks Ken! Much appreciated!
Hi Ken,
I’m curious if you found a good replacement door speaker to go in the door panel. I put in 6.5″ JBL 629 speakers, but the cover is sticks out a bit to far and doesn’t allow the door to open all of the way. I’m searching the web for ideas, but wondering what you used.
Thanks!
Kyle
Hi, are you referring to the front door panel? I did a YouTube video on my speaker upgrades: https://www.youtube.com/watch?v=0FnyK7vP5Bo
and later this video when I added an amp to the factory head unit: https://www.youtube.com/watch?v=jZa6OHZe56Y
I hope that helps!
Ken
Hi, great video! I am mostly wondering about smell retention in the fabric and padding. I am thinking that after a few curry meals or something that the walls would really retain those smells. Also staining… I love the idea of being able to hide all of the imperfections and creases with this approach but cleaning and smell seem to be deal breakers. Thoughts?
I’m coming up on five years with my van this December and can honestly say the upholstery looks as good as day 1, and has not absorbed any smells that I have noticed. Now that said, I prefer to cook outside, and probably only cook inside half the time. The approach I used is done on the nicest of van conversions, so it’s pretty much the industry standard. -Ken
First of all, thanks for your site and videos! Really superior.
I’m debating whether or not to use the polyolefin fabric (Marathon Tweed, Duramax, etc.) on the slider door. Seems like the exposure to rain and dirt when the door is open might warrant vinyl for (in the case of my Transit) those two panels. Your thoughts?
I agree, that area tends to get wet when coming and going in bad weather. I’m not sure it would harm the fabric but a vinyl-based product would wipe dry as opposed to absorbing the water. -Ken
Hi! I’m pretty sure that you need the female 1/4 NPT to air hose adapter. Above it says male and the link is to male, but the air inlet on the Astro 4008 gun is male threaded, so a female adapter is what you’ll need.
Thanks for this website! It’s been a huge help. I’m diving into the upholstery this weekend, so wish me luck!
-Mark
Thank you Mark, you are absolutely right. I was pointing people to the male version because previously the female version was only available if you bought three. You can unthread the adapter that comes in the gun and screw in the male adapter–that works fine but that solution is not obvious. Now that the female version is available in quantity of one, I changed the link to the female version. I hope that makes sense, and I appreciate you reaching out about this! Ken
Hi, love the videos and detailed explanations. Can you tell me how you attached the L track to the van.
Thanks, Pete
Thanks Pete! I did a video on the L-track install here: https://www.youtube.com/watch?v=kGw0KxQvdX0
Good luck! -Ken
Great content! Thank you. When connecting track to the sides of the headliner, what do you do to take up the space between the van wall and the headliner. I read somewhere it is approximately1-1/8 in.
Thanks- Nathan
Hi Nathan,
I don’t have any L-track up high behind the headliner, but I do have a strip of 80/20 on one side to support my overhead cabinets. If I recall correctly the space between the wall and headliner is about 7/8″ and thus the 3/4″ thick 80/20 works perfect back there. You can read more about that here: https://ourkaravan.com/8020-overhead-cabinet-framing
Thank you for the kind words and good luck! -Ken
How did you handle the window sill/trim around your newly installed forward T-vent windows? My friend has a van with OEM windows on the sliding door and opposite, but he is struggling to come up with a solution to transition from paneling to the window itself – looks like you have some trim ring for those larger T-vent windows that you then upholstered? Did you manufacture them yourself or order them along with your windows? RB components don’t seem to have trim rings for those larger, T-vent/full-size windows. Thanks for all your information and documentation, it has made my friends’ life so much easier to at least have an idea to start from!
Hi, I have no trim around the t-vent windows, I left it steel since the dark gray van color matches the gray upholstery well. Putting fabric on the steel makes it more difficult for the magnets of my window covers to stick, so in my case it was best to leave them bare metal.
Some just use 3M-90 glue to adhere upholstery direct the the window surround much like I did on the van’s d-pillars.
Awesome thank you
” For complicated angles or curved surfaces, scribe to get a perfect translation from the surface to your wall panel.”
USING WHAT???? How u scribed it?
Do a quick google search for “scribing tool.” They are inexpensive and will help match a curve to a wall panel.
Hey, thank you so much for this guide! Just wondering if you have any tips or tricks for getting the Astro spray gun to reliably make a good pattern/amount of glue. I just attempted my first panel and it was a little all over the map. Even on similar fluid/air adjustment settings, sometimes it would be hard to get any glue to come out, and at other times I would get big globs. Just wondering if you found any strategies that worked well for your spray pattern. Thank you!!
Interesting…have you tried changing the air pressure? I would pour the glue back into the container, clean the gun with mineral spirits and try again. It’s possible some dried glue is stuck in the spray orifice.
Thanks for the tutorials. Did you leave the L track installed and sort of slide the panels under the flange? Or did you remove the L track, install the walls, then put the L track back on?
HI, I used the flanged L-track to help support the wall panels. So the L-track stayed installed and the walls were slipped into the flanges so that additional fasteners were not required.