

Installing a Thule Hideaway Awning on a Sprinter Van

Have you seen our Thule Awning install video on YouTube?
Applicability
The procedures listed in this article will work on all NCV3 (2008-2018) and VS30 (2019+) Sprinter vans with the factory tracks on the roof. If your van does not have the factory roof tracks, you will need to add them. Alternatively you could install this awning to the side of most of the aftermarket roof racks.
Awning Choices for Vans
Three main companies manufacture awnings designed to mount to Class B vans. Those companies are Fiamma, Dometic, and Thule. The Fiamma and Dometic awnings typically run around $1,100. The 10-foot Thule awning is typically a few hundred dollars less expensive. We chose Thule not only for the savings, but for the excellent reviews, good construction quality and available replacement parts. Most important though is the Thule’s flexible mounting options.
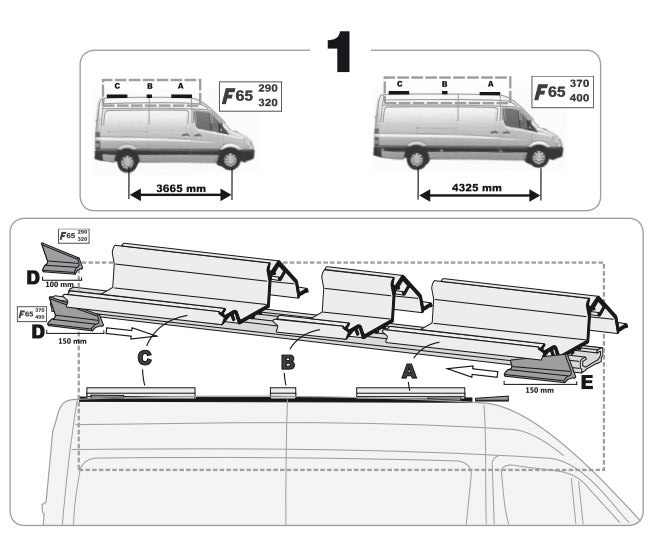
The illustration below from Fiamma shows how its awnings mount to the van. The mounting brackets are quite long and must be glued to portions of the roof with sikaflex. The brackets occupy so much of the factory roof track that it leaves it useless for mounting solar panels or other accessories.

Awning Installation Instructions
Begin by parking the vehicle on a level surface. Using a ladder, position yourself to gain access to the rear of the passenger side roof track. Remove the torx screw that secures the plastic endcap to the roof track. Using a screw driver push down and remove the end cap. This first step will be the same regardless of which method you use to mount your awning.
Awning Install Option 1 – The Easy Way
If you have chosen the easy way and have purchased the Thule awning and the Sprinter-specific mounting brackets (eBay link), begin by sliding the mounting studs into the track of the roof rack. For now, slide two studs to the front, two to the middle and three near the rear of the roof track.
Next we want to remove the 4 threaded t-nuts from each of the brackets. Slide two t-nuts into the top mounting rail on the awning and two t-nuts into the bottom rail. We will do this for all three brackets. Now attach the bracket to the awning while it remains on the ground. Position one bracket toward the front of the awning, one in the middle and one at the rear.
Lifting the Awning into Place
Now the heavy (40 lb) lifting. Using a second person and a second ladder, carefully lift the awning in place on the roof. Beginning at either the front or the rear, slide the mounting studs so they align and pass through the mounting holes in the bracket. Screw the two nuts on just enough to securely engage the threads. While the second person is still holding the other end of the awning, come down off the ladder and move it to the center of the van. Now you want to align the mounting studs for the middle bracket, and engage the threads on the two studs. Finally the second person at the rear can do the same for the remaining bracket.
Positioning the Awning and Mounting Brackets
The awning can now be slid into its desired position. Our awning starts roughly at the sliding door opening. Keep in mind much of the leverage gets transferred through the arms that fold out to support the awning material. Position the front and rear brackets as close to these arms as possible. Now you can snug up the nuts that attach the bracket to the roof tracks, as well as the bolts that attach the bracket to the awning. Reinstall the plastic endcap on the factory roof track.
This concludes the install for “Option 1, the easy way.” Read on below for a modification you should make to the awning extension handle.
Awning Install Option 2 – the DIY Way
For the DIY awning install, you need the Thule awning and the Thule mounting brackets and some aluminum bar stock 1/8″ thick and 1″ wide. Many people on the Sprinter forums and Instagram have installed the awning using one pair of Thule mounting feet. (Thule designed the awning for two mounting feet.) However a friend and I decided to split the cost of a second set of mounting feet (3 total) for extra rigidity. This is likely not necessary at all, but it’s what I chose to do.
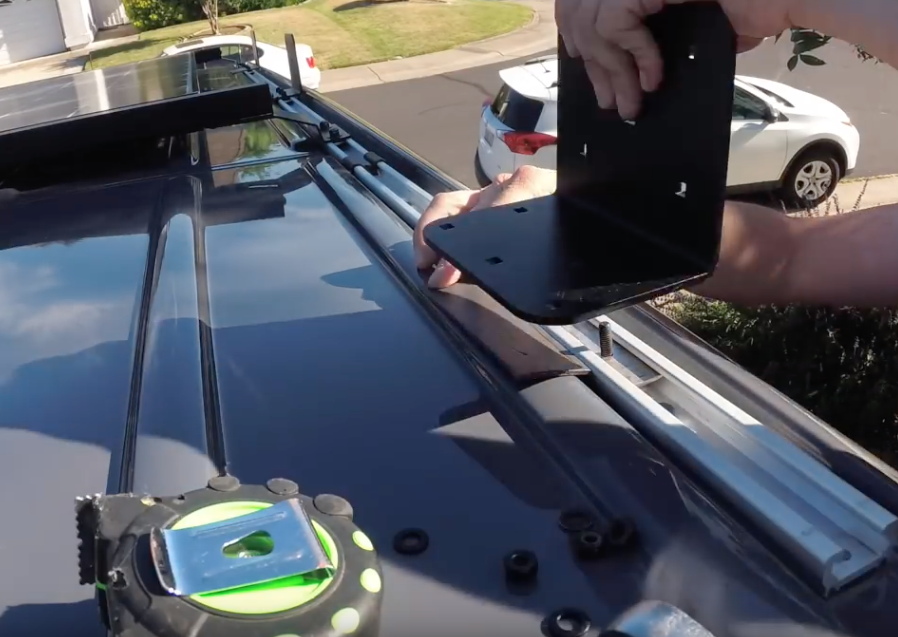
Making the Roof Track Inserts
Cut the aluminum into strips slightly longer than the Thule brackets. You’ll need either two or three strips, depending on how many brackets you used. Align the Thule bracket on the aluminum and mark and drill the two mounting holes. Up on the roof, insert the included Thule t-bolts through the holes in your aluminum strip and insert it into the roof track. If you feel more comfortable using all three holes you’ll need to buy a couple more Thule t-bolts. (Thule part number 853-208909.)
The next step is to used the included Thule hardware to bolt the Thule mounting brackets to the back of the awning while the awning is on the ground. The backside of the awning has two parallel slots. For each bracket, two t-bolts go in the top slot and two in the bottom. Snug up the mounting nuts against the bracket.
Lifting the Awning into Place
Now the heavy (40 lb) lifting. Using a second person and a second ladder, carefully lift the awning in place on the roof. Slide the aluminum strips with the mounting studs so they align and pass through the mounting holes in the Thule bracket. The Thule bracket will lightly rest on the rib of the van roof. (The Fiamma mounts do this too.) To prevent scratching, put some closed cell foam between the bracket and the roof rib. Hardware stores sell a foam weatherstripping that should work fine as well. Snug up the bolts.
(You may note that this is done in a different order than what was shown in the video. I think the method described here will be easier than trying to attach the bracket to the awning while on a ladder.)
Positioning the Awning and Mounting Brackets
The awning can now be slid into its desired position. Our awning starts roughly at the sliding door opening. Position the front and rear brackets evenly along the roof track. It may be beneficial to have the mounting brackets near the arms that extend on the awning, as those will have leverage against the awning case when open. Now you can snug up the nuts that attach the bracket to the roof tracks, as well as the nuts that attach the bracket to the awning.
Note: When bolting the bracket to the aluminum strips in the roof tracks, the t-bolt wants to spin under the aluminum strip as you tighten the nut. To avoid this, either push a small object like a screwdriver under the t-bolt while tightening to resist the tendency for it to spin. Alternatively you can just rock the bracket backwards to put tension on the t-bolt while you tighten. This is illustrated in the install video at about the 3 minute mark.
You may now snap the Thule plastic cover in place, if you choose to use them. Thule provides lock cores that lock the cover to the bracket so any potential thieves cannot access the mounting nuts. Finally, reinstall the plastic endcap on the factory roof track.
Modifying the Thule Awning Crank Handle
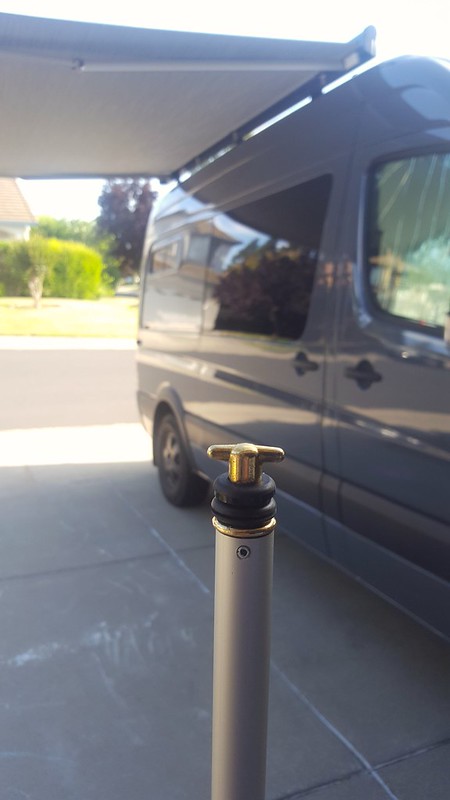
We discovered one issue when using this awning on a Sprinter van. Thule designed the crank socket so the handle would lock in place when extending or retracting the awning. In order to release the handle, one must get the handle perpendicular (90 degrees) to the awning crank socket to release the handle. The problem is, the handle will hit the body of the van before 90-degrees can be achieved, which causes the handle to get stuck in the crank socket.
The way to prevent this is to slip a single 3/4″ outside diameter (1/2″ inside diameter) rubber grommet over the receiving-end of the crank handle. This prevents the handle from bottoming-out in the crank socket and prevents the handle from locking to the socket.
I’ve enjoyed watching your videos and I thank you for all of the information you have shared (we used your idea of installing the roof fan by adding the metal strips). Do you have 3 of those $100 locking covers? Or just 1? Also, the 3 black L shaped brackets come with the rack mounted awning? And then I just need to make the 3 roof rail brackets?
HI Carrie,
The brackets are sold in pairs (2 per box). Retail is usually around $99 for the box with 2 brackets.
A friend and I did our installs and we bought an extra pair and split them so that we would each have three brackets. Lots of people on sprinter forums have done the install using just the two brackets. Be sure to get the rack-mount awning, not the direct mount. And yes the brackets are sold separately. I hope that helps! -Ken
Thank you for your post and video. I appreciate seeing other DIYers methods. The hand crank you have appears to telescope. I bought the awning and have a short crank that can’t reach the awning while standing on the ground (I’m 6’ tall). Did the hand crank come with the awning or did you find it sold aftermarket? I reached out to Thule and the US importer, Lippert Components and they told me they don’t have other options.
The hand crank came with the awning. Are you sure it doesn’t untwist and extend? I know a lot of people with these awnings and they all function like mine. Perhaps they packaged the incorrect one.
Thanks very helpful, do you recall what the measurement of the mounting holes are on the brackets? specifically the height between the top holes and the bottom holes for the mounting bolts? or the distance between the top and bottom track on the awning itself?
What was your experience of the awning when driving. What did it do to the wind noise and consumption?
Hi Piers, I can’t say I notice any difference at all. While it definitely adds drag, I still get pretty amazing fuel economy. I don’t use the awning all of the time but when I do I’m always glad to have it! -Ken
I need help ASAP. Didn’t DIY awning. Came with Roadtrek. Unrolled it yesterday for first time. Didn’t see your advice about grommet and crank handle. Now handle is stuck. I’ve tried and tried to remove it. No luck. Any help would be greatly appreciated.
Is the handle at an angle to the receptacle on the awning? Usually Roadtrek uses Fiamma awnings. In any event, the only way I found to release mine was to loosen the awning and slide it backward enough to pull the handle straight out of the socket. That was before the grommet trick was discovered.
Stuck extension pole fix.
Love your page, long time reader, first time poster…
Going to hard disagree with needing only one grommet. Just got mine stuck on our maiden voyage with it.
I used a 1/8” Allen bit and hammered the “set pin” out of the end (the pin that holds the gold T head to the rod) using an adjustable wrench with a pink handle that I stole from my wife’s tool kit. I’m not sure that part is important, but your results may vary. I then used a pair of needle nosed pliers to pull the pin the rest of the way out. After that was done, I could let the T head hang freely and twist it out.
Reassemble the same way you took it apart.
R,
Chris
Interesting…this is the first I’ve heard of a problem using one grommet. Perhaps your grommet was thinner than mine…either way it’s good to know. Thanks for following our van build journey and sharing this information.
I’ve been on the hunt for this since November 2020.. It’s been sold out/oversold. I even bought the mounting plates and the optional feet to mount the legs to the van. After scouring every retail site and bugging Thule reps, I was able to get one from Etrailer.com. Got this buttoned up today. ! Thanks for the grommet trick and the install video!
Supply chain issues have wrecked havoc on Thule…they’ve barely had any awnings or van-specific bike racks this past year. Glad you found one! -Ken