


Have you seen the Maxxair vent fan install video on YouTube?
Why Trust our Install Method?
We installed this fan in December 2016. This fan has been installed for over 7 years now, with not a single leak or issue. We would install the fan in exactly the same way if doing it over again today.
Planning your Install
First step is decide where you want your vent fan located. Generally these are installed in two locations, one being in roughly the middle of the van and the other common location is near the rear of the van over the top of a typical high-mount bed location. We chose the latter, as having moving air directly over the sleeping area can be really nice in warmer climates.
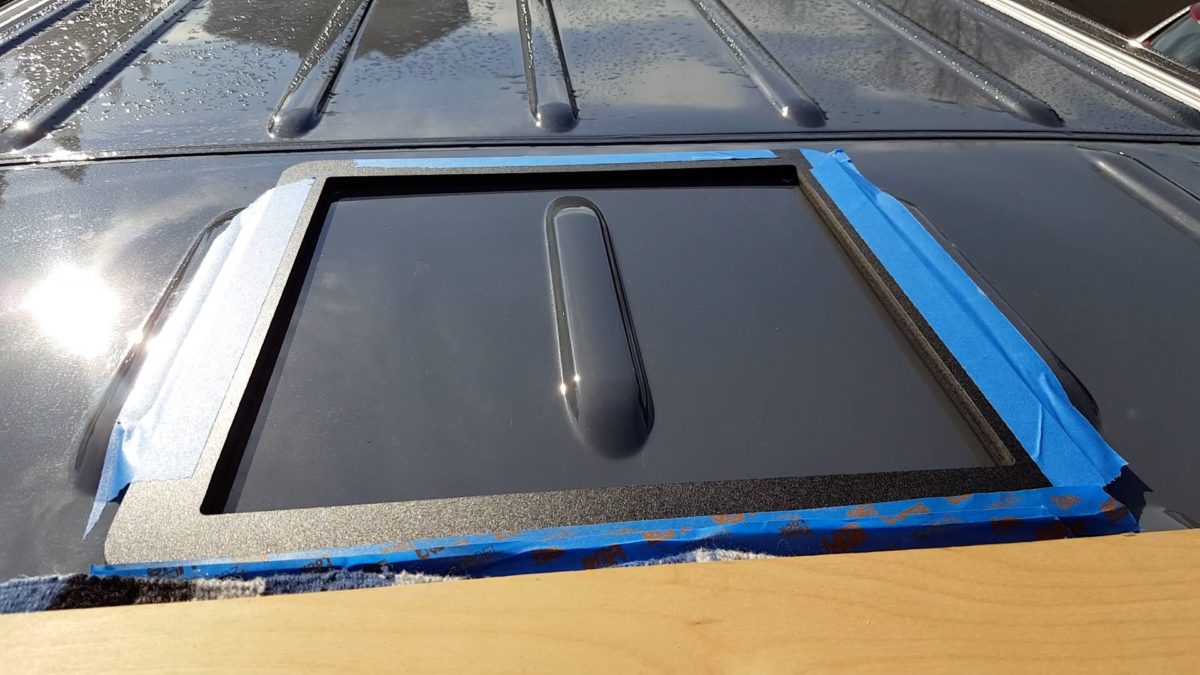
Here’s where our first bit of advice comes in. The roofs of vans are ribbed much like a pickup truck bed. As such, you either have to do metal surgery by cutting out a portion of the rib in front of and behind your fan, or you have to somehow build up the area with gasket or goop so your fan has a flat place to sit. Enter the roof fan adapter (eBay link). These adapters are reasonably priced and allow a flat mounting place for your fan. The adapter eliminates the headache of coming up with your own leak-free solution. They will also keep your fan leak-free longer. When you screw thin plastic (the fan flange) down to a curved roof, the sun’s UV exposure will eventually cause the plastic to crack. Having the vent fan sit flat on the adapter will help prevent it from cracking in the first place.
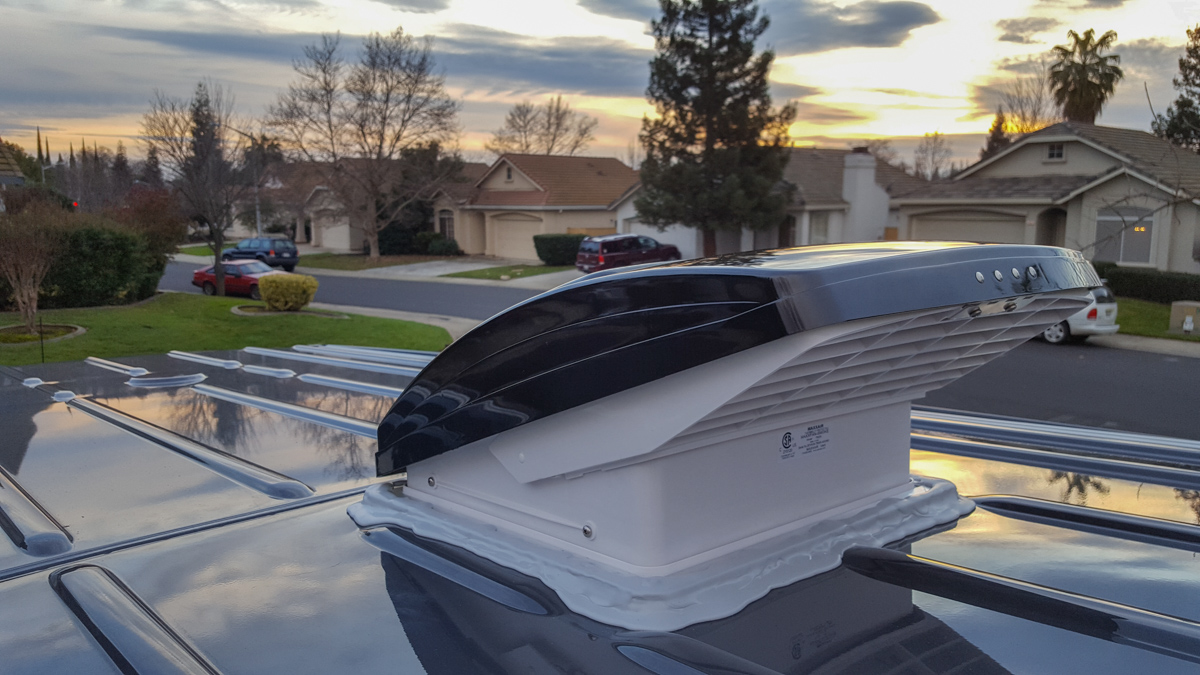
Here’s how the adapter looks when sitting flat on the roof.
Prepping for the Fan Install
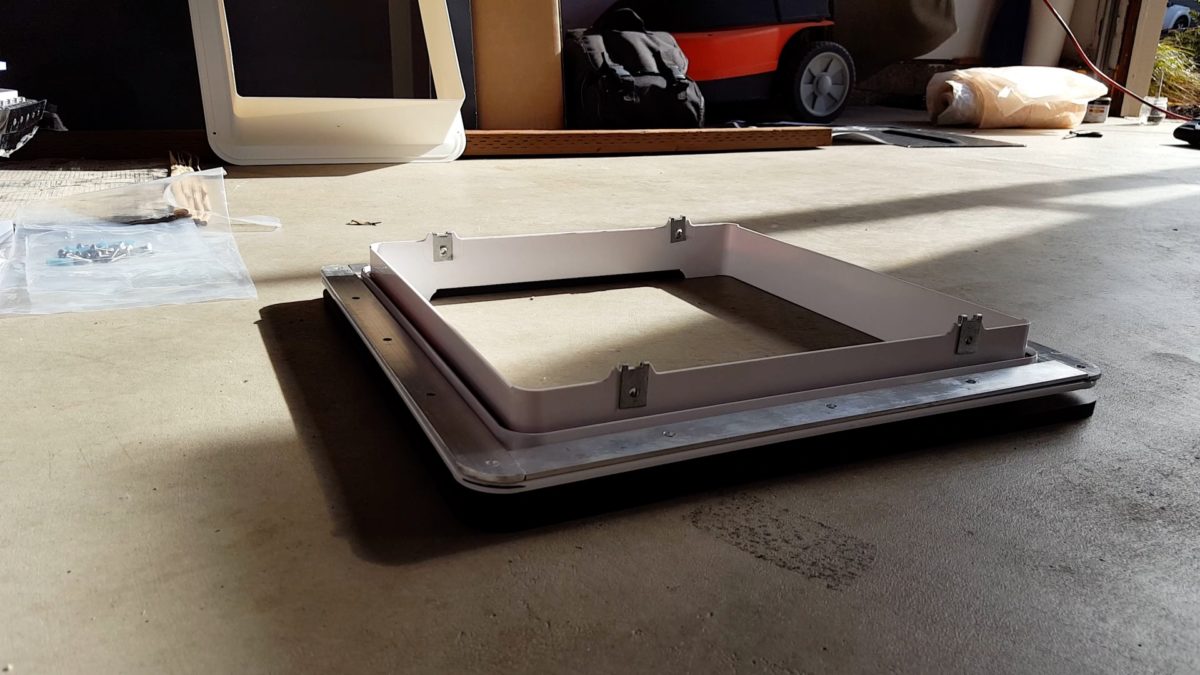
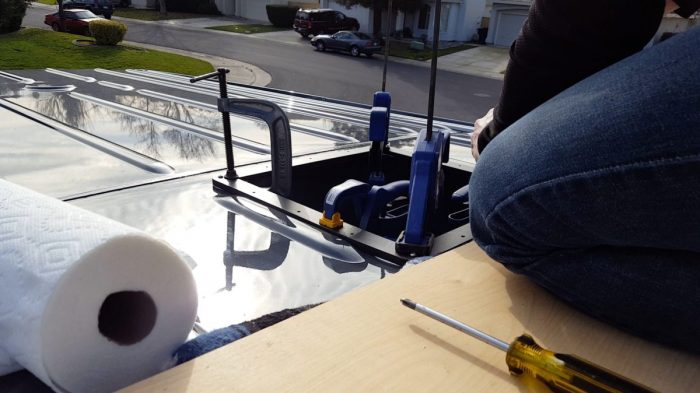
We will start on the garage floor. Set the flange of the fan down on the adapter. Be sure the recesses in the adapter–the places where the adapter is shaved down to accommodate the roof ribs–are facing north-south (so to speak). Also ensure the four raised tabs on the fan flange are to the sides, as shown in the photo. Otherwise, your fan is going to be mounted sideways.
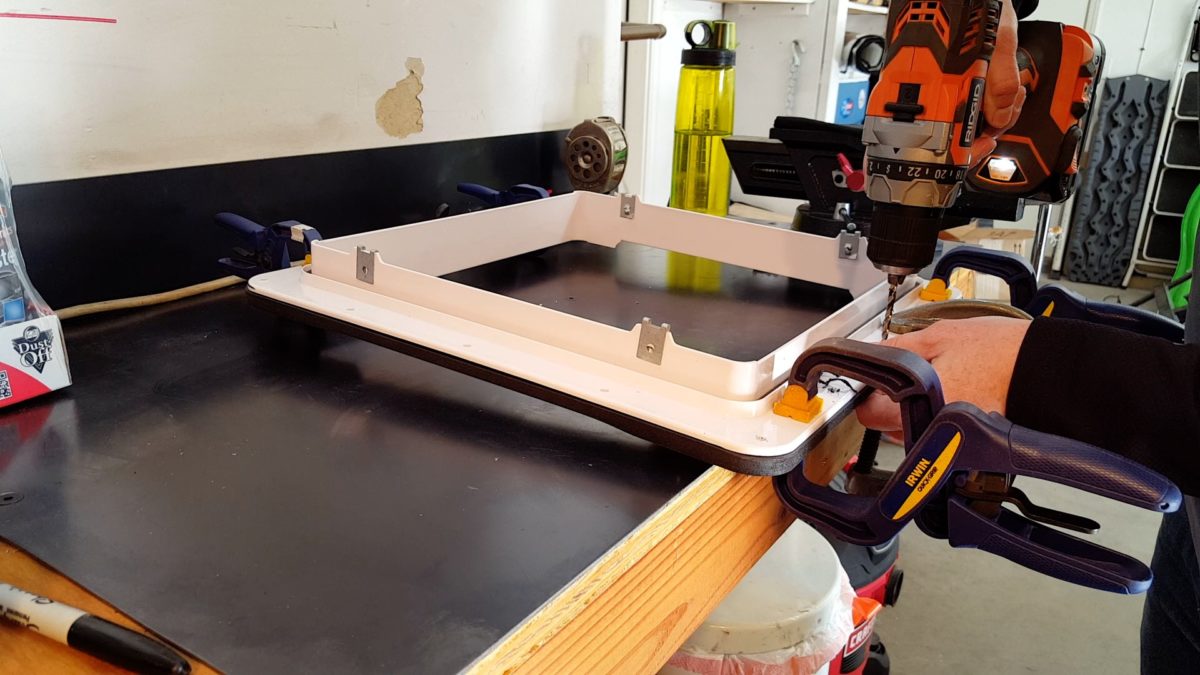
Next step is optional. We took the advice of others and cut some 1” wide aluminum strips to sit on top of the fan flange. When you screw it down, the aluminum pushes evenly on the fan flange. This, in conjunction with the flat adapter plate, reduces the chances of cracking the flange. We all know plastic gets brittle after being exposed to years of UV radiation. If you are using the aluminum strips, cut them to size and use the fan flange to pre-drill the aluminum.
Clamp the adapter to the fan flange and pre-drill it using the same size drill bit as the hole in the flange.
Preparing to Cut the Hole
We are moments away from cutting sheetmetal, and metal shavings will be going everywhere. We recommend taping a garbage bag below the area you will cut to capture your shavings. Now grab your blue tape and a permanent marker pen and head up to the roof. We used a ½” piece of plywood, sitting on a towel, so-as to not dent the roof.
Set the adapter on the roof. The recesses in the adapter should sit comfortably on the high points of the roof ribs and the rest of the adapter should be sitting flat on the roof. Using painter’s tape, tape the adapter to the roof, as seen in the second photo in this article. Now using your marking pen and the adapter as your template, trace the inside of the adapter onto the roof. Check and double check that you have everything oriented correctly.
Time to Drill Holes in Your Prized Possession
Set the adapter aside and using your drill, make holes in each corner of your newly-drawn square. Don’t drill right on the corner using a small pilot bit. Drill back ½” or so. Now enlarge the hole with a step-bit. If you don’t have one of these, you’ll want one. They will cleanly go through sheetmetal without grabbing and twisting/warping the steel. You’ll wonder how you ever lived without one. We made the holes somewhere around ¼” to ⅜”, just enough to allow the jigsaw blade a place to get started.
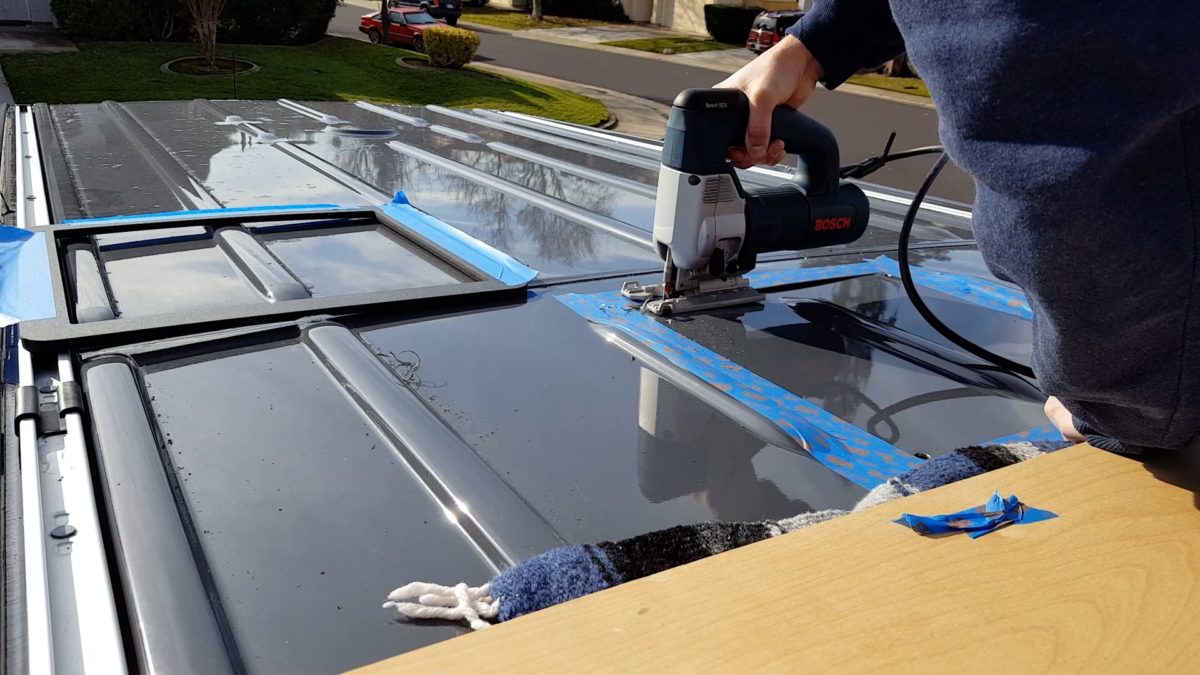
Grab your painter’s tape and tape around the outside of the proposed cut. The shoe of the jigsaw will likely scratch the paint if you don’t. Drop the jigsaw blade into one of the holes and work slowly along your line until you hit the corner. Don’t try and make turns with the jigsaw–cut a straight line to each hole until you’re done. You can always use a file to remove a bit more material, but you can’t add material. Just be sure to stay on (or inside) your cut-line. We found the jigsaw cut a little better at higher speeds.
Cleaning Up Your Cut
Congrats! Now you have a big hole in your van. File it down smooth and do a test-fit with your adapter and flange. If all looks good, paint the bare metal so it does not rust. Now remove the painter’s tape and clean up. Clamp the adapter and the fan flange to the roof. Using a small pilot bit (smaller than the screws you will be inserting), and using the existing holes in the fan’s flange as your guide, drill through the van’s sheetmetal. Now we recommend grabbing your screws and screwing-down the four corners. This ensures that all the future holes you drill will be in perfect alignment. Continue drilling the remaining 12 holes (3 per side). Now remove the adapter and flange and paint your holes.

A Note About Adhesives
At the time we installed our fan, the manufacturer of the adapter recommended using 3M 4200 marine sealant to glue the adapter to the roof. He now recommends 3M Window Weld, but pick whichever you prefer. Clean the mating surface and you will now follow the instructions on the package of adhesive. I ran two parallel beads on the adapter, then clamped it to the roof. IMMEDIATELY install at least the 4 corner screws so you can ensure alignment is correct. You can now clamp the adapter to the roof and wait the recommended time for the adhesive to set up.

Applying the Butyl Tape
Back in the garage, flip the fan adapter upside down and apply the butyl sealant tape. Some people cut the corners at 45-degree angles, but we ran a continuous bead all-around and overlapped at the one seam. We had the seam pointing towards the rear of the vehicle. Logic was that pounding rain can’t enter at the seam when driving. Not sure what to recommend if you drive quickly in reverse.

Screwing it all Down
Back on the roof, remove your clamps and four corner screws. It is very likely that the screws that came with your fan will not be long enough to go through the flange and the adapter. We used these zinc-plated lathe screws, 1-½” long, to do the job. The “sandwich” layer is now like this (from bottom-up) → van sheetmetal → adapter with sealant → fan flange with butyl tape on bottom (with mounting tabs facing to the sides) → optional aluminum strips. You can now screw the assembly to the van.
A Note about Use of a Wooden Adapter Inside the Van
You’ll see some people making a wooden adapter to go inside the van, where they secure the assembly using bolts with nuts through the wood adapter. We would not recommend doing this for the simple reason that these fans do not last forever. If/when the mounting flange succumbs to UV exposure and breaks-down, it will require replacement. If you use nuts on the inside, you may have to pull your upper cabinetry and headliner to access those nuts. For those that use wooden planks nailed to cribbing, this could be disastrous. With standard sheetmetal screws, replacement can occur entirely from the roof of the van.
Applying the Self-Leveling Sealant
Now to the messy part. Load the dicor in the caulk gun and using a side-to-side sweeping motion. Spread the dicor so it overlaps the entire flange, screws, aluminum plate and down onto the roof. Don’t worry about making it perfect, it does self-level after a few minutes. We have yet to see an installation of this stuff that looked super, our own included. Don’t sweat it, no one will see it. But be sure you have full coverage of the hardware to avoid leaks.

Installing the Fan Unit
Drop the vent fan assembly in place and tighten the four screws. You’re basically done! Supply power and ground from a fused source and give it a test run. If you have the auxiliary battery package in your Sprinter, you can make up a 12V power outlet (cigarette lighter–do they still call it that?) and power it from the rear outlet. We did this for months before we installed our lithium battery system. Pat yourself on the back for completing this somewhat scary exercise. It is recommended to crack the vent fan open even on cold nights to allow the condensation from your breath to escape the van.
Hi,
Thank you for the info. I have almost the same van and we are working on most of the same things as you, but i have a family of 6 living in mine and it is taking way longer to do!
No biggie, but when you talk about the caulk at the end you say you never saw one that “didn’t” look good. I think you meant “did” look great because it is a big goopy mess running around to keep out water versus the pretty line like on your bathtub. Apologies if I am mistaken, I just want to help you and avoid others being confused by the tricky double negative business. 🙂 Take care,
Ah yes, double negatives…I fixed it. Thanks for letting me know!
Hello – thanks for all these great write-ups… I’m curious (as I prepare to do my Promaster vent) is there any reason why one couldn’t use traditional bolts/nuts to hold in place vs. the machine screws? Seems like these would hold the vent in place better, assuming you don’t have a trimmed piece on the insde?
Thanks!
Something to think through on this one–if/when the fan dies and requires replacement OR the thing starts leaking and needs to be resealed, use of screws will allow complete removal from the roof. I’m not entirely certain that nuts on the bottom would be accessible without removing my headliner. Removing my headliner means removing upper cabinets too. Just a thought…
Hi-
First off, I just want to say that I am glad I found your website. You have done a great job with your site and youtube videos. Yours are the most helpful, along with your “Kits” for all the different projects.
My reason for writing is that when I look at the adapters on Ebay, there are a lot of different ones available. Can you tell me the exact one to purchase, if I were to install a fan in the same location as you have.
Thanks –
Hugh
Thank you Hugh. Not sure how this will translate, but here is the link: https://rover.ebay.com/rover/1/711-53200-19255-0/1?icep_id=114&ipn=icep&toolid=20004&campid=5338288596&mpre=https%3A%2F%2Fwww.ebay.com%2Fitm%2FSprinter-NCV3-High-or-Low-Roof-Vent-Adapter-%2F132298140143%3Fvar%3D%26hash%3Ditem1ecd9569ef%3Am%3AmCR0nMntgTnMTysS3dpaezA%26vxp%3Dmtr
If it doesn’t carry through on the link, if you have a 144 Sprinter and rear location (like mine) you would choose the one that says “Rear Adapter.” There are other options for the 170 wheelbase and the 170 extended. If it still doesn’t seem clear let me know and I can walk you through it.
Great detailed videos! Glad I found you.
Noticed you haven’t installed an A/C system just the max fan.
Cant wait for the ceramic spray insulation video.
Thanks
Good stuff here.
I’m about to do this install. Looking at the photos of finished product I’m trying to see if the self leveling sealant covers the entire aluminum strips. I see the screws were covered.
I’m curious if you also applied it where the metal strips meet the plastic flange. Seems like water could get in at that junction and flow outward toward the screw holes (between the metal and the base). Please let me know.
Thanks
M.
Doesn’t hurt to cover everything you can. I don’t have it between the metal strips and plastic flange, and never had a single drip. I did the install in December and didn’t have a headliner in for an entire winter. I checked it often and it has been completely sealed from the elements. But again, no reason not to just cover it all.
Did you use self leveling Dicor lap sealant or the no-sag Dicor Lao sealant?
I used self leveling on the fan. I accidentally bought the no-sag when I sealed the solar entry gland to the roof and I don’t think it works as well for an application like a fan install. Not that any of these sealants look neat, but the self-leveling looks slightly neater.
If done today would you still use 3M 5200 or would you go with the 3M Window Weld (urethane)?
The products are pretty similar but I would go ahead and follow the more recent advice of the guy that makes the adapter and use the Window Weld. That said, mine has done just fine with the 5200 for the past 3 years.
Can you install mine? And help me with electrical?
I am super time-limited, but appreciate the inquiry!
Enjoy reading information from your site, appreciated. I have been thinking if I can find an alternative from installing a ceiling fan. I will build my own split AC unit for the van so cooling is not the reason. I’m thinking of mounting an axial fan on a plywood in the shape of front window so that you can lower the window and put up the fan there when ventilation is needed. It wouldn’t be working as well as a ceiling fan as you’ve installed but it seems doing the trick.
Here are the reasons of not install of a ceiling fan: save the room for whole roof solar panels. Keep the low profile of the van and the integrity of the ceiling. cut cost and weight to say the least.
Love to hear your thought. Thanks so much.
I’m all-for new ideas. Roof real estate is important so let us know how it works out.
Hi Ken,
I mounted my solar gland (for 370W LG) using the 3M VHB tape like you did and got to thinking:
Why not use VHB tape to mount the Sprinter vent fan?
Have you formulated the pros and cons for doing that?
Also as the tape forms a watertight seal is the lap goo still needed?
Thanks again for sharing all this great information.
Hi Joe,
Interesting thought. I’m using VHB to seal boxes on both the Sprinter as well as my 4Runner, and so far so good. I imagine it would work great, but one thought is you may still require some dicor sealant on the screws to keep water from wicking down into the interior. Now that you have me thinking about it, VHB might be superior to all other solutions I’ve seen.
Great write up. I just finished installing my Maxxair Deluxe fan and was great help. What did you use to remove the logos on your fan? I’m not really into the red white & blue advertisement. Thanks!
Mine peeled off really easily. I didn’t do anything special. Just say no to free advertising! 🙂
Love the van. I am considering placement of our vent fan. I thought more forward to draw air from the rear side windows, and avoid the fan noise overhead. I am curious if the noise bother you, or is the air worth the trade off. Thanks!
I live and often travel in warm climates so I always appreciate the air moving over us. The fan is pretty quiet on the lower settings, it hasn’t proven to bother me.
Ken,
I bought two tubes of the Dicor self leveling sealant. Will that be enough?
DJ
For sure. I used one full tube and kind of wished I had a second just to glop it up that much more. You’ll be good with that.
Ken
Thanks for all the super helpful information. I have a very similar van, 2018 144 crew van. I am hoping to use the factory headliner in the van interior. Wondered how you planned out the location of the fan with the headliner in mind ? Did the fan opening fall in one of the ceiling panels or did it cut through 2 pieces ? I believe you used the factory headliner as well. Just curious how your Maxx Air vent was finished on the interior. Perhaps you covered that in some of your other posts ? Thanks!
MV
Hi Michael,
Thankfully the fan falls on just one panel. I put a hole in the middle of the headliner section and with it in place, I began slowly trimming to the dimension of the 14×14 fan hole. I found that easier than taking ultra-precise measurements and attempting to cut it away from the van.
As for final finishing, the Maxxair comes with a trim ring that you have to cut down for the depth of your headliner (you would have to do this regardless of what headliner you use) and the retaining screws pass through the material of the headliner and hold it in place just fine. Looks and works great!
Ken
You are a rock star and super nice for these instructions and your entire web site and videos.Way above and beyond the call of duty. Super super helpful.1000 thank you’s for all you have done to make our conversions that much more doable.Truly appreciate your time and effort.
Now it’s time to cut my first hole in my van. After the fan, I have four windows waiting. Even with your help, still a bit nervous to cut the holes.
Thanks again
James,
Eugene OR.
James, you’ll be a pro after you get that fan installed. The first cut is always the worst, then it gets easier every time! My window install video is rubbish as it was the first video I made, but just take your time and follow the stampings on the inside of the van for where to cut.
I appreciate the kind words, thank you so much! And good luck! -ken
Hi There!!
I love your build because you used the stock headliner. Is there a video where you talk about how you made that work with all the extra stuff you put in it?
Thanks Will. We like the OEM look and it certainly saves a lot of time. Here’s the video on the headliner with the added lights and fan trim: https://www.youtube.com/watch?v=e5TA8WmL9rY
-Ken
what size drill bit did you use?
I can’t recall exactly–use a bit that is the same size as the shank of the screw, not including the width of the threads. That will leave metal for the screw to bite. -Ken
Hi Ken,
Your videos are really good and I love your van! I’m getting ready to install a Maxxfan (rear of the van) and retaining the OEM headliner. Did you encounter any issues with the positioning of the fan and the rear factory light? Based on a rough measurement, looks like they’ll be very close to each other?
2019 144 Crew
James
Spokane, WA
Thank you James! There is plenty of room, see this photo from my projector install: https://ourkaravan.com/wp-content/uploads/2021/01/projector-ceiling-mount2-1.jpg
-Ken
hi Ken,
how did you secure the interior trim piece to the OEM ceiling pannels? Did you use glue or double sided tape or any other magic?
I ran the included screws through the factory headliner. I thought I would need to use fender washers (or similar) but the material is thick enough the screws were able to bite.
Any regrets not using AC in the summer? How does just a fan work when in the summer above 90-100? Thanks
This is very location-specific…if I lived on the east coast with humid summers I’m sure I would want it. But in nearly six years of travel on the west coast and Canada, I haven’t needed it. I avoid really hot places because if it’s too hot to sleep, it’s too hot to hike, bike and do all the things I enjoy outside. I also know if I were totally desperate I could run the dash AC for 20-30 minutes and significantly cool the interior, but I have not needed to do that, yet. -Ken