Gray Water Tank Install on a Sprinter Van
Gray Water Tank Install on a Sprinter Van

Background
The purpose of a gray water tank is to capture drain water from the sink so it can be disposed of in the appropriate place. Our sink is supplied with drinking water from a 10-gallon portable jerry can system. We installed a 15-gallon gray water tank so we would not have to ever worry about the possibility of over-filling the tank. In addition, there was no reason not to, as the space under the van accommodates this size perfectly.
Note: This site contains affiliate links for which we may be compensated.
Parts required:
Tank:
Mounting system:
- 1-1/4″ wide flat steel (48″ was enough for both brackets)
- 5/16″ Plusnuts (two required)
- Astro 1442 plus nut install tool (don’t buy it just for this project)
Drain Line to Tank:
- Bulkhead Fitting (for passing through floor)
- 1″ Barbed Fitting (2 required to fit bulkhead fitting)
- 1″ to 1/2″ Barbed Reducer (drain line to hose adapter)
- 90-degree Barbed Fitting (for drain line)
- 1.5″ NPT to 1″ Barbed Fitting (threads into tank)
- 1″ ID Drain Hose (we only needed 24-inches total)
Air Vent:
- 1/2″ threaded elbow (threads into tank vent orifice)
- 1/2″ raiser (standpipe for vent)
- female to female adapter (1/2″)
- Air Vent
Electronic Dump Valve/Drain:
- 1-1/2″ NPT to 1″ Adapter (to connect solenoid to tank)
- 1″ Auto-Return Solenoid Valve
Other:
- Neoprene-backed Rubber (to space tank down from subframe)
- Four 1-1/2″ Hose clamps (to secure hose to fittings)
- 12V switch & wire connected to fused source (for solenoid valve)
- 1/2″ NPT plug (to plug an unused hole in the tank)
- Teflon tape (for threads)

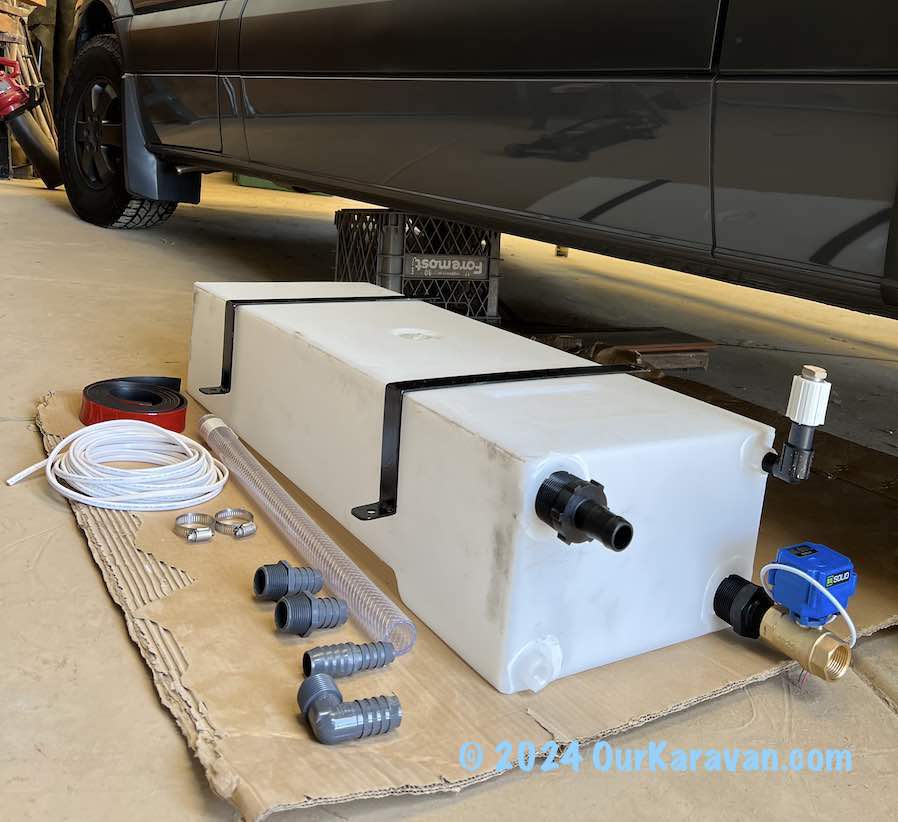
OurKaravan Gray Water System
(all parts shown minus the bulkhead fitting)
Access Hole in Floor for Drain
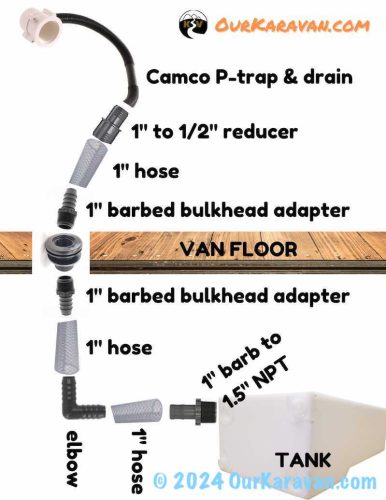
We began by drilling through our floor with a 1-3/4″ hole saw bit. A bulkhead fitting is installed in the hole to get water from inside the van to our under-mount tank. These fittings are gasketed to completely seal the penetration. The diagram below shows how our system is plumbed. Yours might be slightly different depending on the location of your drain line penetration.
Tank-Talk
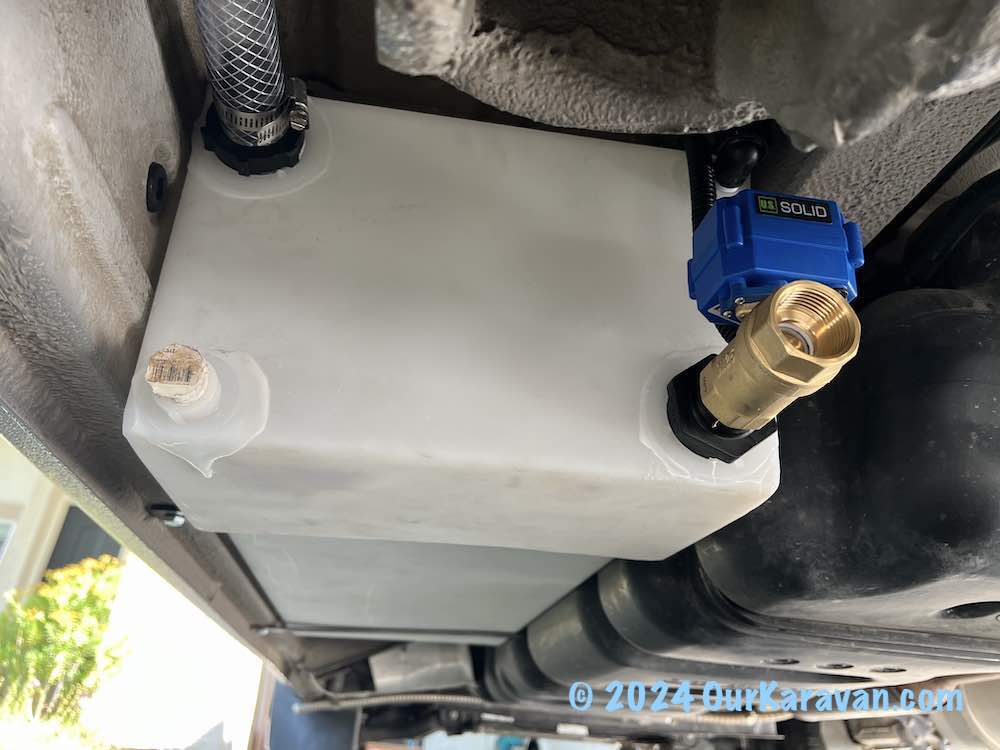
This 15-gallon gray water tank could not be sized any more perfect to fit under the driver’s side of a 2007+ Sprinter van. The tank’s 13-inch width fits so perfect between the frame rail and body that friction almost holds the empty tank in place. The 15-gallon is also a good length for utilizing the factory fuel tank mounting points for your install. It nestles-in above the pinch seam of the van, preserving ground clearance. Even more impressive, the deepened section of the tank happens to align with our rear-most bracket, which secures the tank super well.
Drain System Overview
Please refer to the diagram at the right. We have a Ruvati 13 x 15 inch sink with a Camco p-trap and drain line leading out of the sink. The 1/2″ Camco line connects to a 1″ to 1/2″ barbed reducer where we go from the 1/2″ sink drain line to our 1″ hose. The hose then connects to a bulkhead fitting with 1″ barbed adapters on either end. One is inside the van and the other is under the van, through the bulkhead fitting.
With the water now outside the van, it continues through the 1″ drain hose into a 90-degree barbed fitting. This simply gets the water flowing laterally towards the tank. (The bend was too tight without it, kinking the hose.) The 1″ hose then meets the final adapter, a 1.5″ NPT to 1″ barbed fitting that is threaded into the tank.
* Depending on the location of your bulkhead fitting/drain from your sink, your selection of adapters may be different.
Fittings for the Tank Drain & Vent
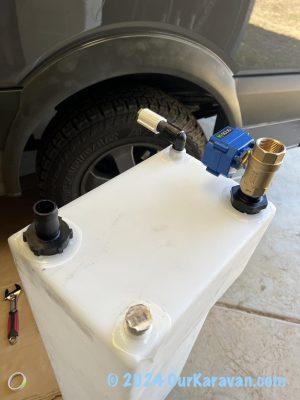
Unlike the plethora of adapters shown above, the rest of the tank requires very few parts. As shown to the left, only one 1.5″ NPT to 1″ NPT adapter is required to attach the electronic drain solenoid to the tank. If you don’t want the electronic tank dump you can always fit a manual valve in place of the electronic.
An air vent is required to allow air into the tank when draining and out of the tank when filling. The air vent should be as high above the tank as you can get it. We threaded a 1/2″ elbow into the tank, along with a raiser, female to female adapter and the air vent fitting to complete the vent system. This combination gets the vent as high as possible but maintains a 1/4-inch clearance from the bottom of the van. This same air vent system has been in use on our PVC water tank since 2019.
Tank Mounting System
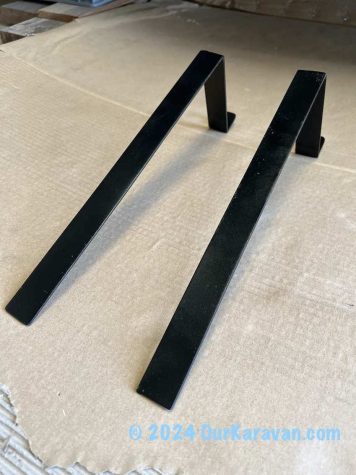
Forming your own steel mounting bracket is the best and most professional method for suspending your tank. While galvanized hanger strap is used a lot on self-built vans, it is not the right tool for the job. We used a $21 piece of steel from Home Depot to make both mounting brackets.
First, we used an angle grinder to score the steel approximately 2/3rds of the way through. We then bent the steel to 90-degrees using pliers and a hammer. Finally, we had access to a friend that was able to weld the inside angle in less than 5 minutes’ time. If you do not have access to such a friend, a local welder should not charge much to do this simple job. The end result is a professional-looking, durable bracket. Our YouTube video at the bottom of this article shows how we fabricated the brackets.
The Sprinter’s fuel tank mounting bolts are in a perfect location for use in suspending your tank. We installed two 5/16″ plusnuts in the body sill across from the fuel tank mounting bolts. The tank mounting brackets span between the plusnut in the body sill and the factory fuel tank mounting bolts. Do not install the tank just yet–the adapters should be threaded into the tank first.
Prepare the Tank for Installation
With the brackets fabricated it’s time to prepare the tank for installation. We attached some 1/4″ thick self-adhesive rubber to the frame cross members where the tank will come into contact. This was down to space the tank down 1/4″ so it sits flush with the body sill and our tank brackets. Run some 2-strand 16 gauge wire above the tank if you’re planning to use the electronic solenoid valve. Thread the four fittings into the tank including the air vent parts, the 1-1/2″ barbed fill adapter, the 1-1/2″ to 1″ threaded adapter for the dump valve as well as a 1/2″ plug to close an unused hole in the tank. We used teflon tape on our threads as well.
Install the Tank
To install the tank we temporarily held the gray water tank in place under the van using a milk crate and a few boards. We then put a floor jack under the van’s fuel tank and put light pressure under the tank simply to support it while we remove the mounting bolt. Do not compress the fuel tank! Remove one bolt at a time, slip your bracket into place and reinstall the mounting bolt.
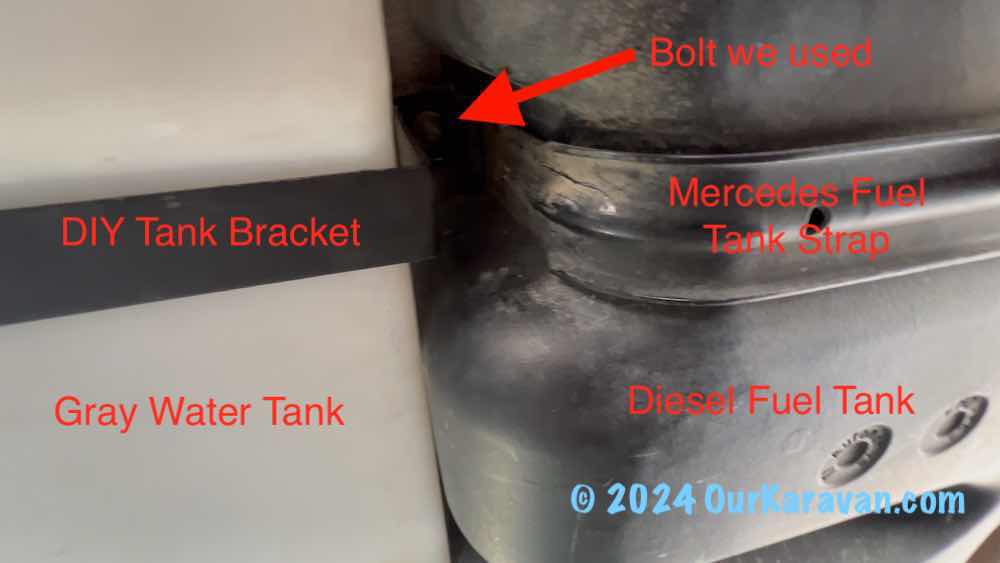
I ran into a bit of difficulty here. When I removed the rear fuel tank bolt, the Mercedes tank trap “sprung” a bit, where it no longer aligned with the mounting hole. It took some time by myself to push the Mercedes strap back into alignment with the mounting hole while simultaneously holding our gray water tank bracket and threading in the bolt. I did not have this issue with the front tank bolt, so perhaps this will not happen to you. But I have a suggestion. Instead of drilling a hole in the end of your bracket, use a slot instead. Then the Mercedes fuel tank bolt will only need to be loosened (not removed) and you can slip your bracket in. This would avoid the issue we ran into.
Complete the Drain Line Plumbing to the Tank
With the bulkhead in place, the tank mounted and the adapters and air vent attached to the tank, make the final hose connections to connect the bulkhead fitting to the tank.
Solenoid Valve Wiring
If you are using an electronic solenoid valve to empty your tank, wire it to a switch and a fused source. There are only two wires, a positive and negative. We put the switch across the negative side. With the switch off and no power to the solenoid it will be closed. With the switch on, power is sent to open the valve. If power is lost, the valve closes automatically.
Congratulations, you now have a gray water system!
Help Us Help You
We offer all of our write-ups and instructional videos for free. A lot of time, effort and money goes into developing and maintaining this website. If you find the information on this website helpful, you may use our various links when you are ready to make purchases. As Amazon Associates we will make earnings from qualifying purchases, however it costs you nothing to use them. Alternatively you may consider using the donate button below to make a simple Paypal payment, or message us if you prefer Venmo. We sincerely appreciate your visit as well as your support.

Have you ever had any issues with debris from the sink clogging the device? Is there a way to catch larger food particles before it enters tank?
I have not had issues so far. Unlike at home I do keep the sink strainer in when using the sink, but mainly so I don’t fill the gray water tank with large amounts of food particles that will result in an odor problem down the road. They make finer screens that sit between the strainer and the sink flange if you want to catch basically everything.
Great video and post. Have you found the NPT air-valve on the tank enough to ensure good draining of the sink and of the dumping process? Looks like you have no other vent line from what I saw.
The air vent is not a limiting factor when draining the tank.